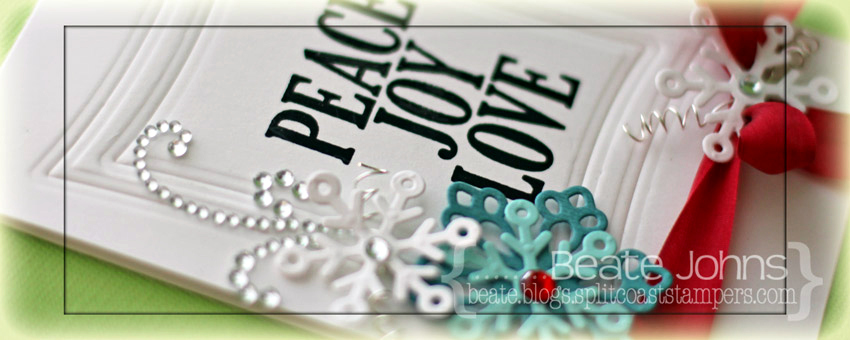
Yesterday I had some free time to play along some of my favorite challenges. I created this card for the current Way to Use it challenge on Splitcoaststampers (favorites), the current CASE Study and Simon Says Stamp challenge (snowflakes).

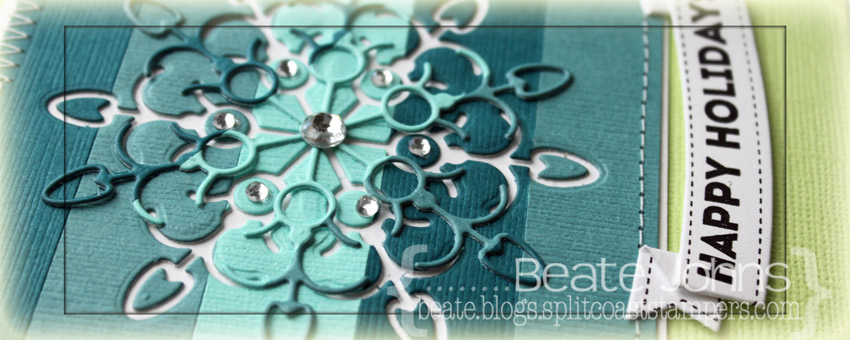
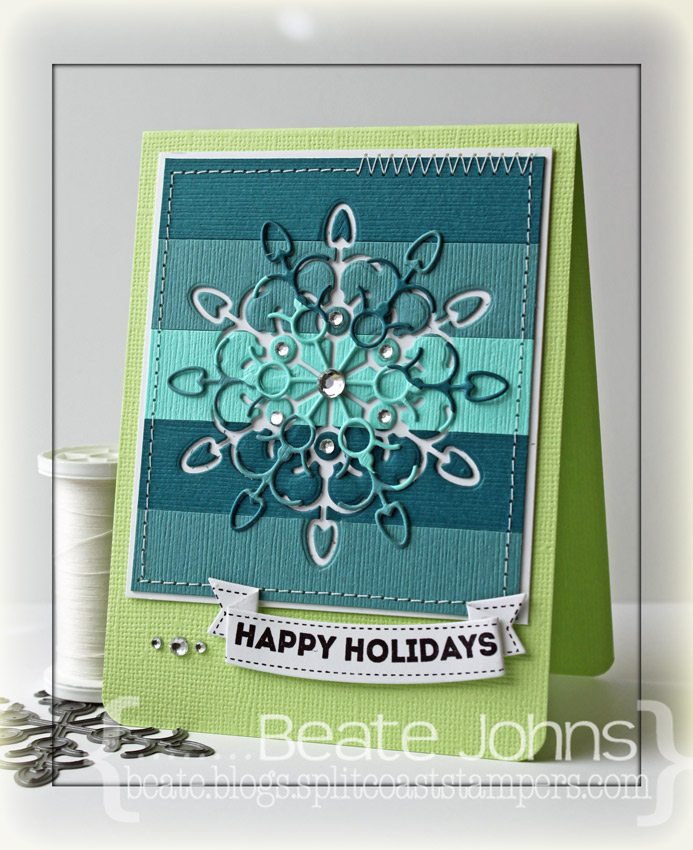
The current CASE study showcases a gorgeous card from Windy Robinson. Her card had some great dry embossing with Nestabilities dies. Her card had flowers in the center, but I thought snowflakes would be more appropriate for December. Plus I LOVE snowflakes. So I cut snowflakes out of Neenah Solar White cardstock, Frosted Teal and Patina Bazzill cardstock with dies from the 2012 Snowflake Pendant Shapeabilities® die set.

A 3 1/2″ x 11″ piece of Neenah Solar White cardstock was folded in half and the bottom corners were rounded.  Two of the Wonky Rectangles Nestabilities® were embossed in the center of the card. A sentiment from Merry Everything was stamped in the center of the embossed rectangles with Midnight Black VersaMagic Ink.

Red silk ribbon was tied around the lower part of the card base. Thin silver wire was wrapped around a stylus and added to the small white snowflakes. The bigger blue snowflake and a while one were adhered to the left hand side of the sentiment. A second white snowflake was adhered over the ribbon bow.  Rhinestones from Want2Scrap finish off the card.

Thanks so much for stopping by! Have a wonderful Friday!
Hugs and smiles

I created this card for a Way to Use it Challenge (no fall colors) and a CASE study challenge.  I just LOVED the card we had to case and it made me create not just one but several cards. For this one I paired 3/4″ x 3 1/4″ wide strips of different colored blue Bazzill cardstock were adhered to a slightly bigger white base. I used the new Simon Says Stamp Curvy Snowflake die to cut a negative image in the center.  The edges were stitched and the snowflake die cut was adhered over the negative cut.

The layers were adhered to the card base, a 3 3/4″ x 10″ piece of Limeade Bazzill cardstock, folded in half. The bottom corners were rounded.

A piece of Solar White cardstock was cut and with Holiday Folded Banner die. The sentiment and frame is from the same named Simon Says Stamps exclusive stamp set and was stamped on the banner with Jet Black Archival ink. The banner was adhered to the lower right edge of the snowflake panel. Rhinestones on the snowflake and next to the banner finish off the card.

Thanks so much for looking! Have a wonderful day!
Hugs and smiles

P.S.: Today’s Holiday Blitz tutorial on Splitcoaststampers was created by Theresa Momber. She shows you how to turn a circle die cut into a darling basket.


I received my Holiday Card Kit from Simon Says Stamp and had to play with it right away. I made two quick cards with it. I can’t wait to color the cute Gnome that comes in the stamp set. I am sure I will get to that soon.  For the first one I started by cutting the Mod tree in a 3 1/4″ x 5″ piece of Shallows paper (came in the kit). The edges were sanded and the side and top edge pierced.

Two 3 1/4″ strips of white cardstock were torn, adhered to the lower part of the layer and the edges were topped with Diamond Stickles.  The layers were adhered to the card base with foam adhesive squares, a 3 3/4″ x 11″ piece of white cardstock (from kit), folded in half. More white cardstock was cut with the Holiday Shapes die. Three stars were added to the tree and topped with a rhinestones.

A sentiment from Gnome for the Holidays (included in the kit) was stamped in the banner outline from the same set, cut out and adhered under the tree to finish off the card.

For my second card I stamped the label image from Gnome for the Holidays in Jet Black Archival ink on white cardstock, that had been cut with Simon Says Stamps exclusive Apothecary Label dies.  A little silver glitter brad (included in kit) was added on the top of the label.

Part of a Doodlebug Francy Frills cardstock sticker (included in the kit) was adhered to a 1 3/8″ x 5″ piece of Aspen Frost Basic Grey (one sheet of each design included in the kit)  paper strip. Both were adhered to a 3 1/4″ x 5″ piece of the same paper kit. Black Doodlebug Twine (from the November kit) was tied around the layers and topped with a button  before the layers were adhered to the card base, a 3 3/4″ x 11″ piece of white cardstock, folded in half.

Faux stitching was added with a white gel pen. The tiny holly image from Gnome for the Holidays was stamped in Tuxedo Black Memento Ink on Neenah Solar White cardstock and colored with Copic Markers (R24, R29, R39, YG93, YG97). The imag was cut out and adhered to the lower right of the label to finish off the card.

There is only a limited amount of those card kits available. I am glad I got mine!

Thanks so much for stopping by! Have a wonderful day! It’s Friday!!!! Wohoo
Hugs and smiles

I created this tag for last week’s Way to use it challenge on Splitcoast.  I cut a piece of Kraft cardstock, cut with the Four Point Die-namics die. A background from Own your Story was stamped in Brilliance Moonlight White ink over the tag and the edges were sponged with the same ink.

Once the ink dried  the flourish from the same set was stamped in Spanish Olive VersaMagic ink on the bottom of  tag and a sentiment of the set with with Midnight Black VersaMagic Ink.  A piece of My Mind’s Eye Six by Six A Mother’s Love was cut with a Mini Rolled Roses Die-namics die, rolled into a flower and adhered above the green flourish. A tiny part of a Finesse Rhinestone Swirl was adhered on the upper right of the flower. White Crinkled Ribbon was tied on to the tag with a button and Linen Thread.

Thanks so much for stopping by! Have a wonderful day!
Hugs and smiles

Hello and welcome to the Sweet ‘n Sassy Stamps Birthday Blog Hop!  Sweet ‘n Sassy Stamps is so excited to be celebrating four wonderful years!  A fantastic group of Sweet ‘n Sassy Stamps design team members past and present, along with some special friends, have put together this fabulous Birthday Blog Hop to kick off a whole month of fun. We have 36 stops so the hop will take place over three days – feel free to take your time visiting each blog!  You have until 11:59pm EST November 9th to leave comments on as many blogs as you can.  On Saturday, November 12th Sweet ‘n Sassy Stamps will announce FOUR winners (chosen at random from comments on random stops along the hop); each lucky winner will receive a prize pack including stamps, dies, paper & twine valued at $40!

If you have been following along already you should have come from Cathy McCauley.  If you are only starting here, please head back to the SNSS blog and go from there.  You won’t want to miss any stops along the way!  Also, don’t forget to comment on as many stops as you can….the more comments the better your chance of winning one of the fabulous prize packs! 🙂

I created this card for several of last weeks challenges:  Moxie Fab World Tuesday Trigger, Splitcoaststampers Way To Use it Challenge and the CPS Sketch.

I started by picking paper from the MME Lost & Found 2 Breeze paper pack so it would fit the Way to use it challenge (use newsprint paper).  A lighter blue paper was cut  embossed with a Grand Classic Square Nestabilities die. The edges were sanded. It was cut down so it would be stitched t0 a piece of Neenah Solar White cardstock that had been cut and embossed with the Largest Lattice Rectangle die.

The newsprint patterned paper measures 4″ x 5 1/4″. The top two corners were rounded and the edges were sanded before the lattice layers were adhered. A 1 3/4″ x 5 1/4″ strip of another pattern from the same paper pack was adhered over the lattice layers and May Arts White Organdy Ribbon was tied around those.  The bow was topped with a Basic Grey button that was tied on with Embroidery floss.

A piece of Solar White cardstock was cut and embossed with one of the Fancy Tag 2 dies. The tag was sponged with  Scattered Straw Distress ink and a sentiment from Sweet ‘n Sassy’s Wildflower stamp set was stamped in it’s center with Tuxedo Black Memento ink. Part of the Wildflower image was stamped over the panel while the die was still on it to create more interest.

Parts of a brown Finesse Rhinestone swirl were adhered above the bow and underneath a flower cluster to finish off the card.

Your next stop on the hop is Janice Melton, but just in case there are any hiccups, here is the whole list of celebrants on this party train:

Beate Johns – you are here
Thanks so much for stopping by! Good luck winning the prizes! Have a wonderful day.
Hugs and smiles

This month challenge at Inspiration Emporium is to use metal somewhere on your project. You have all month to make a project for that challenge and link it to the challenge blog entry.

The card I created for last weeks Way to Use it challenge on Splitcoast works for that. The WTC was to use staples on your card. I used an image I had colored with Copic Markers during the CHA Super show. I can’t remember the colors I used nor do I know what the patterned paper is that I used for her dress. I had walked around and begged for a small piece of paper that I could use to dress her up.

The image is from MFT’s Sunflower Girl. It was stamped in Tuxedo Black Memento Ink on Neenah Solar White cardstock. It was cut out with Classic Oval Nestabilities, layered on a piece of Kraft cardstock, cut and embossed with a Classic Scallop Oval Nestabilities die and the edges of the oval were paper pierced. The image was masked, the background covered with Cloud dies cut with the Cloud Die-namic die and airbrushed with Copic Marker B02.

The sketch for this card was from last weeks MFT sketch challenge.  The paper used for this card is from the Echo Park Walk in the Park paper pack. The lower white piece of cardstock had been embossed with the Cuttlebug Polka Dot embossing folder.

The staples were added with Tim’s tiny attacher.

Thanks so much for stopping by today. I hope you have time to participate in the challenge. You have all September to do so and you may win a $50 shopping spree if you win.

Have a wonderful day!
Hugs and smiles


I created this card for today’s JustRite Stampers Color Challenge. The inspiration piece is a beautiful bed cover shown in this picture. It also worked great for yesterday’s Way to Use it Challenge on Splitcoast, Flower Frenzy.

Doesn’t that just scream Springtime? I hope Ohio hears that scream….because on Wednesday, I created this card while snow was falling.  It didn’t stay on the ground, thank goodness, but really? Snow at the end of March? No thank you!

For my card I decided to use a frame from the Fancy Label Cling set with an image from the Breath of Spring set. The frame was stamped first in Rich Cocoa Memento Ink on Neenah Solar White cardstock, It was then masked and the tulip bouquet from Breath of Spring was stamped in the same color.

The image was colored with Copic Markers (Tulips: YR61, YR65, YR68   Y21, Y23, Y38    Leaves: YG61, YG63, YG67   Bow and tag: B60, B63    Shading and Frame: YR30, 1/5th YR31 (custom made marker), YR31) and cut out with Label 18 Nestabilities (those just came in that day! Perfect timing).


After coloring I went on the hunt for the perfect paper. I looked through my entire stash trying to find matching blue paper, but couldn’t find a thing. I guess I need more paper, LOL?

I finally settled on a 2 1/4″ x 3 3/4″ strip of Material Girl green paper from Cosmo Cricket stitched on a 3 3/4″ x 5 /12″ piece of Cosmo Cricket Ever After paper. 1/2 a doily was adhered to the top and White Organdy Ribbon was tied around the green paper strip. The ribbon was heated with a heat gun to age it and topped with a Vintage Brad from Stampin’ Up!. A second brad was placed over it.

The image was adhered over the ribbon with dimensionals. A Recollections Pearl Swirl was cut up. The big part was adhered on the top left , the small piece was adhered to the lower right of the image.

The sentiment is from the Cling set Fancy Tags. It was stamped in Tuxedo Black Memento ink (just noticed I did a booboo and didn’t stamp that in Rich Cocoa. DUH) on a piece of Solar White cardstock cut and embossed with the smallest die from the Tag Trio set. The embossed part of the tag was colored with Copic Marker B60.

I hope you have time to play in this challenge. To participate, make a card, upload it and post a link on the JustRite Inspiration blog. Please visit the other designers that prepared samples for you:

Sharon Harnist

Lori Craig

Bianca Mandity

Kathy Jones

Thanks so much for stopping by!
Have a wonderful weekend! Hugs and smiles


Today’s Waltzingmouse Challenge is a fun one. More pennants, but this time just one big one! I cut my pieces with TCP’s CutUp Pennant dies out of Neenah Solar White cardstock and October Afternoon Ducks in a Row patterned paper. The pieces were stitched together and topped with green buttons that were threaded with embroidery  thread.

The card was created for this weeks Way to Use it Challenge on Splitcoaststampers. Kim challenged us not to use black, brown or white ink. I stamped the little sheep from L’il Buddies in Ocean Depth VersaMagic ink on Solar White cardstock that had been cut and embossed with Classic Circle Nestabilities dies. The image was colored with Copic Markers (R000, R00, No, N1, N2, YG01, YG03, BG0000, BG000) and the layer was adhered to a piece of Kraft cardstock cut and embossed with the next size circle die.

A 3 3/4″ x 5″ piece of Ducks in a Row paper was stitched to a 3/16″ bigger piece of white cardstock before the layers were adhered to the card base, a 4 1/4″ x 11″ piece of Kraft cardstock folded in half. The sentiment is also from the L’il Buddies stamp set. It was stamped in Ocean Depth ink on Solar White cardstock, cut into a banner and topped with a pink button.

Hint: When stamping with VersaMagic ink, don’t touch the lines with your Copic Markers. The ink will smear and stain your tip.

Thanks so much for stopping by! I hope you have time to play! It’s a fun, different layout!
Hugs and smiles

As soon as I saw this darling image for the first time, I ran to the MFT store and ordered it right away. How cute can it get?

When  Jenn and decided to  cyber stamp yesterday, I knew it was the perfect time to get this set out. Okay..the brown isn’t quite orange….but it was an inspiration challenge. I like to take challenges as starting points to get me going and then…who knows where the card ends up. LOL

I stamped the image in Tuxedo Black Memento ink on Neenah Solar White cardstock and colored it with Copic Markers (Bee costume: Y13, Y15, Y17, E08, E07, E19,    Hair: N5, N7, N9,    Skin: E000, E01, E11,    sky: B0000, B000,    Wings: BG10, BG11). The image was cut out with a Classic Rectangle Nestabilities die. MME Stella & Rose Gertie Paper was cut with MFT’s Grass Die-namics die and adhered to the bottom of the rectangle. Stardust Stickles Glitter was added to the wings of the image.

Since I was using a My Favorite Things image I thought I would use the card sketch from their weekly sketch challenge for my card. I was struggling with it for a bit until a way to make the layers look right for me.

For the layers I used patterned paper from MME Stella & Rose Gertie and Mabel paper pack. The bottom layers along with some white Melissa Frances Ribbon were stitched to the card base, a 4 1/4″ x 10″ piece of Neenah Solar White cardstock, folded in half. The bottom corners were corner rounded.

The sentiment is from MFT’s Peek A Boo set. It was stamped on a piece of Solar White cardstock that had been cut and embossed with Petite Oval Nestabilities and colored with Copic Markers (Y00, Y11, Y13). Recollection flowers (with some added Stardust Stickles) and Recollection Rhinestone swirls finish off the card front.

We might be cyber stamping some more tonight. Check in on facebook and hang out with us. Hugs and smiles

© 2012 fresh & fun Suffusion theme by Sayontan Sinha