Hello and welcome to the Sweet ‘n Sassy Stamps Birthday Blog Hop!  Sweet ‘n Sassy Stamps is so excited to be celebrating four wonderful years!  A fantastic group of Sweet ‘n Sassy Stamps design team members past and present, along with some special friends, have put together this fabulous Birthday Blog Hop to kick off a whole month of fun. We have 36 stops so the hop will take place over three days – feel free to take your time visiting each blog!  You have until 11:59pm EST November 9th to leave comments on as many blogs as you can.  On Saturday, November 12th Sweet ‘n Sassy Stamps will announce FOUR winners (chosen at random from comments on random stops along the hop); each lucky winner will receive a prize pack including stamps, dies, paper & twine valued at $40!

If you have been following along already you should have come from Cathy McCauley.  If you are only starting here, please head back to the SNSS blog and go from there.  You won’t want to miss any stops along the way!  Also, don’t forget to comment on as many stops as you can….the more comments the better your chance of winning one of the fabulous prize packs! 🙂

I created this card for several of last weeks challenges:  Moxie Fab World Tuesday Trigger, Splitcoaststampers Way To Use it Challenge and the CPS Sketch.

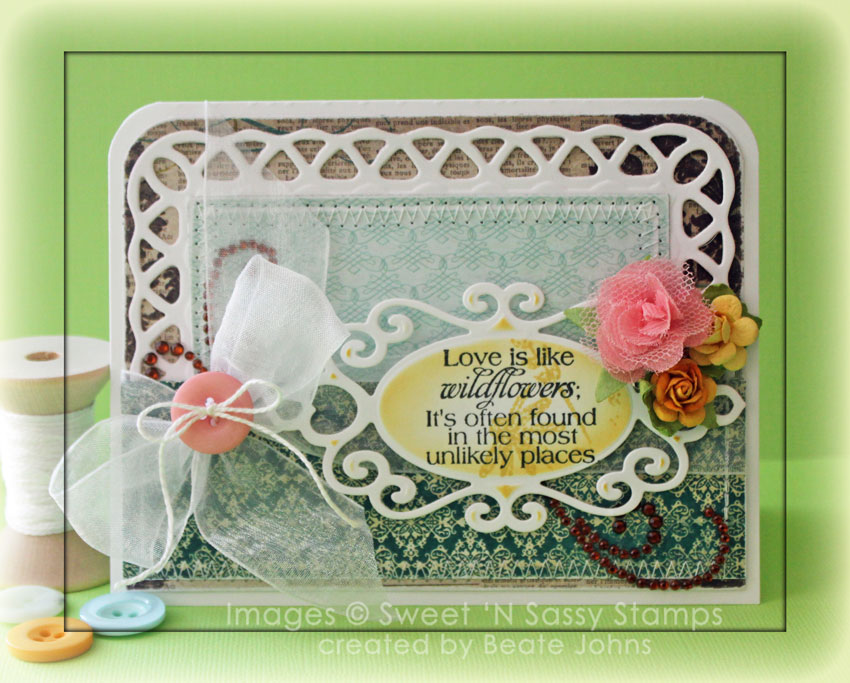
I started by picking paper from the MME Lost & Found 2 Breeze paper pack so it would fit the Way to use it challenge (use newsprint paper).  A lighter blue paper was cut  embossed with a Grand Classic Square Nestabilities die. The edges were sanded. It was cut down so it would be stitched t0 a piece of Neenah Solar White cardstock that had been cut and embossed with the Largest Lattice Rectangle die.

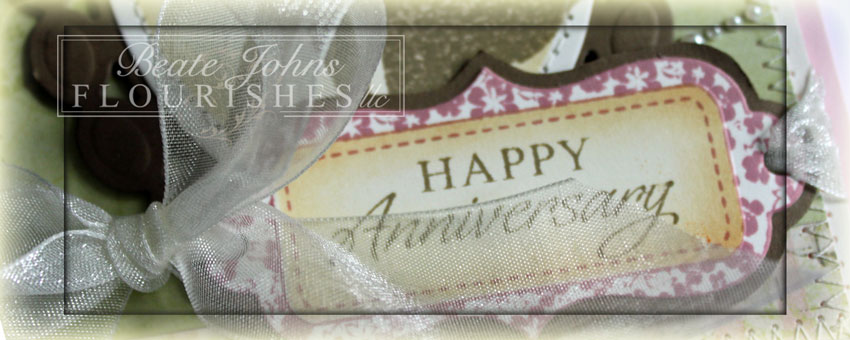
The newsprint patterned paper measures 4″ x 5 1/4″. The top two corners were rounded and the edges were sanded before the lattice layers were adhered. A 1 3/4″ x 5 1/4″ strip of another pattern from the same paper pack was adhered over the lattice layers and May Arts White Organdy Ribbon was tied around those.  The bow was topped with a Basic Grey button that was tied on with Embroidery floss.

A piece of Solar White cardstock was cut and embossed with one of the Fancy Tag 2 dies. The tag was sponged with  Scattered Straw Distress ink and a sentiment from Sweet ‘n Sassy’s Wildflower stamp set was stamped in it’s center with Tuxedo Black Memento ink. Part of the Wildflower image was stamped over the panel while the die was still on it to create more interest.

Parts of a brown Finesse Rhinestone swirl were adhered above the bow and underneath a flower cluster to finish off the card.

Your next stop on the hop is Janice Melton, but just in case there are any hiccups, here is the whole list of celebrants on this party train:

Beate Johns – you are here
Thanks so much for stopping by! Good luck winning the prizes! Have a wonderful day.
Hugs and smiles

I created this card for the Moxie Fab Tuesday Trigger this week.

The image reminded me of a technique I had seen but never used, Herringbone technique. I saw a video a couple years back and have had the technique in the back of my mind every since. I picked some paper from MMME Stella Rose Mabel Paper and cut them in strips varying between 1/8″ and 15/16″.

A piece of cardstock was ran through the Xyron (if you don’t have a Xyron, you can just apply double sided adhesive over your entire piece of cardstock). I started  taping one of my wood grain brown paper strips diagonal across the paper piece. Next I placed another piece of the same paper pattern on a diagonal to create a T. Another piece from the same pattern was adhered to the other side of the first diagonal strip creating another T shape on the opposite side of the first. Then I filled in the four sections with paper strips of different pattern.

The paper was trimmed to a 3 1/2″ x 4 3/4″ and stitched to a 3/16″ bigger piece of Neenah Solar White cardstock. The card base is a 4 1/4″ x 11″ piece of Kraft cardstock folded in half. The card front was embossed with Cuttlebugs Polka Dot Embossing folder.

A piece of Solar White cardstock was cut and embossed with one of the Fancy Tag 2 dies. The tag was sponged with Antique Linen Distress ink and a sentiment from Sweet ‘n Sassy’s Wildflower stamp set was stamped in it’s center with Rich Cocoa Memento ink.

Two Zva Creative Flowers as well as a Recollection one were tied together and adhered to the tag before it was adhered to the card with dimensionals. Part of a Finesse Rhinestone Swirl and two pieces of Baby Bling on the tag finish off the tag.

Thanks so much for stopping by! Have a wonderful weekend
Hugs and smiles

Saturday morning means a Waltzingmouse Sketch post. I love participating in the sketches. While I love, love, LOVE coloring cute images with my Copics it’s nice to have the Waltzingmouse challenge to balance it out a bit.

Again I combined the sketch challenge with this week’s Tuesday Trigger. It’s a good one. White/Orange/Red bowls….what’s not to love? I was inspired by the colors and the little flower on the white bowls.

Last week I received my latest order of Waltzingmouse Stamps with the new Large Doily stamp set. I stamped several of the stamps from that set in Fired Brick and Wild Honey Distress ink on a 3 3/4″ x 4 1/2″ piece of Neenah Solar White cardstock. The layer was stitched to a 3/16″ bigger piece of black cardstock.

A 4 1/4″ x 11″ piece of Solar White cardstock was folded in half. The lower edges were cut and embossed with one of the Grand Square Nestabilities dies.  White Organdy Ribbon was tied around the lower half of the stamped layer before the layers were adhered to the card base.

A frame from the Vintage Label 10 set was stamped in Jet Black Archival ink on Solar White cardstock and cut and embossed with a Label 10 Nestabilities die. The sentiments are from Waltzingmouse new stamp set called Say It Loud. The image layer was adhered over the ribbon with dimensionals.

A black Recollections Rhinestone swirl was cut in two pieces. The bigger swirl was adhered to the upper right hand side of the stamped layer, the small swirl to the lower left of the image layer. A Prima Flower next to the bow finish off the card.

I hope you have time to participate in the Sketch as well as the inspiration challenge! They are both so much fun this week.

Have a great Memorial Day weekend! We have friends from Illinois visiting this weekend! It will be fun!
Hugs and smiles

I created this card as a challenge entry for the Come Find the Treasure! VSN challenge. We were to create a card and hide something in the card.

I hadn’t created a Big Buckle Card in a very long time and thought it would be the perfect time to create one for the challenge and then use it as a sample for the video tutorial for that technique.

I recently had purchased the Life is Good Technique Tuesday stamp set at my LSS and thought it would be perfect for a Buckle card. I stamped the image in Jet Black Archival ink on Echo Park Playground paper. The image was cut and embossed with a Classic Circle Nestabilities die. The sky was sponged with Tumbled Glass Distress ink, the ground with Shabby Shutter Distress ink before the image was adhered to a piece of black cardstock, cut and embossed with a Floral Doily Motif die.

The card base was created out of the Neenah Solar White cardstock. The left hand side of the card front was lined with a 2 1/4″ x 5″ piece of Echo Park Playground paper that had been stitched to a  1/4″ bigger piece of Kraft cardstock. Before the stitched panel was adhered to the left hand side of the card front, a white cardstock strip was cut and embossed with the Floral Doily Accent border die and adhered under the panel.

A 1 7/8″ wide strip of Echo Park Little Girl paper was adhered to a 2″ wide White cardstock strip. The corners of the right end were rounded, the left end was adhered under the 4″ x 5 1/4″ piece of Kraft cardstock that was adhered to the inside panel of the card.

The sentiment is also from Life is Good. It was stamped in Jet Black Archival Ink directly on the buckle. Part of the sentiment is hidden to comply with the challenge. The smaller sentiment (really good) that comes with the set, was stamped on the inside of the card underneath the panel. Silver Recollection pearls finish off the card.

Here is a video for the visual learner:

[youtube]https://www.youtube.com/watch?v=ybhwiREtzgw[/youtube]

Thanks so much for stopping by! Have a wonderful day!
Hugs and smiles

It’s time for another Waltzingmouse Sketch Challenge. 12 little circles on a card front. It took me a while to figure out what to use. I kept on hoping my new stamps would arrive, but by Friday I had to give up and use one of the sets that I already had.  I looked through my Waltzingmouse stamps and picked the Fleur De Lis image from Vintage Label 2 set.

I love to combine the Waltzingmouse sketch challenge with the current Moxie Fab World Tuesday Trigger. Cath always finds the best inspiration images for us! I picked the colors from the image. The Fleur De Lis image isn’t quite the diamond shapes of the plate, but I thought it would work well. I like how the black Fleur is so solid in front of the sponged and stamped blue background.


I cut and embossed 12 circles with one of the Classic Circle Nestabilities dies out of Neenah Solar White cardstock. First I stamped the Fleur in Jet Black Archival Ink.  The die was placed back over the cardstock circle and one of the textured frames was stamped over the circles with Tumbled Glass Distress ink. The edges of the circle were sponged with the same ink.

A 2 1/4″ x 4″ piece of Stella & Rose Hazel MME patterned Paper was adhered over a 4″ x 5 1/4″ piece of the same paper pack. The two bottom corner were rounded before the layers were stitched to a 3/16″ bigger piece of black cardstock.

The circles were adhered to the layers with dimensionals. May Arts Organdy Ribbon was tied around the horizontal strip before the layers were adhered to the card base, a 4 7/16″ x 11 1/4″ piece of Textured Whisper White cardstock (Stampin’ Up!) folded in half.

The sentiment is from Fancy Phrases. It was stamped on white cardstock with Jet Black Archival ink that had been cut and embossed with a retired Spellbinders die (at least I think it’s retired, I can’t find it anywhere to link to). It was adhered under the bow.

A big fleur was cut and embossed with a die from Spellbinders Antiquities die. It was adhered above the bow. Silver Kaisercraft Rhinestones in the center in each stamped Fleur as well as in the cardstock one finish off the card.

I hope you have time to participate in the challenge. If you have a lot of time to stamp, head on over to Splitcoaststampers. There is a Virtual Stamp Night going on this weekend. Challenges were posted Friday night and will continue today at 1 EST.

Thanks so much for stopping by! Have a wonderful weekend!
Hugs and smiles


Sundays in May mean I get to show you another teaser of a card created with Flourishes stamps. You can see the full card on the Flourishes blog. For my card today I picked three of the newly released sets: and Country Charm Labels, Borders as well as Wedding Bliss.

I had just finished the card I shared yesterday and was still tuned into the Tuesday Trigger colors from this week. I picked colors from the photo (Victorian Velvet, Frayed Burlap and Antique Linen Distress inks). I used a striped paper from Pink Paislee’s Butterfly Garden paper pack.

Check out the Flourishes blog for an image of the entire card and more information.

Thanks so much for stopping by!
Hugs and smiles

It’s time for another fun Waltzingmouse Sketch! For my sample I started by cutting two strips of Neenah Classic White cardstock with one of the Jumbo Scalloped Borderabilities die.


I sponged one of the strips with Bundled Sage Distress Ink, the other with Spiced Marmelade Distress Ink. Next I stamped a border strip from Text-It over each border with the same inks.

I picked the colors from this weeks Tuesday Trigger challenge. I love the soft colors and with the skirt being striped, I thought it fit this sketch perfectly.

The bottom corners of a 3 3/4″ x 5″ piece of Springtime Echo Park Paper were rounded and stitched to a 3/16″ bigger piece of Kraft cardstock. The bottom corners of the Kraft piece were rounded as well.

The scallop layers were adhered on top of each other on the upper part of the layers and  May Arts Taupe Silk Ribbon was tied around it.The bow was topped with a Coral button.

Everything was adhered to the card base, a 4 3/16″ x 10 3/4″ piece of Classic White cardstock folded in half. A sentiment from Fancy Phrases in Frayed Burlap Distress ink to finish off the card.

I hope you have time to play with the sketch and the Tuesday Trigger challenge. Have a wonderful weekend!
Hugs and smiles


Today’s sketch included something new for me. A tassel or as Claire told us, a dangly bit. 🙂 As inspiration I used  the image for this weeks Trigger Target, the Polka Dotted Hullabaloo.

I love the Gray/Yellow/Red/White combo of the fabric and used that as my color combo. The circular shape I tried to incorporate with my pearl accents.

My card base was cut out of Basic Gray cardstock with one of the Grand Nestabilities Label Eleven dies. A piece of Pink Paisley Hometown Summer paper that was cut with the next size smaller die. A piece of Solar White cardstock was hand cut to a slightly bigger layer. The layers were stitched together after a piece of lace was adhered to the left hand side.

A few pearls and glass beads from Stampin’ Up!’s Pretties Kit were tied to a piece of white Organdy Ribbon. That ribbon was stitched to the top of the lace.

One of the stamps from the Vintage Label Four set was stamped in Fired Brick Distress ink on Solar White cardstock and cut and embossed with a Label 4 Nestabilities dies. The swirl is from the same set and was stamped into the label with Tuxedo Black Memento Ink. The sentiment is from Fancy Phrases and was also stamped in Tuxedo Black Memento ink.

A Recollection Pearl swirl was adhered to the upper right hand side of the card. The label was adhered to the lower half with dimensionals. Two black Kaisercraft Pearls on the label finish off the card.

I hope you have time to play with the sketch this week. Have a great weekend!
Hugs and smiles

I love this weeks Tuesday Trigger image. LOVE the colors and love that gorgeous mirror. So far I have created two cards for it and I am thinking there might be more. LOL

For this weeks sketch, the mirror was my main inspiration! I had just received my Fancy Tag Three dies and had to use them right away. I cut Real Red cardstock with one of the dies and sponged it with Fired Brick Distress Ink.

To top it I cut and embossed Solar White cardstock with a Classic Oval Nestabilities die. A sentiment from Fancy Phrases was stamped in the oval with Rich Cocoa Memento Ink. The edges of the oval were sponged with Antique Linen Distress ink.

With my Fancy Tag dies, I also received the new Foliage dies. I cut and embossed Wild Wasabi cardstock with two of the dies and sponged them with Peeled Paint Distress Ink. The leaves were adhered under the frame and three aqua Recollections flowers were added.

Two corners of a 3 3/4″ x 5″ piece of October Afternoon Thrift Store paper were rounded. The paper was stitched to a 3/16″ bigger piece of Kraft cardstock after a piece of white Melissa Frances ribbon was adhered across the layers.

The layers were adhered to the card base, a 5 1/2″ x 8 1/2″ piece of Solar White cardstock folded in half. The frame was adhered to the card base with dimensionals.

I hope you have time to play one or both of the challenges. I LOVE the sketch and the inspiration piece.

Thanks so much for stopping by! Have a wonderful weekend! Hugs and smiles

Today’s Waltzingmouse sketch challenge is to create mini cards. How fun is that? As inspiration for my cards I used this Tuesday’s Trigger challenge.

I LOVED the color combo and composition of the piece and kept it all. My cards are tiny 3″ x 3″ cards. They were created out of 3″ x 6″ Solar White cardstock folded in half.

I started by stamping a label from Very Vintage Label No. 4 in Broken China Distress Ink.  I stamped a different sentiment into the frame of each card with the same ink. All sentiments are from the Fancy Phrases set.

The border stamp from Victorian Frippery was stamped in Spiced Marmelade on the right edge of the cards. The left side of the card was embossed with the Damask Embossing Folder.

After making the cards I decided to make a matching note card tote, following this tutorial on Splitcoaststampers.  It’s simple and almost like the cards. I did use a bigger frame from the Very Vintage Label set and added a little scroll on the top and bottom of the sentiment.

The top corners of the box were punched with the Crop-a-Dile Cloud Chomper. The handle is a 3 /4″ x 8″ piece of Pumpkin pie. It was adhered to the outside of the box with silver brads. This way you can move the handle back while adding the cards into the box (this cool hint was posted under the video tutorial).

Here is a video (with a different box that I will share later) for the visual learner:

[youtube]https://www.youtube.com/watch?v=VR-Ht2uOyv4[/youtube]

© 2012 fresh & fun Suffusion theme by Sayontan Sinha