When I received the new blanks and Bezel matching dies from Spellbinders I had to try them out right away.  I used the Birds one die to cut patterned paper. The edges were sanded before the pieces were adhered to Bird blanks.  Brown cardstock was cut and embossed with the branch die from Cherry Blossoms.

Corrugated cardboard was cut with the largest of the new Heart One dies. The cardboard was painted with Snow Cap Paint Dabber and then sanded. The heart was adhered to white cardstock and cut out before the branch and birds were adhered in it’s center.

A 1 3/4″ x 5 1/2″ piece of Winter Fun patterned paper was adhered to a 3 1/2″ x 5 1/2″ of patterned paper from the same paper pack. Seam binding was tied around the vertical strip and topped with a button, tied on with Linen Thread.

A sentiment from GinaK. Designs Mistletoe Memories was inked with Wheat and Jumbo Java VersaMagic ink on white cardstock and cut out. It was adhered next to the seam binding bow.

The top right and bottom left corner were rounded before Washi tape topped with a button on the top right finish off the card.

Thanks so much for stopping by! Have a wonderful day!
Hugs and smiles

Today’s tutorial on Splitcoaststampers is written by the amazing Eva Doblias. She shows us how easy it is to use Twinkling H2O’s. She couldn’t create a video, so I shot one showing how to use the paints to create a watercolor wash background.

I started by stamping snowflakes from Verve’s Glad Tidings in VersaMark ink on a 3″ x 5″ piece of white cardstock.  They were embossed with white embossing powder before I used blue and purple Twinkling H2O’s for the waterwash. Once the paper dried, I stitched the edges of that layer.

A piece of white cardstock was cut with the Vintage Oval Frame die and the stamp with the same name was stamped over it with Starlite Black Brilliance Ink. A sentiment from Glad Tidings was stamped in the center.

Silver glimmer paper was cut and embossed with the two smallest dies from Spellbinders Create-A-Flake Four, layered on top of each other and connected with a Recollections brad (Michaels). The snowflake was adhered to the right hand side of the sentiment layer. Rhinestones from a Sleek Strips Silver Rhinestone package were added underneath the sentiment. The sentiment layer was adhered to the lower left of the background layer before the background was adhered to the card base. Part of a Finesse Rhinestone Swirl finishes off the card.

Here is a video for the visual learner:

[youtube]https://www.youtube.com/watch?v=oSWBfnl_wSo[/youtube]

Thanks so much for stopping by! Have a wonderful day!
Hugs and smiles

I am back with another cute Tiddly Inks image called Cocoa Wishes. It was printed out on Neenah Solar White cardstock. It was cut 3 1/2″ wide and the image was colored with Copic Markers (Skin: E50, E21, E33, R20   Hair: E13, E15, E19, E18   Jeans: B91, B93, B95, B97   Ear Muffs/shirt/bird: YR09, R24, R29, R39    Cup: E40, E41, E42, E43  ).

Two pieces of  3 1/2″ wide strips of Carta Bella’s Winter Fun patterned paper were adhered above the image and the edges were stitched. The layers were adhered to the card base a 3 1/2″ x 11″ piece of Kraft cardstock, folded in half. The bottom corners were rounded and a piece of red washi tape was adhered on the the paper strips on top.

A sentiment from Snowflake Letters Mini seals was stamped in Tuxedo Black Memento Ink on a piece of white cardstock, cut and embossed with a Standard Circle Nestabilities die. A red button was tied on with a silver cord before the sentiment circle was adhered with foam adhesive squares. A few snowflakes were cut and embossed out of silver glimmer paper with Snowflake Borderabilities dies and adhered to the card to finish it off.

Thanks so much for looking! Have a wonderful day!
Hugs and smiles

I am exciting to be guest designing for Tiddly Ink this month. For my first card I decided to use the darling Winter Wryn image. I printed her out on Neenah Solar White cardstock and colored her with Copic Markers (Coat/Hat: YR09, R24, R29, R39    Hat/coat trim: W00, W1, W2    Skin: E50, E21, E34    Hair: Y21, Y23, E31, E33     Boots: C1, C3, C5, C7, C9). The cardstock was cut down to 5 1/4″ length and the left hand side was cut with the Notebook Die-namics die. The right hand corner was rounded.

A piece of Carta Bella Merry & Bright paper was adhered on the left to form a 3 1/4″ x 5 1/4″ layer. It was adhered to the card base, a 3 1/2″ x 11″ piece of Kraft cardstock, folded in half. Both bottom corners were rounded.

A sentiment from Kelli Purkey’s Joy stamp set was stamped in Sea Breeze VersaMagic ink on white cardstock. It was embossed with iridescent ice embossing powder and cut out.  Hemp cord was wrapped into a bow and tied together with a bow. The sentiment was taped under it and it was adhered to the upper right hand side.

Do you have any Tiddly Ink images? They are so cute and so much to color.
Hugs and smiles


Yesterday I had some free time to play along some of my favorite challenges. I created this card for the current Way to Use it challenge on Splitcoaststampers (favorites), the current CASE Study and Simon Says Stamp challenge (snowflakes).

The current CASE study showcases a gorgeous card from Windy Robinson. Her card had some great dry embossing with Nestabilities dies. Her card had flowers in the center, but I thought snowflakes would be more appropriate for December. Plus I LOVE snowflakes. So I cut snowflakes out of Neenah Solar White cardstock, Frosted Teal and Patina Bazzill cardstock with dies from the 2012 Snowflake Pendant Shapeabilities® die set.

A 3 1/2″ x 11″ piece of Neenah Solar White cardstock was folded in half and the bottom corners were rounded.  Two of the Wonky Rectangles Nestabilities® were embossed in the center of the card. A sentiment from Merry Everything was stamped in the center of the embossed rectangles with Midnight Black VersaMagic Ink.

Red silk ribbon was tied around the lower part of the card base. Thin silver wire was wrapped around a stylus and added to the small white snowflakes. The bigger blue snowflake and a while one were adhered to the left hand side of the sentiment. A second white snowflake was adhered over the ribbon bow.  Rhinestones from Want2Scrap finish off the card.

Thanks so much for stopping by! Have a wonderful Friday!
Hugs and smiles


Hello and welcome to Day four of Whimsy Stamps November Rubber & Die Release Showcase!

On Wednesday (21 November) Whimsy Stamps released this month’s new rubber designs, Shapeology dies, Whimsy Designer Paper packs, Shape EZ templates and *new* Whimsy Prints pre-coloured toppers. From then until 27 November the Whimsy Stamps DT and Special Guests are showcasing these fabulous new goodies with a daily mini blog hop and I am part of today’s hop!

Each mini blog hop has a new release prize hidden somewhere along the way and you have 24hrs to enter each prize draw.

To be entered into today’s mini blog hop prize draw, be sure to leave a comment on ALL of the DT’s posts listed below by 12.00PM EST tomorrow. All winners will be announced on the Whimsy blog on 28 November.

For my card today I used the new Wee image Berry. It was stamped in Tuxedo Black Memento Ink on Neenah Solar White cardstock that had been cut and embossed with the second largest Spellbinders™ Label Twenty-Five Nestabilities® die and colored with Copic Markers (coat: BG11, BG13, BG15, BG18   coat/boots/scarf: E41, E42, E43, E44   Scarf/Berries: R32, R35, R39   Holly Leaves: G40, G43, G46   Skin: E50, E21, E34    Hair: Y21, Y23, E33   Cat: T0, T1, T3, T5, R20   Ground: BG10, BG11, T0, T1    Background: C0, C1, BV00o0). White Opal Liquid Pearl spots were added to the background, Stardust Glitter over the ground.

A 2″ x 3 1/4″ strip of  Whimsy Winter Blues paper were adhered over a 3 1/4″ x 5 1/4″ piece of the same paper pack. The bottom corners were rounded and the edges were sanded and stitched. May Arts white organdy ribbon was tied around the horizontal strip was tied around the paper before it was adhered to the card base, 3 1/2″ x 11″ solar white cardstock, folded in half. The ribbon was topped with a white button, tied on with silver cord.

A sentiment from Snowflake Mini Letter Seals was stamped in Tuxedo Black ink on white cardstock and cut and embossed with a Standard Circle Nestabilities die. The center was colored with Copic Marker BG10 and BG11. The image was adhered to the card base with foam adhesive squares, the sentiment was adhered to the upper right of the image. A rhinestone from a Sleek Strips Silver Rhinestones was added in the center of the snowflake and Stardust Stickles was placed over the colored part of the sentiment panel. Part of a Fancy That! Border Bling on the bottom right corner finishes off the card.

To take a peek at today’s fabulous new release creations, please click on the links below…

Bev RochesterSpecial Guest
Erin Bailey
Heidy
Simonne
Tammy Louise

Remember that the entire new release is available to buy right now from the Whimsy Stamps store along with all your Whimsy favorites.

Thank you so much for stopping by! Have a wonderful day!
Hugs and smiles

If you would like to join Whimsy Stamps as their Guest Designer for the January 2013 release, please CLICK HERE for all the details. Entries close at 12.00pm on 28 November.

Hello and welcome to Day one of Whimsy Stamps November Rubber & Die Release Showcase!

First of all I want to wish all my American readers a Happy Thanksgiving. I hope you have a wonderful day with your family. Let me just tell you how thankful I am for all my readers. It still boggles my mind that so  many of you subscribe to my blog. I am extremely thankful for all of you and LOVE it when you let me know what you think about my creations.

On Wednesday (21 November) Whimsy Stamps released this month’s new rubber designs, Shapeology dies, Whimsy Designer Paper packs, Shape EZ templates and *new* Whimsy Prints pre-coloured toppers. From then until 27 November the Whimsy Stamps DT and Special Guests are showcasing these fabulous new goodies with a daily mini blog hop and I am part of today’s hop!

Each mini blog hop has a new release prize hidden somewhere along the way and you have 24hrs to enter each prize draw.

To be entered into today’s mini blog hop prize draw, be sure to leave a comment on ALL of the DT’s posts listed below by 12.00PM EST tomorrow. All winners will be announced on the Whimsy blog on 28 November.

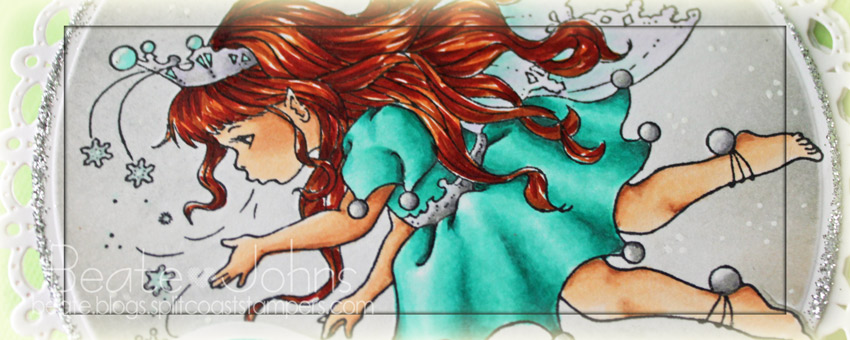
For my card today I used Crissy’s darling new Snow Fairy Princess. It was stamped inTuxedo Black Memento Ink on Neenah Solar White cardstock that had been cut and embossed with the smallest Spellbinders™ Grand Circles Nestabilities®. The image was colored with Copic Markers (Dress: BG11, BG13, BG15, BG18, N0, N1, N3     Wings: BG10, BG11, BV0000, BV000     Skin: E97, E99, E09, E18    Skin: E50, E21, E34), masked and sponged first with London Fog, then a bit with Toffee Crunch Memento inks.

The edges of the circle were inked with VersaMark ink, sprinkled with Sticky Embossing Powder, heated and Martha Stewart Sterling Glitter was added over it. Little dots were added with a white gel pen.  Subtle sparkle was added with a clear spica pen, more sparkle was added to the wings with Frost Smooch Glitz.

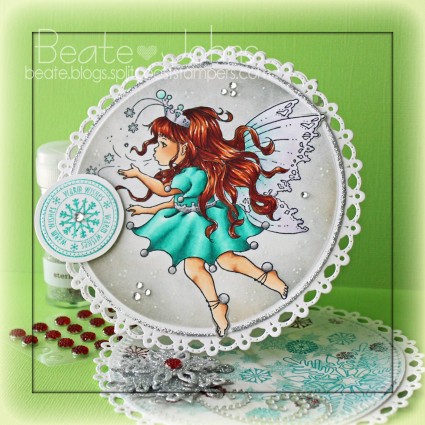
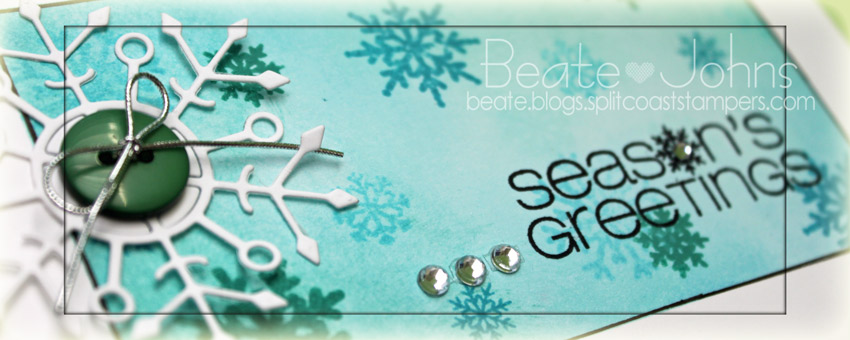
A sentiment from the new Snowflake Mini Letter Seals was stamped in Turquoise Gem VersaMagic Ink on white cardstock and embossed with iridescent ice embossing powder and cut and embossed with a Standard Circle die. It was adhered to the image layer with foam adhesive squares.

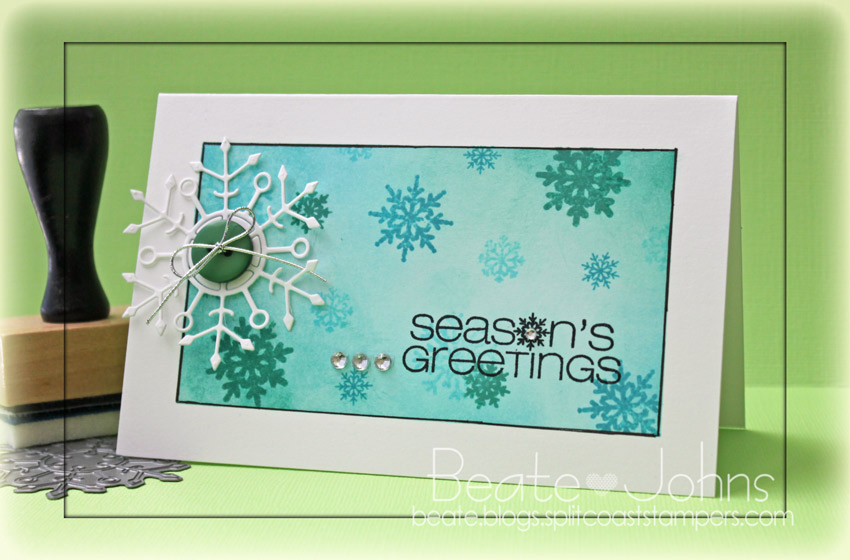
The card base was created as a Twisted Easel card, cut and embossed out of Neenah Solar White cardstock with the smallest of the Grand Decorative Circle Nestabilities dies. A piece of Whimsy Winter Blues Patterned Paper was cut with the smallest Grand Circle Nestabilities die,  the edges were sanded and adhered to the inside of the card.

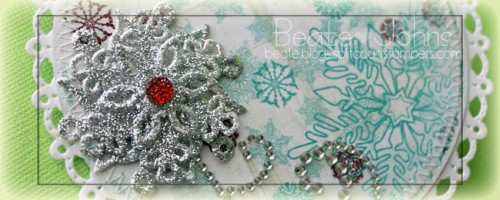
Solar White cardstock was cut and embossed with the three smallest Create-a-Flake Four Shapeabilities® dies. The snowflake pieces were covered with the Emboss It Dabber. Sticky embossing powder was added, heated and the snowflakes were covered with Sterling Glitter.  They were stacked together with foam adhesive squares and topped with a Queen & Co Twinkle Goosebumps.  The sparkly snowflake was adhered to the bottom of the inside of the card. Part of a Finesse Rhinestone Swirl was adhered to the snowflake. Rhinestones from a Sleek Strip Silver Rhinestone were added to the card front to finish off the card.

To take a peek at today’s fabulous new release creations, please click on the links below…

Ann Vento
Deb Routledge – Special Guest
Debbie Eastman
Michele Roos – Special Guest
Sylvia Blum

Remember that the entire new release is available to buy right now from the Whimsy Stamps store along with all your Whimsy favorites.

Thank you so much for stopping by! Have a wonderful Thanksgiving day!
Hugs and smiles

If you would like to join Whimsy Stamps as their Guest Designer for the January 2013 release, please CLICK HERE for all the details. Entries close at 12.00pm on 28 November.

Welcome to the monthly NinaB Designs team blog hop. NinaB Designs is a product designer for a few paper crafting companies including Spellbinders, Want2ScrapPenny Black, and The Craft’s Meow. For this month’s hop, Nina challenged us to create something with Winter and Holidays in mind.
The holidays provide many opportunities for paper crafters to give an extra personal touch to every occasion.  Whether you are doing place cards for a dinner, tags for gift giving or even just hand made projects using your supplies on hand, it is a blessed season indeed!

As you can see it’s my post from yesterday’s Spellbinders Blog. We moved the blog hop right before I left for my trip to Arizona and I didn’t have time to create a new one. I used The Craft’s Meow Vintage Snowflake Set to stamp the circles with Versamagic ink. You can see a better picture on the Spellbinders blog. If you comment there, and then come back and post on yesterday’s post as well, you will be entered in a drawing for my Create-a-Flake 4 dies.

To welcome you back to our blog hop, we are giving away PRIZE PACKAGES so be sure to hop along!  Winners will be picked randomly from 2 of the designers’ blogs:
Everybody is welcome to comment and be eligible to win. The winners will be announced on  November 23 on Nina’s Blog, where you will also find all the relevant info regarding the giveaways.  Finally, please consider liking the following Facebook pages that are represented on today’s hop, so you don’t miss the latest news and happenings:
Penny Black Inc. 

Thank you for joining us today!

Here is a little sneak peek of the card I am sharing at the  Spellbinders blog today.  I hope you have time to check out my quick tutorial for this card on the Spellbinders blog. If you have time to comment there, come back and let me know.

If you do that (comment there and then here) it will enter you in a raffle for my gorgeous Create-a-Flake Four Snowflake die set. It just retired (meaning Spellbinders Paper Arts is out of those dies and you soon won’t get them anymore. Still available in stores while supplies last).

I will pick a winner on Sunday with the help of random.org. International readers are invited to enter the raffle too.

Thanks so much for stopping by! Have a wonderful day! I know mine will be. I am in Arizona right now hanging out with my fellow Spellblogger and the Spellbinders Blog team.

Hugs and smiles

Today’s featured new CAS-ual Fridays Stamps set is called Snowflake Greetings. As the name says it has quite an assortment of snowflakes as well as greetings. My card was created out of  5 1/2″ x 7″  piece of Neenah Solar White cardstock. It was folded in half and  a 3/4″ border was masked off with Eclipse Tape.

The center of the card was sponged with Evergreen Bough and Broken China Distress inks. Snowflakes were stamped with those same colors as well as Tumbled Glass Distress ink.

A border was drawn with a Copic Multiliner and a sentiment was stamped in the lower right corner of the sponged area with Jet Black Archival Ink.  Three rhinestones from Sleek Strip Silver Rhinestones were adhered to the left of the sentiment.

White cardstock was cut with the Faceted Snowflake die. A green button was tied on with silver cord before the snowflake was adhered to the upper right hand corner of the sponged area.

Make sure you check the CAS-ual Fridays Stamp blog to see more samples created with the new set.  Thanks so much for stopping by! Have a wonderful day!

Hugs and smiles

© 2012 fresh & fun Suffusion theme by Sayontan Sinha