
Don’t you love that word? Thumping. I don’t know why, I think it’s a cool word. Another word I like to say is WHACK. For this technique you ink up your stamp, don’t stamp but turn it rubber side up. Now WHACK it with a darker shade of marker. That’s Thumping. LOL
You can see a step by step tutorial today on Splitcoast. I made this card while taking pictures of the tutorial.
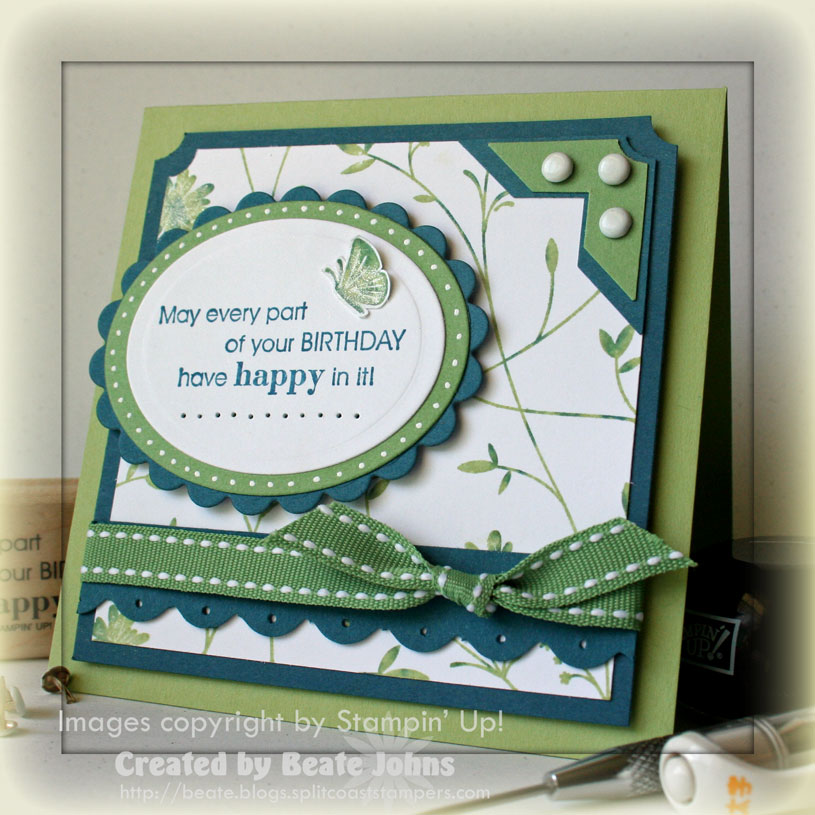
The card base is a 4 1/4″ x 8 1/2″ piece of Certainly Celery cardstock folded in half.
I inked up the Pretty Petals background with Certainly Celery ink and WHACKED it with my Not Quite Navy Marker.
Next I huffed (breathed heavily) on it and stamped it on a 3 1/2″ square of Whisper White cardstock. The top two corners were punched with the ticket corner punch and it was layered on a 1/4″ bigger piece of Not Quite Navy cardstock. That layer also had the top two corners punched. A double photo corner (with ticket corner punched points) was added to the top left and white brads finished the corner off.
I added scallops with my corner rounder to a 5/8″ x 3 3/4″ strip of Not Quite Navy and paper pierced a hole in each scallop. That strip was adhered to the lower half of the front and Wild Wasabi Double Stitched ribbon was tied around both layers.
The sentiment is from the Occasional Mini catalog set Full of Life. It’s stamped in Not Quite Navy on Whisper White. I cut the sentiment out with my Nestabilities oval and dry embossed that layer as well with the same template (YOU NEED NESTABILITIES!!!). It was layered on a Wild Wasabi oval cut with the next size Nestabilities die. I added a white gel pen border to that. Last is a scallop oval out of Not Quite Navy cardstock. You guessed it. Cut with Nestabilities.
I paper pierced a line underneath my sentiment and added a tiny butterfly from the Pretty Petals background (stamped the same way as the background before, but outlined with the marker as well before stamping) on the top right. I used my Sakura Gelly Roll Stardust Pen on that butterfly, then while the pen lines were still wet smeared them with my finger to make the lines less pronounced. (The pens are not quite clear, but have a silvery shine otherwise.)
The sentiment layers were attached with dimensionals to the White/Not quite Navy layers, which in turn were adhered with dimensionals to the card base.
Now…get your markers out and start whacking your inked up stamps. It works well with solid images or images that are mostly solid, but with fine details. I love to WHACK (maybe I should rename the technique WHACKING. LOL) the Kind Thoughts butterfly.
If you decide to try it out, post a link to your card here. I wanna see it. Plus….I will raffle away one Sakura Gelly Roll Stardust pen. Every card entry counts as one Raffle entry.
Beate
38 Responses to “Tutorial on SCS – Thumping”
Sorry, the comment form is closed at this time.


OMG, I love it. Beautiful colors… Thanks for the great tutorial. Have a nice day:-) Bye Silke
so pretty! Another technique I MUST try!!!!
I just love everything about this card, the colors, the design. It’s just beautiful! And a new technique to try, can’t wait!
GORGEOUS card Beate!!!
Oh, and HAPPY BIRTHDAY!!!!! I hope you have an amazing day filled with LOVE and happiness!!!
Oh, and you’re 100% RIGHT!!! Those Nestabilities–worth EVERY penny!! I’d been putting off getting them– my husband just bought me the whole set (from PaperTrey) and I LOVE THEM!! I only wish I’d bought them sooner!!! 🙂 He didn’t think to get the pad (to emboss), I’ve still been able to do it but not as well, I’m sure, as if I had the pad so I’ve just got to order that.
Enjoy your day and THANKS for the INSPIRATION!!!
Always,
Stacey
Happy Birthday! Love your card! I hope you have a wonderful, Thumpy and Whacky birthday! You ROCK!
Hugs, Pam
Totally gorgeous Beate!!! Love the colors and I have never seen this technique before, but I am sure going to try it!! Love this!! *STAMPIN HUGS* Alex
This is beautiful Beate!!! Love the colors you used. Sounds kinda fun too!!!
Beautiful card, Beate!! HAPPY BIRTHDAY!!!
Beautiful! I love this technique, it makes such a pretty mix of color. I’ve actually tried it once before for a butterfly I stamped. I learned of it on SCS, so I’m betting it was your tutorial! 🙂 Thanks!
Deena
They say it’s your birthday!!!! HAPPY HAPPY DAY!!! Make sure you check in!!!
What a cool technique! Another well-planned, thorough tutorial … I’ll have to try that! Your card is gorgeous too, Beate!
Happy to You! I just celebrated my birthday on Monday…did not know you were a fellow Aries. Enjoy your day!
Love the colors on this card and again you are enablng me…I must get that background stamp! Great technique as well! Thanks so much for your blogging. I look forward to it every day!
Birthday Blessings! Your card is GORGEOUS!! What a cool technique-easy with awesome results. Thanks for sharing the tutorial!
This is such a pretty card Beate! I love the colors- it is so bright and springy (is that a word?). I’m definitely going to give this technique a try (I have that very background on the way to me right now :0)
Beautiful colors. Great technique! Loved the tutorial.
Wonderfully beautiful card….I love the way you not only punched the top corners….but also the corners of the photo corners….awesome look! Joan
GORGEOUS card, Beate! Just gorgeous!
I love this so much? I had to order Pretty Petals today with my free set earned from Sale-a-bration!! I will have to try this with another set though, in the meantime. :0)
Happy Birthday sweet girl! 🙂
Girl, you’re cracking me up with all that thumping and whacking!
Oh it is your birthday today, so first happy, happy birthday to you!! May your coming year be filled with happyness and inspiration 🙂
Your card is gorgeous like always, thanks for the tutorial, will definitely try that out, I just bought the right stamp for this 😉
Beate, this is really sTHUMPING special. *groan* But it really is beautiful. Very cool technique.
Yep – gotta love those words, and this card! WONDERFUL on it, you go, girl! Love all your work. 🙂 Have an awsome day.
I combined this one with your other challenge! http://tanyastampsnthings.blogspot.com/ Yeay!
Happy Birthday to you!
This is so pretty. I just love the colors you used.
I made a card using your new technique – and I LOVE it!!!! (as usual!) Here’s my card…. http://www.splitcoaststampers.com/gallery/photo/879215?cat=500&ppuser=104635
Hey, nobody told me it was your birthday!
ahaha…ahem….
Happy Birthday to you! Happy birthday to you! Happy birthday, fellow stamper……. Happy birthday to YOU!!! 🙂
Have a great day!!!
What a cool technique! And love your card, the colors are so pretty and the technique looks great! And last but not least, HAPPY BIRTHDAY!!!!!!!
Hi Beate!!
I am going to WHACK a card here in a bit, but I have another question…
I know I need these Nestabilities, but how do I cut them?! I need some kind of machine, right? Can you tell that I have yet to corrupted by all of you high-class stampers! 😉
I’d appreciate any advice on the Nestabilites you can give me. Hopefully it means I *need* some kind of machine and I have to find another way to break the news to hubby! 😉
-Kristin
I love the card and the tutorial, Beate! Happy Birthday!!!!
This card is GORGEOUS Beate! I love the technique!!! I saw this in the SCS email today and your tutorials always pop right out!! Love them all!
I’ve got a ton of volunteer stuff going on at the school this week so my stamping time is limited…total bummer too!
I’ll definitely try this out this weekend!!!
Thanks for the super tutorial! Hope your birthday is FANTASTIC!
Awesome card…and I love the stamp you chose to “whack”! It really changes how I have viewed this technique! Now I can’t wait to try!
Happy Wonderful Birthday Beate! You totally ROCK girl!
Beate, your card is wonderful! I absolutely love the colors you chose and what a fun technique you’ve shared. I think I may have to give “thumping” a go! 🙂
Great card. Love the colors you use.
The colors look great on this card! I’ve made my mental note to use it!!
Neat technique and love the colors, neat way to do the corner!
http://www.splitcoaststampers.com/gallery/photo/880614?cat=8364
I’m not quite happy with this but the thumping was fun and I’ll definitely come back and try it again. I’ll have to have a better look through my stamps first.
And, I did think it was today’s weekend sketch I was following – but now I don’t know what sketch it was at all – not today’s, for sure.
I loved your card – green is one of my favourite colours.
Hi 🙂 – back again with my second attempt and much happier with it this time.
http://www.splitcoaststampers.com/gallery/photo/882475?cat=500&ppuser=133118
The first one looked more “thumped” IRL, but still not as much as I hoped – practice makes pefect, so they say.
Amazing card, love this DESIGN!!!