Good morning,

I promise I stamped yesterday! I did. I just can’t share it just quite yet. But I am so excited to say that all my secrect stamping is over. It’s so hard for me to stamp something and then not being able to share it! So today…I get to play and just stamp for fun!!!!

But first, I still have more RAK’s to share with you. I know…I am one lucky girl! 🙂

rak-nicole-cooke.jpg

This first one is made by Nicole Cooke. Check out her blog The Stampin’ Librarian. I really like how the cuttlebug dry embossing template goes with the Big Pieces set from the winter mini catalog. I love the colors and layout as well. Thank you so much Nicole!

rak-rachel-baird.jpg

The next beauty is from Rachel Baird. Her blog is called Hope Stamps Eternal. I love how pretty the background looks embossed in black and how it makes the Flower from Doodle This  pop. Rachel added bling and glitter! What more can a girl want. Thank you soooo much Rachel! You rock!!!

Here are two more great RAK’s that I got in the mail yesterday.

rak-julee-tilman-copy.jpg

My jaw hit the floor when I opened this Beauty. I kept on looking at it and finding more amazing details. Julee Tilman send me this card. Like all the other RAK sender, she is part of the Splitcoaststampers blogger RAK group. I love being in this group. Back to Julee. I hadn’t been to her blog before I got this card, but boy oh boy…I was missing out! Her work is gorgeous! Make sure check out her blog Poetic Artistry.

rak-lauri-rybarczyk.jpg

This gorgeous card is from Lauri Rybarczyk. Check out her fun blog called I lie, cheat, and caseThis is a pocket card. You pull on the clear marble centered flower and your message comes out. It’s gorgeous!

Thank you Julee and Lauri to make yesterday a WONDERFUL day for me! You girls ROCK!

I didn’t get done with my housework until about 2:00 p.m. Then I started working on my second to last project for the artisian award. That one dragged on for a long time but I was worth it. I really like how it turned out.

At five I went to my mailbox and almost had a heart attack when I opened it. I had a big package from Cindy with my Crate paper order and more May Arts ribbon.  I also had SEVEN, yes, SEVEN RAK’s in the mail! My goodness…it’s not even my birthday month yet.

I will post two RAK’s every day so you can properly oohhh and ahhh over them. They are all extremly gorgeous. I will post them in alphabetic order of the first names of the stamper (That’s easiest, since they are saved that way).

The first one came from the very talented Asela Hopkins. Check out her wonderful blog Hop Art Studio.

rak-asela-hopkins.jpg

I am blown away by her watercoloring. This card is stunning!

rak-jana-weaver.jpg

The second card is from Jana Weaver. She is living in Germany right now. I am so jealous of her being able to eat that good bread, the delicious butter and all the German chocolate she wants. She is jealous of my beach time. LOL It all evens out! She is a wonderful artist and person. Check her blog Janas Creative Pursuits of StampingThis is a business size card. It’s gorgeous. The whole image panel is covered in glitter. It’s beautiful. Jana used the Polka Dots & Paisley set from the spring mini catalog.

Wait until you see the next two RAK’s. They are just as beautiful!

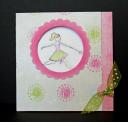
Mondays are always busy mornings for me. There is regular laundry and all the bedsheets and towels to wash, vaccuming, dusting, moping and cleaning bathrooms. Let’s just say…Monday’s are not my favorite days. I haven’t gotten a chance to stamp yet. I still have to mop and do one more load of laundry. But I have another Fairy card to share with you that I made yesterday. This time I used the Dancing/Springing Princess stamp from the My Favorite things stamp set.

birday-princess-closed-trif.jpg

I love this Fancy Pants Paper from the Key Lime Pie collection. It’ so cute and fresh.   I scored and folded my 4″ x 11″ piece of  patterned paper. You can find the tutorial for this trifold here.

I  used the scallop circle from Marvy to punch out my frame out of Pink Passion Cardstock. I stamped the Linen background over it in white and distressed the edges white as well.  I adhered it where I wanted my window to be and cut a window in the center with my Coluzzle cutting system.

birthday-princess-trifold-m.jpg

Next I stamped and colored my main image on the white cardstock that was punched out with the biggest Marvy Scallop circle.  I stamped the birthday greeting on the inside. To color the girl, I used Blush Blossoms, Bashful Blue, Pixie Pink and Green Galore Classic ink and my aqua painter.

The Saying For A Birthday Princess comes as a straight stamp. But you can shape clear stamps while sticking them on your acrylic block. That’s what  I did for this saying.

The ribbon is from May Arts and I bought it from Cindy, aka Starlitstudio!

The ribbon is optional. You can also just tie a knot through the hole, without running the ribbon all the way around the card.

cami-trifold-finished-variation.jpg

It’s casing time!!!! Today’s challenge feature’s SCS member DuckwaddleQuack. I love Sunday’s challenge.

I picked this card  to case from Angie

doodle-this-phoebe-fsj06.jpg

I loved the layout. I changed the colors and since added the flower instead of the snowflake. This is the first card I used my cuttlebug embossing folders. I tried to run the whole card through, but I had the pattern missing on about 1/4″ on top and one side. So I cut it down and made the card base black. I sponged the embossed swirls with Bashful blue ink.

The paper is from my new Phoebe Grey paper pack. I am having a lot of fun with that one.

I stamped the Doodle This flower in Black stazon and colored it with Pretty in pink and Really Rust. I would have never picked that color combo. But I had to tie the rust from the papers in a bit. I then added a black layer around the flower. The Saying is from Just Sayings of the Spring mini catalog from Stampin’ Up!

I just put in the numbers 1 – 290 (I had two people email me to my home address) and the online random selector picked #28!!!!!

I was glad it was a low number so I didn’t have to count too far down. I couldn’t believe my eyes when I saw who won!

Charmaine Ikach!!!!!

She is the sweetest person ever and has become a great blogging friend of mine. We are both pretty new at it! Check out her blog Oodlebug Alley. She creates the cutest projects and has just posted a great tutorial on Stationary holder.

Thank you all for posting about your favorite plants! Ever since we created our own backyard in San Antonio, I love gardening. It was hard work but so much fun! It wasn’t easy to sell that house and leave that backyard behind. *sigh* I had a lot of fun learning more about your favorite plants! Sorry that not everyone could win…..but their will be another smaller candy prize at 60,000.

Yesterday I didn’t just get one box with goodies from Ecletic Paperie, I also got a new stamp set from My Favorite Things!

princess-stamps-mft.jpg

If you haven’t checked out their stamps yet, go and take a peek. I love their cute images.

I love that little Fairy/Princess. I think she is adorable. I wanted to make a sample with her and my new papers. I was asked to make another Trifold card for someone and thought this little stamp would be cute for it.

i-do-believe-in-fairies-watermarked.jpg

I started out with Rose Red Cardstock from Stampin’ Up! as my card base. The patterned Paper is from the Pheobe 6×6 paper pad. I had a bit of a hard time cutting into that gorgeous paper. But you know what…I can always order more, right? LOL

First I stamped the Saying “Have a Fairy Nice Day” all around a white circle. Then I stamped my sweet fairy in the middle.  I tied the card shut with wide white organdy ribbon from Stampin’ Up!

i-do-believe-in-fairies-open-watermarked.jpg

The center page has a little wand stamp on the bottom. The rest is left free for a note.

You can see my tutorial for the triangle trifold here on my blog or at Splitcoaststampers in the resource section.

Okay….here is my first try covering a frame and adding rub ons to a project.

It was so funny that the mail came when it did. I already had the plain frame (Walmart, JoAnn’s or somewhere else…it was cheap) out. I knew I wanted to put Lucas picture from last weekend in there. My kids are so grown up already, but in this shot….you can still see the little boy he used to be. I love this shot!!!!

Once I tore in my awesome package and touched every sheet of paper and oohed and aahed over it, I picked to pieces of Fancy Pants paper that I thought would work well with a boy frame. I used green on the bottom, because that’s Lucas favorite color.

fancy-pants-precious-memori.jpg

I cut two strip of paper the lenghts of the fram and the height that I wanted. Next I measured how thick the frame piece was. The canvas went 1 1/2″ inches in from each side. I cut my paper accordingly. Then I got my Mod Podge out and applied it all over the frame and taped the paper on it. Once it was dried, I used Stampin’ Up!’s sanding block to distress the edges. It’s a boy frame after all and it needs to look a bit roughed up.  Next I applied another layer of Mod Podge over the paper and let it dry.

Now…all of you Rub On experts already know what I did wrong. I was so excited to pick one of these gorgeous rub ons and to add it to my frame. I rubbed and rubbed….and nothing! Obviously my frame was a bit too slick after the Mod Podge layer to hold the rub on down. It took me a good while to make it work. Carefully I applied more Mod Podge over the rub on.

This frame is a real cheap frame. It’s only one piece with a slit on the top to add the picture. I cut a small opening on the side, but I just couldn’t get the ribbon to go through. So I used Sticky Tape all over the back of the ribbon and stuck it on there.

I am so happy with my first frame. If it was a frame for Rebecca’s picture I would have added lots of flowers and extra accents. I can’t do that for Lucas. He isn’t a little boy anymore even though this picture makes me think of his toddler years and just tugs on my heart! My precious baby boy!

Girls….I got my Eclectic Paperie order!!!!! I am in love!!! If you are looking for an online provider for gorgeous stuff at great prices, the girls at Eclectic Paperie are IT! They are the bombs!

motherload-from-eclectic-pa.jpg

I was waiting for this paper. I was drooling all over the computer because of this paper. It’s here, it’s here. I got Basic Grey 6×6 pads and one sheet of each of the Fancy pants Paper Joy carries as well as rub ons. I have never used them before…..but I can’t wait to try them out. Well…I did have my first try and will post it in my next post. It’s definitely a learning experience. LOL

I also got another cuttlebug embossing folder and two die packs! I am beyond excited!!!!!!!!!!!!! Sweet paper is in the house!

Here is the other card I made yesterday in between reading your flower comments.

both-way-blosoms-polka-dot-daisies.jpg

I still had It’s your Birthday and Both Way Blossoms out, so I used those again. A lot of you like daisies. I do love them too. They look so fresh. I had punched a lot of scallop shapes that I originally wanted to put in the candy. But the basket was already full and I decided to keep the punchouts for next time. I couldn’t help it and had to use one though.

The paper is from  Au chocolat Designer paper in the Spring mini catalog. My prima Flowers and the white brad are from Starlitstudio. My Scallop Marvy punch I got from Ellen Hutson  when she had them in stock. The celery colored brads are from Stampin’ Up!’s Soft Subtle Brads assortment.

The flowers and saying  are stamped with Timber Brown Stazon. I then colored the flowers with the white gel pen and the Pure Color Pencils from Stampin’ Up!. I blended the pencils with Gamsol and blending stump. And yes…I am kind of lazy and had everything still out from my tulip card earlier. LOL

I added doodles on the apricot scallop circle with the white gel pen and brown doodles around the saying.  I punched the HB out with the 1/2″ circle punch from Stampin’ Up! and then layered it on a white 3/4″ circle of white cardstock.

The background stamp is called Flannel Plaid. I stamped it with Whisper White craft ink on my Certainly Celery card base.

I am not quite sure about this card. I think the center circle with the flowers should have been a different color. I didn’t want to make the card too white, maybe Saffron? Or maybe I should have just stamped linen in Celery first to make it not so empty looking…. Oh well…I am still okay with it. Just keep looking at it thinking I should have done something different with it.

© 2012 fresh & fun Suffusion theme by Sayontan Sinha