wsc40-winner-anne.jpg

I am so sorry that I am so late announcing the winner of the last weekend sketch challenge.

My last two days have been crazy.

Random.org picked #22. That is Anne Granger with this card.

You can see more of Anne’s work on her blog Stamp with Anne.

Thank you all for playing with the sketch! The cards you created were wonderful!

essence-of-love-striped-wee.jpg

Here is what I came up with for today’s Be Inspired challenge.

I remembered last night at 10:00 p.m. that I hadn’t made a card for it yet. Yikes!

I wrote down White, Turquoise, Black and Celery for colors and stripes and leaves for design.

I started with piecing Certainly Celery Prints Designer Paper strips over a 3″ x 4″ piece of Tempting Turquoise Prints Designer Paper to create my focal image base.

Next I stamped the Essence of Love stamp over the striped background with Black StazOn, layered it on a 1/4″ bigger piece of Basic Black cardstock and paper pierced around the top half of the paper. I added a double photo corner out of Basic Black and Certainly Celery cardstock to the top left and topped it off with three turquoise brads. 5/8″ Certainly Celery Grosgrain ribbon was tied around the lower half of both layers.

The sentiment is also from Essence of Love and is stamped in black on a 1″ circle punchout out of Certainly Celery Prints Designer Paper. That is layered on a 1 1/4″ Tempting Turquoise Prints Designer paper circle and a 1 3/8″ black circle. The turquoise layer was paper pierced. Under the sentiment I added a 1/4″ black circle topped with another turquoise brad. The sentiment circles were adhered underneath the ribbon knot.

The butterfly was inked with Tempting Turquoise ink and kissed with the black inked Stitched background. Next I outlined the stamp with a black journaling marker before stamping it on white cardstock. It was cut out, adhered with dimensionals. Stardust Stickles was added to it’s wings.

My card base is a 4″ x 10″ piece of Certailny Celery folded in half. The gorgeous Stitched background was embossed in white over the entire card front before the other layers were attached with dimensionals.

coldwater-creek-skirt.jpg

Use this Coldwater Creek Skirt as inspiration and starting point for your card or project. Use the colors, layout or image….

I can’t wait to see what you come up with.

Check out the cards made by the Inspiration Challenge Team:

 Charmaine Ikach

Danielle Lounds

Dawn McVey

Jenn Balcer

Silke Ledlow

Susan Roberts

rak-0323-teresa-shaw.jpg

Teresa Shaw sent me her interpretation of of the BIC#4.

I LOVE the card she came up with.

You can see more of Teresa’s great work on her blog Inkfully Yours.

This was my first sample for the technique challenge last week. I LOVE the Always stamp set. The bird is gorgeous, the heart beautiful and all the rest of the stamps go so well together. It’s definitely one of my favorite sets right now.

I recently got all the new embossing folders for the Cuttlebug at Eclectic Paperie and I thought the bird/vine one would perfectly complement the set. I inked up the folder with Always Artichoke and ran a piece of Old Olive cardstock through my Cuttlebug.  I highlighted the dry embossed image with the white gel pen and then freehanded (I know…totally scary. I love templates) the paper piercing over it.  I cut the paper down to a 3 1/2″ square, ticket corner punched the corners and sponged the edges.

always-cuttlebugged-birds-tlc160.jpg

I layered the background on a sponged, 1/4″ bigger piece of Chocolate Chip cardstock and punched those corners as well.

White Taffeta Ribbon was tied around the lower half of it.

The sentiment from Always and is stamped on Shimmery White cardstock with Chocolate Chip ink, punched out with the large oval punch and sponged with Old Olive. I taped it to the right side of the ribbon knot and added an Aged Copper frame over it.

I attached both layers with dimensionals to the 4 1/2″ square textured Soft Sky card base and pierced a border around those layers.

I stamped the bird with Chocolate Chip Craft ink on a 1 3/4″ x 2 3/8″ Soft Sky cardstock and traced the design in the bird body with white gel pen. I layered the cardstock on a scalloped rectangle cut with my Nestabilities, paper pierced the edges and colored the inner part with Soft Sky Ink and Aqua Painter to darken it a bit. Then I added faux stitched lines with the white gel pen. The main image was attached with dimensionals

Rebecca has an appointment with our new dentist. Our old one decided he didn’t want to be a Tricare provider anymore. I tell you….being a military family doesn’t always feel that great. Special with getting doctor appointments. Anyway….the new dentist has to check her out. Rebecca probably has to get some of her baby teeth pulled because the new permanent once don’t have room and are coming in all crooked.

I will be announcing the winner of the WSC raffle a little later then usual today!  I’ll be back (think Arnold…yeah, I know…this totally dates me!). Have a wonderful day! Hugs and smiles 

rak-0323-jana-weaver.jpg

Jana Weaver sent me this gorgeous card!

I love Jana’s work.

Check out her blog: Jana’s Creative Pursuits in Stamping.

sweet-celebrations-first-sp.jpg

I love this shot of Rebecca and one of the kids from the neighborhood playing with chalk. I need to remember to shoot images at a crooked angle. I took it on one of our first real warm days last month. Rebecca and I had been to The Children’s Place the weekend before and she couldn’t wait to wear one of her new dresses.

As soon as I saw the Sweet Celebrations stamp set in the catalog, I knew I HAD TO have it! This is the first time I have used it.

The page base is a 6″ x 6″ piece of Bashful Blue cardstock stamped with White craft ink and the Polka Dot background. I used the this weekend’s sketch challenge for my layout. I wanted to keep all the focus on the picture and the sketch was perfect for that.

I cut the photo down to 4 1/4″ x 5″ and layered it first on a slightly bigger piece of Basic Black cardstock, then on a 4 3/4″ x 5 1/2″ piece of textured Wild Wasabi. On the bottom right I added a double photo corner punched out of Pumpkin Pie and Basic Black cardstock, topped with five silver brads.

I stamped the Day to Remember circle three times. I stamped it once on Pumpkin Pie and punched it out with the Scallop circle punch. I stamped it on Wild Wasabi and punched that out with the 1 3/8″ circle punch and last it was stamped on Bashful Blue and punched out with a 3/4″ circle punch.

Next I stamped the flower from Sweet Celebrations in Bashful Blue on Whisper White cardstock, cut it out and layered it into the center of all my circle punchouts. I topped it off with a black brad. I attached the scallop with dimensionals to the page.

One of the sentiments from Stem Sayings was stamped with Versamark under the flower. I used it as a guide for my paper piercing. Faux Stitches were added with the white gel pen. I used the Faux Stitched line as a guideline for my journaling.

rak-0323-joy-kennedy.jpg

Besides being the co-owner of one of my favorite online stores Eclectic Paperie, Joy Kennedy is also one of the sweetest stamper I know.

I had the pleasure of meeting her twice.

I received this adorable Easter card in the mail yesterday!

I had to share it with you right away.

Thank you for your well wishes! I am headache free today! Wohoo!!!

 Happy Easter to you all!

Sorry I haven’t posted earlier! I am having another bad migraine attack! Let’s hope I don’t have this while Rick is coming home. So I am sharing a card I made last week. 

The Limited Supply Challenge last week was more then tough for me! No tools were allowed except for sponges. I had the hardest time with that and I am not quite sure if I like this card!  I had just gotten my Tart & Tangy set with the Summer Picnic Designer Paper and new I wanted to use that.

tart-tangy-plain-lsc159.jpg

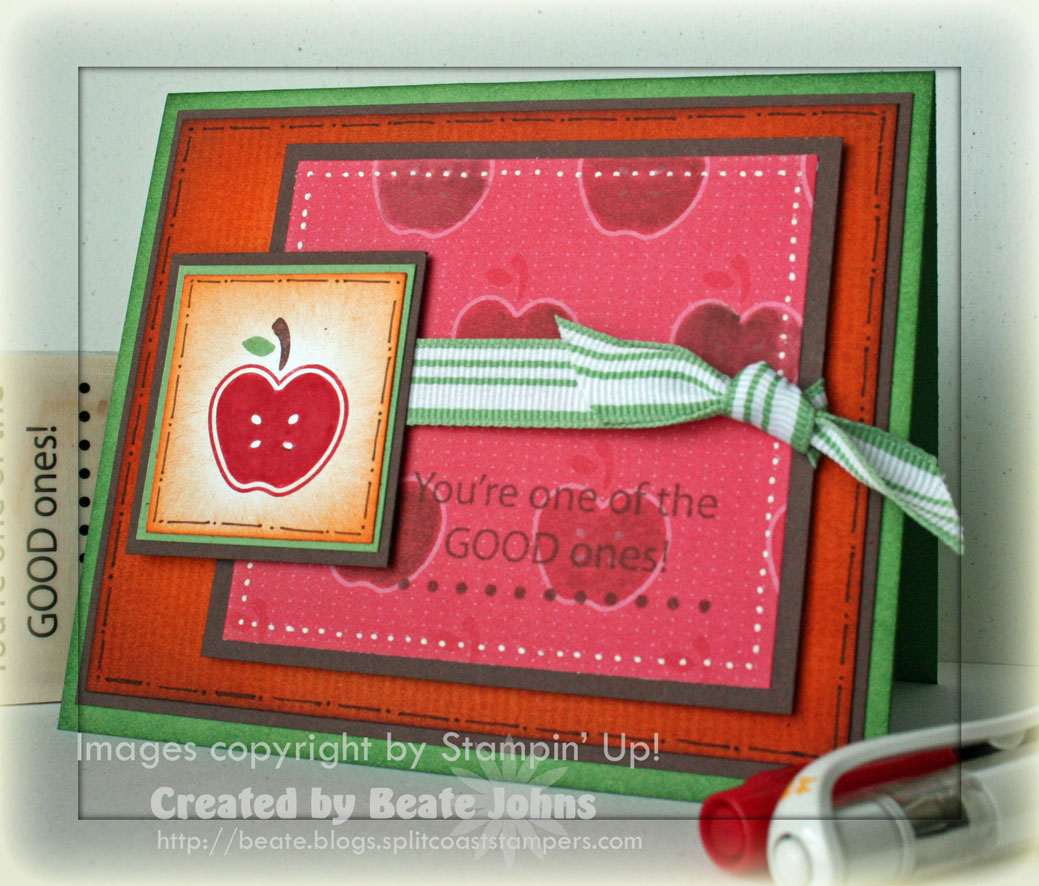
Since sponging was pretty much all I could do, sponging I did!

I colored the apples on my designer paper brown, so that the sentiment from Smarty Pants would make more sense.

The card base is a piece of 5″ x 8 1/2″ piece of Wild Wasabi cardstock. It was folded in half and the edges of the card front were sponged.

Next is a 4″ x 4 3/4″ piece of Chocolate Chip cardstock followed by a 1/4″ smaller piece of Pumpkin Pie. The Pumpkin Pie layer was stamped with the Twill background, sponged and a border was doodled with Chocolate Chip marker.

The Designer Paper layer measures 3″ x 3 1/4″ and is layered on a 1/4″ bigger piece of Chocolate Chip. I added a dotted border to the Designer paper with my white gel pen. Striped Wild Wasabi Ribbon was tied around both of those layers. They were attached to the other layers with dimensionals.

The apple was inked up with Real Red, Wild Wasabi and Chocolate Chip Markers (well…Wild Wasabi was applied with a Fantastix) and stamped on a 1 1/2″ x 1 5/8″ piece of Whisper White cardstock. Again a border was doodled on the edges. The edge was also sponged with Pumpkin Pie. The cardstock was first layered on a 1/8″ bigger piece of Wild Wasabi, then Chocolate Chip.

So here you got it. A card I stamped that I am not crazy about! It lacks some umpf! It would look prettier if the apple was on a circle, or if I could have added paper piercing or brads. Oh well…I didn’t chicken out of the challenge! That has to count for something, right?

embrace-life-thinking-of-yo.jpg

Here is another sample for this weekend’s sketch challenge!

Since my first sample was pretty much just like the sketch, I altered a sketch a bit for this card .

I made it for yesterday’s Way to Use it challenge.

We were supposed to use tags. I think the scallop circle can count as a tag, right? LOL

For my main image I stamped the “weed” stamp from Essence of Love in Basic Gray on a 2 1/4″ x 3″ piece of Shimmery White cardstock.

I sponged the edges with Soft Sky ink, layered it on a 1/4″ bigger piece of Basic Black cardstock and paper pierced all around it. Then I attached both layers to a sponged basic gray scallop rectangle that was cut with Nestabilities.

The card base is a 5″ x 8 1/2″ piece of Groovy Guava cardstock folded in half. The next two layers are a 1/4″ smaller piece of sponged Basic Gray cardstock followed by a 3 3/4″ x 4 1/2″ piece of Soft Sky cardstock. The Soft Sky layer was stamped with one of my new favorite background stamps Twill. The edges were sponged first with Soft Sky, then with Basic Gray and were paper pierced (Paper piercing makes everything prettier!!!)

I taped the Gray and Soft Sky layers together and adhered the image layers on top of that. Next I punched a hole with my anywhere hole punch through all five layers on the upper left hand side of the image panel.

I stamped the sentiment from Essence of Love in Basic Black on a 1 1/4″ Shimmery White circle. It was layered on a 1 3/8″ Groovy Guava and a Basic Black scallop circle. The edges were paper pierced. I attached a Pewter Hodgepodge Hardware piece to the lower right of the scallop circle and adhered the scallop sentiment with dimensionals to my card front. The hardware triangle was  positioned right over my punched hole. Next I tied Groovy Guava Double Stitched ribbon through the hole around all layers and attached the card front with dimensionals to my card base.

© 2012 fresh & fun Suffusion theme by Sayontan Sinha