
Welcome to JustRite Stampers’ newest Wednesday feature, 12 Weeks of Christmas Blog Hops #3! Every Wednesday up until Thanksgiving some of your favorite designers will be joining some of the JustRite design team for a series of Christmas blog hops, showcasing JustRite’s entire Christmas Collection of stamps! So mark your calendars for Wednesdays at 9am Central for great Christmas gift, card & project ideas, starting at the JustRite Inspiration blog!
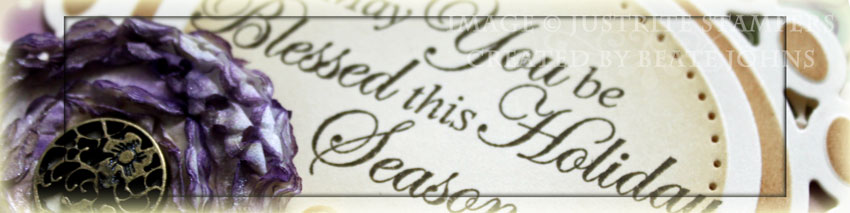
For my card I picked a set that is not in the Christmas collection, but has a beautiful Christmas Sentiment: Nature’s Nested Sentiments. The sentiment I picked has a big beautiful font and was perfect to place into a beaded oval. I started by cutting and embossing an oval out of Cream Neenah Cardstock with Classic Oval Nestabilities. The oval was sponged first with Antique Linen, then the edges with Vintage Photo Distress ink. The sentiment was stamped in the center with Walnut Stain Distress Ink and a border was paper pierced.
A beaded oval was cut and embossed from Cream cardstock and sponged with Vintage Photo ink. The oval with the sentiment was adhered with dimensionals to the beaded oval.
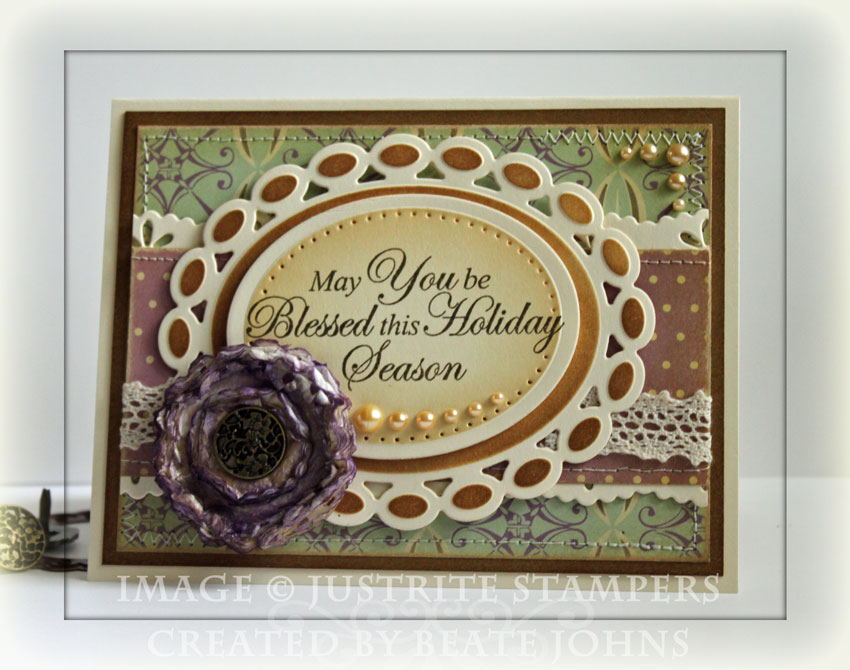
The card base is a 5 1/2″ x 8 1/2″ piece of Neenah Cream cardstock folded in half. The edges were sponged with Antique Linen.
A 4″ x 5 1/4″ piece of Kraft cardstock was sponged with Vintage photo. A 3 3/4″ x 5″ piece of Cosmo Cricket Jack Frost paper was sanded, sponged with Antique Linen ink and then stitched to the sponged Kraft cardstock piece. Then the layers were adhered to the card base.
A Cream strip of cardstock was cut and embossed with Eyelet Borderabilities. It was cut in half length wise and adhered to the top and bottom of a 2″ x 5″ strip of Cosmo Cricket Flurry paper. The edges of the strip was sanded then sponged with Antique Linen. May Arts Crochet Lace was added to the lower half of the strip. The strip was adhered to card base. The oval layers were attached to the card base with dimensionals.
I cut tissue paper with the two smallest Eyelet Circle Nestabilities and held them together with one of Stampin’ Up!’s Vintage brads. The tissue paper layers were sponged with Dusty Concord Distress ink. Then I created a colored pearlized spray by mixing water, Pearl Perfect Pearls and a drop of Vintage Photo Distress Re-inker in a Mini Mister. I then sprayed the flower and dried it with a heat tool to add shimmer and a darken the rest of the white tissue showing. Champagne Kaisercraft pearls finish off the card front.
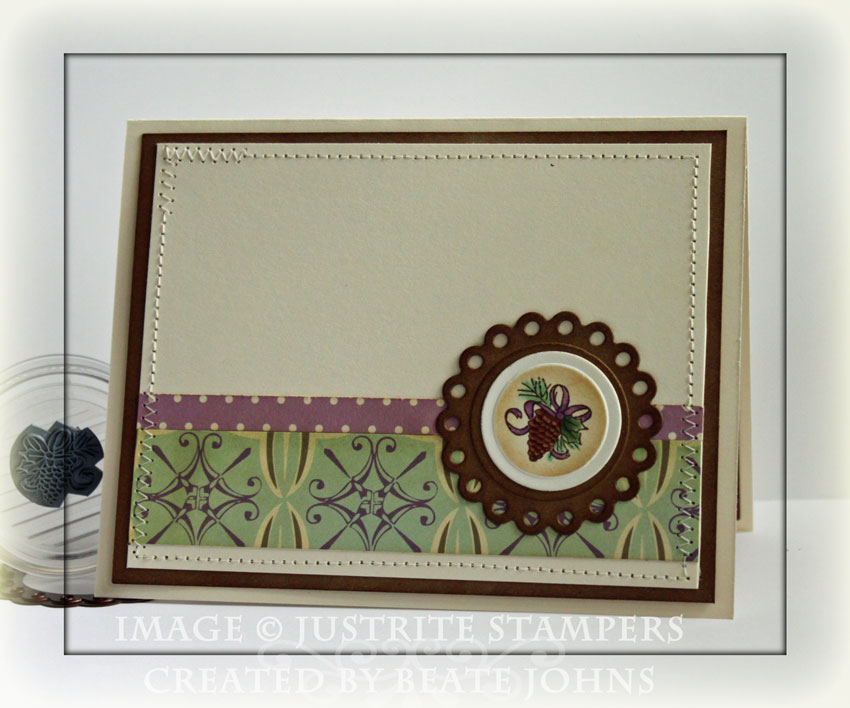
For the inside of the card, I sponged another 4″ x 5 1/4″ piece of Kraft cardstock with Vintage Photo. A 1″ strip of Jack frost and a 3/8″ strip of Flurry paper were stitched to a 3 3/4″ x 5″ piece of Cream cardstock.
I stamped the pine cone from Holiday Cheer Borders & Centers in Rich Cocoa Memento Ink on Cream cardstock. It cut and embossed it with Classic Circle Nestabilities. The image was colored with Copic Markers (E31, E33, E35, E37, V12, V15, BG11, G21, G24) and sponged with Antique Linen and Vintage Photo Distress ink. It was then layered on a Kraft cardstock piece with cut and embossed with Eyelet Circle Nestabilities and sponged with Vintage photo.
You can find a video for the tissue flower here:
[youtube]https://www.youtube.com/watch?v=LKRosUoQ2ww[/youtube]
Please visit these designers’ blogs to see what fabulous Christmas projects they have for you on the hop today!
JustRite Inspiration Blog
Debbie Olson
Becca Feeken
Sharon Harnist
Jeanne Streiff <=may have some downtime 1-4pm Central
Michele Kovack
Mona Pendleton
Heidi Blankenship
Beate Johns <=may have some downtime 1-4pm Central
Sankari Wegman
Selma Stevenson
Kellie Fortin
Angela Barkhouse
Pam Imholz
Kazan Clark
Liz Weber
Stephanie Kraft
Personal Note:
I am excited to tell you that I will be teaching my first class at a scrapbook store. You can find out the date, the cards and all the other details here! All three cards are Christmas cards created with Spellbinder dies. This card is one of them (minus the stitching, spraying the flower and the inside of the card).
Have a wonderful day! Hugs and smiles
Beate
28 Responses to “JustRite 12 Weeks of Christmas Blog Hop #3”
Sorry, the comment form is closed at this time.


Just gorgeous, Beate.. inside AND out!!
Love the gorgeous non-traditional colors, Beate, and that tissue flower is amazing! What a beautiful inside, too — love that sweet pinecone accent!
Beautiful.
Beautiful card – and your tissue flower is gorgeous
Beate, these cards are absolutely fabulous! But you never deliver anything but! Thanks very much for sharing your creative talent with us.
Love the SB dies you used, distress inks, as well as the JR stamp. The flower is just great. Thanks for the video tutorial also. God bless!
So pretty! I love the sentiment and that pretty tissue flower
Lovely cards. Love the tissue paper flowers. TFS.
Marcie
Great card. thanks for sharing the video on the tissue flower.
Oh, LOVE these nontraditional colors sooo much! Must remember to use piercing more often in my paper crafting too! LOVE what it adds!!!
Such a pretty card Beate! Love that framed sentiment & flower! Wish I could attend one of your classes! Sigh…
Beate this is stunning – just gorgeous. I love how you used the beaded oval to accent and your flower – Divine!!
Beate this is truly beautiful!! The shading makes the card and oh that flower is gorgeous!!
Love your card, everything about it!!! The colors, layout and especially the use of the pearls. Thank you for sharing your talents with all of us in blogger world!
This is so beautiful. I love your tissue flower.
Beate this is stunning inside and out!!! Love the colours and detailing and out you’ve showcased these stamps!!!
Love your card! The colours are so soft and different and your flower is awesome!
Thanks for sharing! :o)
THis is beautiful. I love how you finished off he inside too.
That card is just gorgeous!
I would so love to take your class, but my little brother is getting married the day before & I’m sure it’ll be a busy weekend. I hope you do some more.
Beautiful creations.
This is absolutely gorgeous, Beate!
What can I say … Love it, love it,love it. Sigh, the heights of perfection.
Thank you so much for leaving a comment on my blog. I am really honored! To me you are the Goddess of cards, LOL.
Gorgeous card Beate!! I love the non-traditional colors! Beautiful flower! Congrats on your upcoming class–very exciting!!
this is so pretty. love the colors and the tissue flower is beautiful. gorgeous holiday card, Beate!
so pretty and it doesn’t look like they would be too bulky!
Love this card girl and side and out.
Beate, a very beautiful, elegant card.
I’ve never seen that Nestbilitity.
hugs,
Brooke
WOW WOW WOW und noch so eine sagenhaft schöne Karte *umfall*
Liebe Grüße
von Anke