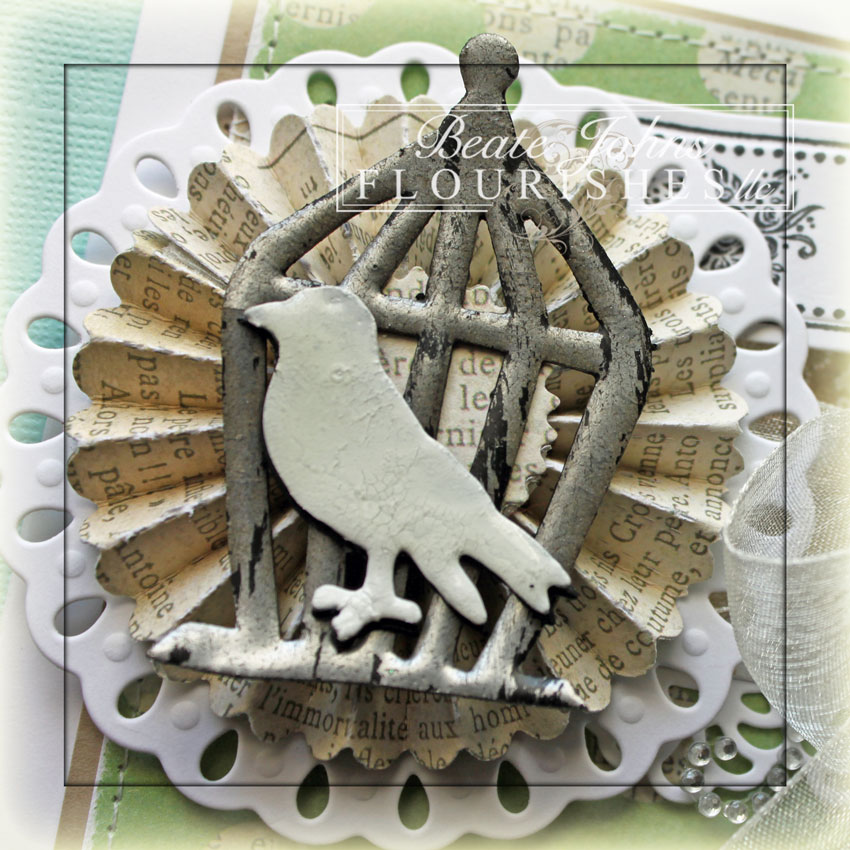
Today’s Timeless Tuesday challenge hostess is Maki. Her challenge is to use a Bird image and/or elements for your creation. I had recently seen the Faux Tarnished Metal technique on Shelly Hickox blog and wanted to try it out. I started by cutting Grunge paper with Tim’s Mini Bird & Cage set. I used the FauxTarnished Metal technique for the cage and the Crazed Porcellain technique on the bird.

I cut a strip of MME Lost & Found 2 Blush Patterned Paper with the Mini Paper Rosette Decorative Strip Die. The Rosette was adhered to a piece of Neenah Solar White cardstock, cut and embossed with a  Tear Drop Circle die and the bird and cage were adhered on top of the rosette.

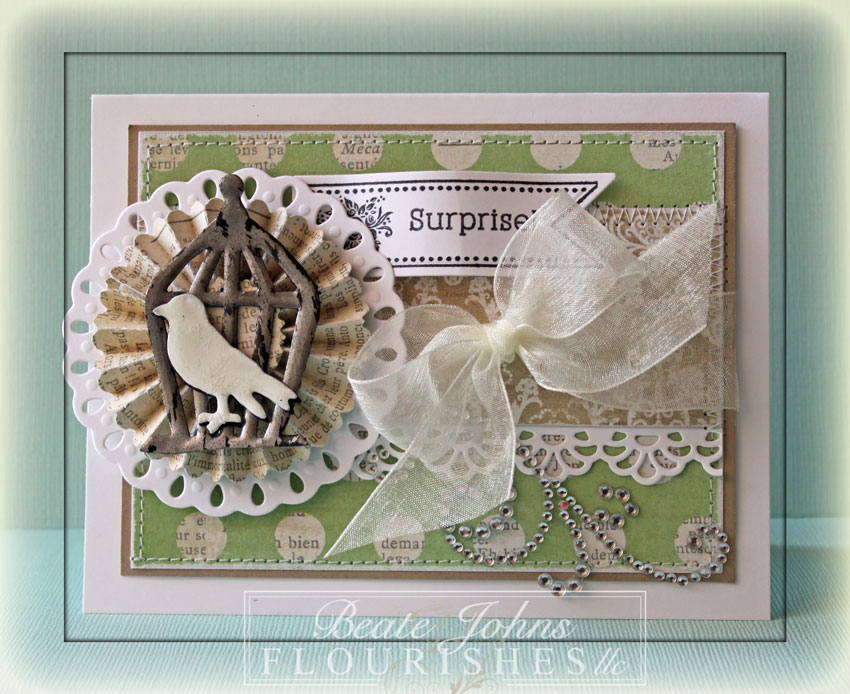
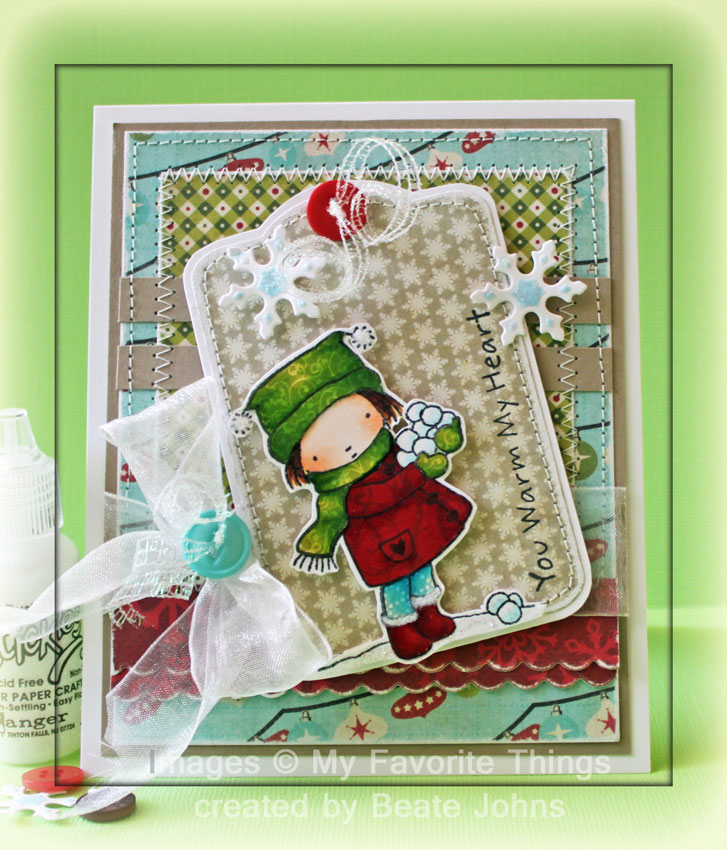
A 3 1/2″ x 4 3/4″ piece of Rosy Patterned paper was sanded and stitched to a 3/16″ bigger piece of Kraft cardstock. A 4 3/4″ long strip of white paper was cut with the Faux Crochet Dienamic die. A 2″ x 4 3/4″ strip of Rosy paper was sanded the Faux Crochet Strip was adhered under underneath the paper strip. The strip was adhered over the stitched layers and Ivory Organdy Ribbon was tied around the horizontal strip.

The layers were adhered to the card base, a 5 1/2″ x 8 1/2″ piece of Solar White cardstock, folded in half. The bird layers were adhered to the left hand side with dimensional. A pennant was cut and embossed with a Nested Pennant die and stamped with images from the Birthday Pennant stamp set. Part of a Finesse Rhinestone Swirl finish the card off.

Check out my fellow Timeless Tuesday Challenge Members for more inspiration:

Cindy Haffner
Heather Jensen
Maki Jones
Mona Pendleton
Silke Ledlow
and
February Guest Designer Tera Fujan

Thanks so much for stopping by! Have a wonderful day!
Hugs and smiles


I thought it would be nice to have a video for the Acetate Box Tutorial. It’s a great project to dress up Valentine’s treats.

The finished box measures 2″ wide, 2″ deep and 3 1/2″ wide. Because it’s so little, there isn’t much room to decorate. The patterned paper strip are from  Echo Park Little Girl Patterned Paper. One edge was cut with the Stampin’ Up! Scallloped Edge Punch.

A tiny tag was cut with MFT’s Notched Tag die out of Neenah Solar White cardstock. Two small hearts were cut with dies from the same stamp set/die combo out of Little Girl paper as well as red cardstock. The hearts were adhered to the tag and a sentiment was stamped on it with Tuxedo Black Memento ink. Silver curling ribbon was tied into a double bow and adhered on top of the tag.

Here is a video for the visual learner:
[youtube]https://www.youtube.com/watch?v=HCfWNFyfkRU[/youtube]

Thanks so much for stopping by! Have a wonderful day.
Hugs and smiles

Over the last few days in our Krafty Peeks, we have shared lots of FUN new stamps for you to get inky with! We’ve got something for everyone!! There is a fun new SET by Cheryl Alger for the little ladies in your life!! It’s called SUGAR AND SPICE! We also have TWO fantastic sets of VALENTINES from Emilie Goulet called LOTS OF LOVE 1 AND LOTS OF LOVE 2!!! And of course we have an amazing new set of six ALICE IN WONDERLAND stamp from Annie Rodrigue! PLUS we are also releasing a coordinating set of WONDERLAND SENTIMENTS!!

You will get to see most of the new images today as you sit back and enjoy our DECEMBER Krafty Hop! If you want to start from the beginning, just head over to the Kraftin’ Kimmie Challenge Blog! As you hop from blog to blog, be sure to leave a comment at each and every stop because some lucky stampers will win packages of these incredible stamps from the new release!! And when you’re done hoppin’, be sure to head over to the Kraftin’ Kimmie shop, because ALL the new images are NOW available!

And of course, as always, we have our Gimme Kimmies Kits available for those of you who ‘need it all’!! (You’ve been buying presents for everyone else all month long….don’t you think it’s time to reward your krafty self a little bit??!! ) The stamps are grouped together by artist and are available at a discount, but only for a limited time!!

For my card I used an image from Cheryl’s new Sugar and Spice stamp set. The girl was stamped in Tuxedo Black Memento ink on a piece of Neenah Solar White cardstock, cut and embossed with a Grand Square Nestabilities die and colored with Copic Markers (Skin: E000, E01, E11, BV00   Hair: YR24, E39, E29   Dress: Y13, Y15, Y17   Socks: YR15, YR18, R05   Cat: N0, N1, N3 ).Cloud Masks were added before the image was airbrushed with Copic Marker B02. Shading was added to the clouds with Copic Markers W00, W0, W1 and Diamond Stickles added a bit of sparkle to the dots on the headband.

For my layout I used the current sketch over at Magical Monday Challenge. I cut four 2 3/8″ patterned paper squares from My Mind’s Eye Stella & Rose Mabel Collection and stitched them to a 5″ square of white cardstock. White Organdy ribbon was tied around the layers and topped with a button that was tied on with iridescent curling Ribbon.

Brown Rhinestones and part of a Finesse Rhinestone swirl were used to tress up the card front. A sentiment from Sugar and Spice was stamped on a piece of white cardstock, cut and embossed with a Standard Circle Nestabilities die. The inside of the circle was colored with Copic Marker B0000. The layers were adhered to the card base, Sno Cone cardstock, cut and embossed with a Grand Scallop Square Nestabilities die.

The next stop on the blog hop is Diana. Thank you so much for stopping by! Have a wonderful day!
Hugs and smiles

Today’s Kraftin’ Kimmie Challenge is an easy sketch.

Today is also a sneak peek  day for a new set. These are from Annie and they are called Alice and Wonderland and Wonderland Sentiments.  For my sample I used the Doormouse image. I stamped the  mouse with Tuxedo Black Memento Ink on Neenah Solar White cardstock and cut and embossed it with a Standard Circle Nestabilities die.

The cup was paper pieced with a pattern from  MME Lost & Found  Madison Avenue paper and the image and patterned paper were colored with Copic Makers (Mouse: E41, E42, E43   Tea Cup: R00, R01, R02   Bow: R21, R43, R46 ). The circle was sponged with Antique Linen and Vintage Photo Distress ink and layered on a piece of Kraft cardstock, cut and embossed with the largest Tear Drop circle Nestabilities die.

A 4 1/2″ long strip of white cardstock was cut with the small scallop Die-namics die and adhered to a piece of Madison Avenue paper. Several different pattern from the same paper pack were adhered to a 4 1/2″ square of paper and stitched to a 1/8″ larger white square. May arts Organdy Ribbon was tied around the upper half and topped with a button, tied on with Linen Thread.

A sentiment from Wonderland Sentiments was stamped in Tuxedo Black on a piece of white cardstock, cut and embossed with a retired Spellbinders tag die. It was sponged with Vintage Photo Distress ink and adhered to the lower right of the image layers. The card front was adhered to the card base, a piece of Kraft cardstock, cut and embossed with a Grand Scallop Square Nestabilities.  Part of a Finesse Pearl swirl and additional pearls finish off the card.

Thanks so much for stopping by! I hope you have time to participate in the challenge. It’s a fun sketch!Have a wonderful day.
Hugs and smiles

I am excited to be a Guest Designer for Little Darlings new rubber stamp release. I stamped the image called Snowy Friends in Tuxedo Black Memento Ink on Neenah Solar White cardstock. It was cut and embossed with a Classic Circle Nestabilities die and colored with Copic Markers (Skin: E0000, E00, R20 Hair: E99, E37, E29 Pants: E42, E43, E44 Jacket: G0000, G00, G00 Shoes: R24, R27, R39 Hat: YR15, Y18, R24, R28 Snowman Scarf: G03, G05, G07 Snowman hat: C3, C5, C7, C9 Branch: E25, E29 Eyes: E99, E39, E27).

The image was masked and two cloud masks were added before the circle was airbrushed with Copic Marker B41. The bottom was covered with Polar White Flower Soft.   The bottom of the clouds were colored with Copic Markers (W00, W0, W1). The layer was adhered to a piece of Canyon Brown Cardstock, cut and embossed with a Big Scalloped Circle Nestabilities die.

A white paper strip was cut with MFT’s  new Icicle Border die. It was adhered under a 4″ square of Echo Park Holly Jolly Paper and a slim strip of white cardstock was adhered on top. The layers were stitched to a 4″ x 5 1/4″ piece of Holly Jolly paper. The bottom two corners were rounded and white organdy ribbon was tied around the horizontal layers before the image was adhered with dimensionals.

Two snowflakes were cut out of white cardstock with Whimsy Layered Snowflake die, stacked and topped with a brad, that had been colored with Copic Marker G02. The snowflake was adhered to the upper right edge of the layers, part of a Finesse Rhinestone Swirl to the top right.

Another snowflake was cut with the smallest of the MFT Snowflakes die-namic dies. It was adhered to the top of the bow with Glossy Accents. A Baby Bling Rhinestone was adhered in the center of the snowflake.

A sentiment from The Cats Pajama’s Bearing Flowers was stamped in Tuxedo Black ink on a piece of Neenah Solar White cardstock, cut and embossed with a Classic Circle Nestabilities die. It was airbrushed with Copic Marker B41 and adhered to the lower right  of the image.

If you like this image and the others from this release, check out the Little Darlings Challenge Blog. Participate in the challenge and you could win a $10 Gift certificate if you win and made a project without their stamps, or a $20 Gift certificate if you made a project with Little Darling stamps.

Thanks so much for stopping by! Have a wonderful day.
Hugs and smiles

Today’ is Julie Koerber’s birthday. Some of the Flourishes Design team members and friends have decided to create a blog hop to celebrate her! She is such a wonderful woman and an amazing designer. I love everything she creates.

For my birthday card I thought I use the hat image from Feminine Charms. I stamped it twice in Tuxedo Black Memento Ink on Neenah Solar White cardstock. One image was cut and embossed with a Classic Circle Nestabilities die, from the other I cut out the hat. The main image and the hat were colored with Copic Markers (Hat Stand: E21, E23, E25   Hat: R00, R20, R21, R22   Ribbon: E41, E42   Flower: Y11, Y15, Y17). The circle was sponged with Antique Linen and Vintage Photo Distress Ink.

The circle was stitched to a slightly bigger Kraft cardstock circle, that had been sponged with Vintage Distress ink. The cut out hat was adhered to the main image with dimensionals and Stardust Stickles was added over the white strip under the ribbon. The layers were adhered over a paper doily.

I used the layout from last weeks CPS sketch.  A 3 5/8″ x 4 3/4″ piece of MME Lost & Found Market Street paper was adhered to a 1/4″ bigger piece of Kraft cardstock.

A 3 7/8″ piece of white cardstock was cut with MFT’s Faux Crochet Border Die-namic die and adhered under a 7/8″ wide strip of Market street paper. That strip along with another 7/8″ wide strip of the same paper were adhered to the layers before the edges were stitched.

A small piece of the same paper used for the strips was cut and embossed with a Blossom Tags & Accent die. The embossed edges were sanded before it was adhered to the upper left edge of the layers. A button was tied over it with Linen Thread. The image layers were adhered to the layers with dimensionals before those were adhered to the card base, Solar White cardstock that had been  cut and embossed  with a Grand Label 23 Nestabilities die.

Another piece of Solar White cardstock were cut and embossed with a Petite Scallop Oval Nestabilities die. A sentiment from Feminine Charm Was stamped in it’s center with Tuxedo Black Ink and the inner part was sponged with Vintage Photo Distress Ink. The oval was adhered to the lower right of the hat image.

A piece of seam binding was colored with Copic Marker E23 before it was tied into a bow and topped with one yellow flower. The bow was adhered under the sentiment panel. Part of a Finesse Pearl Swirl on the top right finish off the card.

Please check out all the other birthday posts!

Thanks so much for stopping by! Please hop on over to Julie to wish her a happy birthday with us!
Have a wonderful day!
Hugs and smiles

Here is another card I made for one of the VSN challenge. I combined it with last weeks MFT sketch. For my card I picked the Pure Innocence set called Snow Day. I stamped the image in Tuxedo Black Memento Ink on Neenah Solar White cardstock as well as different patterned paper from Echo Parks Season’s Greetings. The image and clothes pieces were colored with Copic Markers (jacket/boots: R17, R29, R39   Hat: YG21, YG25, YG17   Pants: B000, B12, B14    Hair: Y23, E25, E29    Skin: E0000, E00, E01) cut out and assembled.

A piece of Season’s Greetings paper was cut with MFT’s Tag die-namic die. The edges were sanded before the paper was stitched to a piece of Solar White cardstock. A sentiment from Snow Day was stamped on the right edge in Tuxedo Black Ink. The paper pieced image was adhered to the tag with dimensionals. Sugar Sparkly Fluff was added to the pom poms of the hat and the rims of the boot. Stardust Stickles was added to the snowballs.

Two 4″ long strips of Season’s Greetings were cut with the Small Scalloped Border Die-namics die, sanded and adhered to a 4″ x 5″ piece of the same paper pack.  a 3 1/4″ wide patterend paper was adhered on top of the blue paper and two 3/8″ wide Kraft strips were adhered to the papers before they were stitched to a 1/4″ bigger piece of Kraft cardstock.

White Organdy Ribbon was tied above the red strips and topped with a blue button, which was tied on with iridescent curling ribbon. Before the tag was adhered to the layers with dimensionals, a button was tied to the top with more curling ribbon.

Solar White cardstock was cut and embossed with a Snowflake Borderabilities die. The snowflakes were airbrushed with Copic Marker B02. The snowflakes were adhered to the layers with dimensionals. The airbrushed parts of the snowflake were covered with Stardust Stickles. Everything was adhered to the card base a 4 1/2″ x 11″ piece of white cardstock, folded in half.

Thanks so much for stopping by! Have a wonderful day.
Hugs and smiles

Today’s challenge at Lala Land Crafts is to make your own paper or chipboard embellishments. For my card I chose Faerie Marci. I stamped her in Tuxedo Black Memento Ink on Neenah Solar White cardstock, colored with Copic Markers (Skin: E000, E00, E01, E11  Lips: R21, R22   Hair: E50, YR31,  E31, E33   Dress: R21, R22, R24   Emeralds: G03, G07   Wings: G000, G00, G02, C1, C2   Leggings: YR30, 1/5th YR31, YR31)  and cut her out.

I cut and embossed a frame with the Classic Frame die from Spellbinders out of textured Kraft cardstock and sponged with Vintage Photo Distress ink. It was adhered on top of Echo Park Victoria Garden Patterned paper, that had an edge stitched to it.  The fairy image was adhered inside the frame with dimensionals.

A 3 1/4″ x 4 1/4″ piece of Victoria Garden paper were adhered to a 5 1/2″ piece of the same paper pack. The layers were stitched to a 3/16″ bigger piece of Kraft cardstock. A strip of white cardstock was cut with MFT’s Faux Crochet Dienamic die and adhered to the bottom edge of the horizontal strip. A piece of tulle was cut into a strip and tied around the layers. A Paper bead was tied around the bow.

The layers were adhered to the card base, a 4 3/4″ x 12″ piece of Aqua Core’dinations cardstock folded in half. Two floral swirls were cut and embossed with a Floral Accent die out of Victoria Garden paper and sponged with Peeled Paint Distress ink.  They were used as petals for a Prima flower which was adhered to the lower left corner of the frame.

Stardust Stickles on the wings and Glossy Accents on the Emeralds finished off the card. My paper embellishments for the challenge are the frame and the leaves for the flower as well as the paper bead.

Thanks so much for stopping by! Have a wonderful day! Hugs and smiles


I was very excited when Irina asked me to be a guest designer for La-La Land Crafts this month.  I will be participating in their Inspiration Friday challenges. Today’s challenge was to incorporate tearing. I am not a big fan of tearing, but I thought torn paper could make some great waves for this darling Mermaid Marcie.

I stamped Marcie in Tuxedo Black Memento ink on X-Press It! Blending card, colored her with Copic Markers (Hair: E08, E09, E19    Skin: E000, E01, E11     Lips: R21, R22      Tail: G12, G14    Vest: Y13, Y15, Y17, YR12, YR15, YR18) and cut her out.

Neenah Solar White cardstock strips were torn and cut with a small Petite Oval Nestabilities die and airbrushed first with Copic Marker G00, then with B12. Another piece of Solar White was cut with the same die. Some Cloud masks (cut with the Cloud Die-namic die) were adhered to the oval and the oval was airbrushed with Copic Marker B12 to create the sky. The waves were adhered to the sky and Marcie was adhered between them. Diamond Stickles were added to the waves to add some sparkle.

A 4 1/4″ strip of Neenah Solar White cardstock was cut and embossed with a Floral Doily Accent die before it was adhered to a 1 3/4″ x 4 1/4″ strip of Echo Park Splash patterned paper. Seafoam Organdy Ribbon was tied around the layers were before they were adhered to the card base.

The sentiment is from Kimmie’s Mermaid sentiments. It was stamped in Tuxedo Black Memento ink on Neenah Solar White cardstock. It was cut and embossed with the smallest Petite Oval Nestabilities die and airbrushed with Copic Marker YR15.

The top corners were rounded with the corner chomper (LOVE that tool!!!) and the upper part of the card edge were paper pierced. Baby Bling Rhinestones from Want2Scrap finish off the card.

Now you all know how much I LOVE my Copics. If you don’t have any yet, or not that many, head on over to the La-La Land Crafts blog. Irina is celebrating the first birthday of Marcie and Luka with a contest where you can win a 36 set of Copic Sketch Markers.

All you have to do is create a birthday card with either a Marci or Luka stamp, upload the card and add a link to the La-La Land Craft blog post. You have until the end of the month to do so. And if you don’t have any Marcie stamps….it might be the perfect time to purchase one. They are a blast to color.

Thanks so much for stopping by! Have a wonderful day!
Hugs and smiles

Here is another sample I am showing at CHA.

The image is from from MFT’s Pure Innocence Blooming Good Day. It was stamped in Tuxedo Black Memento Ink on Neenah Solar White and once more on Echo Park Playground paper. The image on white cardstock was cut and embossed with a Classic Circle Nestabilities die. The image was colored with Copic Markers (Hair: Y23, E33, E37   Red: R08, R27, R29   Flower: Y13, Y15, Y17, E99, E29   Grass: YG01, YG03, YG17    Skin: E50, E51, E53) The dress of the second image was colored for a bit of shading with Copic Markers (YR00, YR12, YR15) , cut out and adhered to the main image.

The image was masked, a few clouds were cut with the Cloud Dienamic dies out of Eclipse tape, adhered to the circle and airbrushed Copic Marker B02. The circle was adhered to a piece of black cardstock, cut and embossed with one of the Jumbo Scallop Circle Nestabilities die. The edge of the circle was paper pierced.

The card base was cut and embossed with a Grand Label 11 Nestabilities die out of Neenah Solar White cardstock. Echo Park Springtime and Playground paper were cut with the next smaller size. Before they were adhered to the card base May Arts Organdy ribbon was tied the horizontal strip.

The sentiment was stamped on a piece of white cardstock, cut and embossed with a Circle Nestabilities die. The center of the embossed circle was colored with Copic Marker B0000. The sentiment panel was adhered to the upper right edge of the image with dimensionals. Silver Kaisercraft Rhinestones underneath the sentiment finish off the card.

Thanks so much for stopping by! Have a wonderful day.
Hugs and smiles

© 2012 fresh & fun Suffusion theme by Sayontan Sinha