I am excited to be joining in the Gina K. Designs Design Team December Inspiration Blog Hop! Gina and the Design Team will inspire you with many beautiful ideas, and as you hop through their blogs, make sure to leave a comment on each of them because a few random comments will be chosen and those stampers will each win a grab bag of Gina K. Designs products! To see the full list of winners, check the Big News forum at Stamp TV a couple of days after the hops.

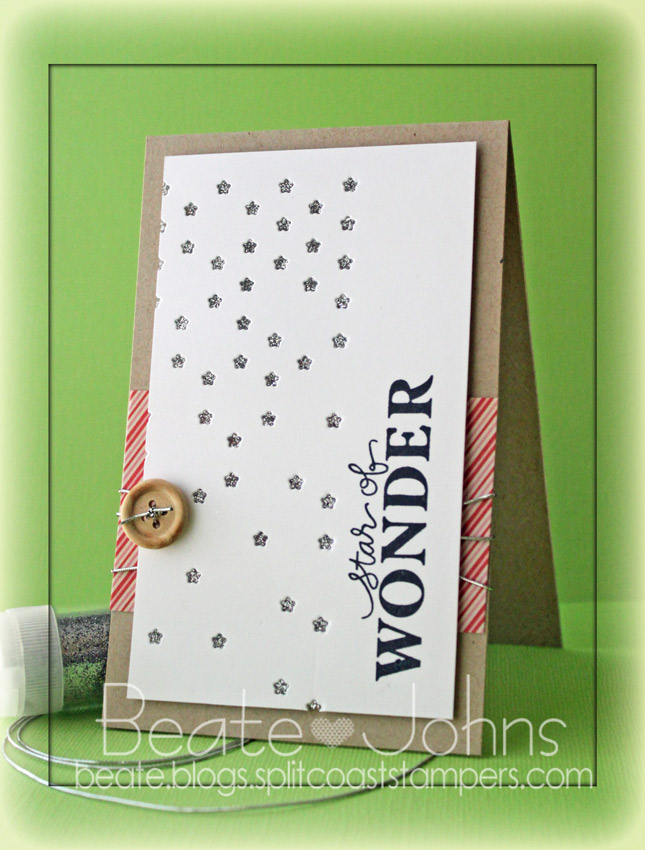
The new Melanie Muenchinger set called Lots of Letters  is just perfect for my new love of Clean and simple cards. It  is available in both clear photopolymer and red rubber.

This is the first letter and number set from Gina K. Designs and is packed with frames and elements that will help your stamped cards, pages or personalized designs shine!   Gina K. also carries matching Silhouette Studio cut files for only 99 cents each which make creating beautiful and professional cut designs with these stamps a breeze. The square and circles images are also perfect for your dies and punches, fitting perfectly in a ¾” or larger die or punch.

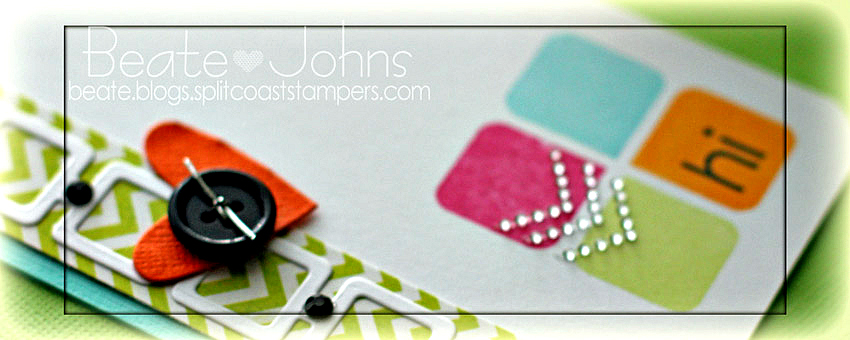
I created this card not just for Melanie’s blog hop, but also as an entry for the Keen on Neon Moxie Fab World Challenge.  I started with a 3″ x 5″ piece of white cardstock. The bottom right corner was rounded before I stamped the square stamp with the one rounded edge  four times in the right corner  (once in Mango Madness VersaMagic ink, once in Key Lime VersaMagic ink, once in Sea Breeze VersaMagic and once in Rose Bud Memento Ink). Hi was stamped in the orange square with Tuxedo Black Memento Ink.


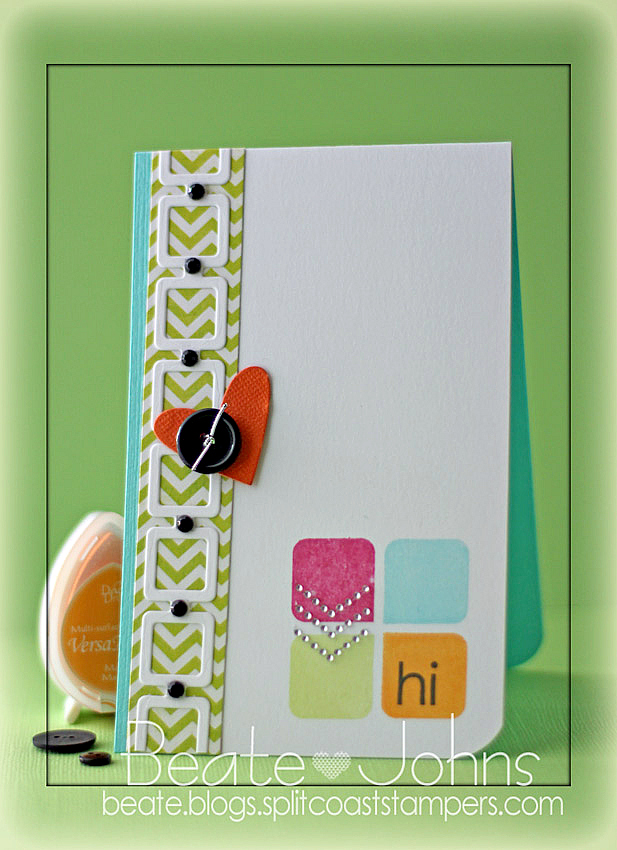
More white cardstock was cut and embossed with MFT’s Retro Squares Die-namic die and adhered over a thin strip of MME Life of the Party patterned paper (old pack…I wish I had more. Love the funky colors). The white cardstock piece was adhered to the right hand side of the  card base, a 3 1/2″ x 11″ piece of Patina Fourz Bazzill cardstock, folded in half. The retro square strip was adhered to the left hand side, leaving only about 1/4″ of the Patina base showing.

A heart was cut out of orange Core’dinations cardstock with the smallest heart from Hearts a Plenty Die-namics die. It was topped with a button that was tied on with silver cord. The heart was adhered slightly above the center of the retro squares strip. Black rhinestones were added to the square strip and silver chevron rhinestones to the colorful stamped squares to finish off the card.

Please see Melanie’s blog for the full link list of blog hop participants! Also, if you come back tomorrow, you will see another card created with the Lots of Letter sets and with leftovers from what I used (or tried to use) on this car).  And this afternoon, I am posting some super exciting Splitcoaststampers news here! I am tickled pink about this!

Thanks so much for stopping by! Have a wonderful day!
Hugs and smiles

I am the hostess for the new Crafty Friends Challenge. Since I have been on a CAS card kick lately, I thought it would be fun if that was my challenge to do. Create a clean and simple card.

I created my card a while ago for a Featured Stamper Challenge on Splitcoaststampers. I started with a 3 1/2″ x 11″ piece of Neenah Solar White cardstock, folded in half. The top right and bottom left corners were rounded and the background stamp from Simon Says Stamp exclusive Music 2 My Ears stamp set was stamped on the left hand side in Key Lime VersaMagic Ink.

More white cardstock was cut with one of the Holiday Labels dies. Two of the Hexagons were stamped with the snowflake hexagon from the Holiday Labels stamp set in Turquoise Gem VersaMagic Ink, on with the Hexagon outline stamp. The hexagons were adhered over the stamped background. A snowflake was cut out of white cardstock with the Faceted Snowflake die, topped with a button that was tied on with silver cord and adhered to the empty hexagon.

Blue Calipso Fourz Bazzill cardstock was cut with the Snowflake Bracket die and adhered to the right hand side next to the Hexagons. A sentiment from the Holiday Label set was stamped in Ocean Depth VersaMagic ink to the lower left corner. Rhinestones from a Sleek Strips Silver Rhinestone pack finish off the card.

Check out my fellow Crafty Friends for more  inspiration:

    Thanks so much for looking! I hope you have time to join us in the challenge. It’s easy and fun! Come back Monday and Tuesday for more CAS inspiration!!!  Have a wonderful week!
    Hugs and smiles


I have another Clean and Simple card to share with you that is mostly made with supplies from the new Simon Says Stamp December card kit. I created the card for the current CAS(E) this sketch challenge. I will also enter it into the current Simon Says Stamp Challenge, because the current one is anything goes! One lucky entry will win a $50 shopping spree!!!

I started by cutting two red papers of Pink Paislee Sidewalks patterned paper (included in kit) in 2″ wide strips. The bottom was cut with one of MFT’s Fishtail Flags Die-namics die and the center was cut with Simon Says Stamp Air Vent die. Sea Salt Bazzill cardstock (included in kit) was adhered behind the vent and a 1/4″ strip of white cardstock was adhered above. A white button was tied on to the side of that paper strip with Beetle Black twine.


A 2 1/2″ long strip of Sea Salt cardstock was cut with MFT’s small scalloped border die and adhered to the top right of the strip. Rhinestones from a Sleek Strip Silver Rhinestones pack were adhered next to each scallop. The banner strip was adhered to the card base, 3 1/2″ x 11″ piece of green Bazzill cardstock (included in kit), folded in half. The bottom corners were rounded.

A sentiment from Merry Everything (included in kit) was stamped in Tuxedo Black Memento Ink on a piece of Neenah Solar White cardstock that had been cut with a small folded  Banner die.  It was adhered slightly off center underneath the vent die cut. A tiny rhinestone was adhered as the dot over the i and three rhinestones from the Sleek strip pack were adhered on the bottom right corner to finish off the card.

Thanks so much for stopping by! Have a wonderful day!
Hugs and smiles

I recently got the new Simon Says Stamp December card kit in the mail and couldn’t wait to play with it. I had missed the deadline of the latest CAS(E) this sketch, but I wanted to create a card with it anyway. It definitely works for the current Simon Says Stamp Challenge, because the current one is anything goes! You could win a $50 shopping spree if you enter!!! And with me being broke because I ordered a new camera, 2 lenses, wireless memory card and kids presents on Black Friday, that would be wonderful!

I started by cutting the right side of a 3″ x 5″ piece of white cardstock (from kit) with the Simon Says Falling Stars die. Packing tape was adhered behind the stars and Sterling Glitter was rubbed over it.  A sentiment from Merry Everything stamp set (included in kit) was stamped in Tuxedo Black Memento Ink on the right side of the cardstock piece.

The card base is a 3 1/2″ x 11″ piece of Neenah Desert Storm cardstock (included in kit) folded in half. A 2″ x 3 1/2″ piece of Pink Paislee Sidewalk patterned paper (included in kit) was taped to the lower half of the card base and silver cord was tied around the card base. A wooden button (included in the kit) was adhered to the left hand side of the white layer to finish off the card.

Thanks so much for stopping by! Have a wonderful day! I know mine will be! My new camera is scheduled to arrive today!!!
Hugs and smiles

Today’s tutorial on Splitcoaststampers was created by the wonderful Shelly Hickox. She shows us how to use die cuts and turn them into 3d images. What a great idea! I had to try it out right away. Her sample is vintage prefection, so I tried to go a different route and see if it would work for a different style as well.

I used the elephant die from My Favorite Things Circus Spectacular and cut it 7 times out of light-weight coasters. The elephants were cut down adhered to each other with Beacon 3 in 1 Craft Glue. Once it was dry it small pieces of dictionary page pieces were adhered to the elephant with Glue N’ Seal. Once it was dry, Pearl Acrylic paint was added over it.

A frame was cut twice out of light weight coasters with the Vintage Cameo die. A piece of Fancy Pants The Good Life patterned paper was cut with the same die, adhered to the frame. The edges were painted with Acrylic Pearl Paint. Another piece of The Good life paper was adhered behind the frame and the elephant was adhered in the middle.

The card base was cut out of Neenah Solar White cardstock with the largest Stax Jumbo Fishtail Banners. More The Good Life paper was cut with the same die, sanded and cut down. The edges were stitched, Beetle Black doodlebug twine was tied around the layer before it was adhered to the card base.

A sentiment from Circus Spectacular was stamped on more The Good Life paper with Tuxedo Black Memento Ink. It was cut out and layered on Solar White cardstock, cut and embossed with the Ticket Strip Die-namics die. It was adhered on the left side of the frame and topped with a button to finish off the card.

Thanks so much for stopping by! I hope you have time to check out Shelly’s amazing tutorial and sample.
Hugs and smiles

I created this card for the wonderful Bev Rousch’s Hope You Can Cling to Challenge “Shine It Out!” back in October. I was cyber stamping with Tami Mayberry a little while ago and we created cards fro the same challenges. I thought it was only right to use one of her stamp sets for my sample.

Just before that, I had found a new challenge blog with a wonderful sketch and I wanted to use that for my card. My card base is very basic, a 4 1/4″ x 11″ piece of Neenah Solar White cardstock, folded in half. The bottom corners were rounded.

I started by inking the heart from Hopeful Hearts first with Versamark ink, then with Memento’s Rosebud ink. It was then embossed with iridescent Ice Embossing powder to add sparkle. Next I stamped the solid circle from GKD Inspiration Mosaic in Pear Tart Memento Ink 3 1/2 times on the left and once on the right of the heart. A sentiment from Hopeful Hearts was stamped over the circles on the left in Jet Black Archival ink.

I scored one line under the shapes and two lines above. Beautiful Bling Border – Beautiful Bloom was added above the top score line. 5 Rhinestones from a Sleek Strips Silver Rhinestones were adhered to the bottom right and one above an i in the sentiment to finish off the card.

Thanks so much for stopping by!
Hugs and smiles


I created this card a few weeks ago for a CASE study challenge.  For this one I paired 3/4″ x 3 1/4″ wide strips of different colored blue Bazzill cardstock were adhered to a slightly bigger white base. Clouds were cut out with Flat Bottom Cloud Die-namic dies.

The layer was adhered to the card base, a 3 1/2″ x 11″ piece of Neenah Solar White cardstock, folded in half. The bottom corners were rounded. A sentiment from Simon Says Stamps On Edge stamp set was stamped underneath the colored cardstock layers in Tuxedo Black Memento Ink.

White cardstock was cut with the Simon Says Stamp die Always and adhered right on the edge of the colored cardstock edge.  Black Doodlebug Twine was tied right under that edge and topped with a button. Faux Stitching was added to the colored cardstock with a white gel pen. Three rhinestones from a Sleek Strips Silver Rhinestones finish off the card.

Thanks so much for stopping by! Have a wonderful day.
Hugs and smiles


Hello and welcome to Day four of Whimsy Stamps November Rubber & Die Release Showcase!

On Wednesday (21 November) Whimsy Stamps released this month’s new rubber designs, Shapeology dies, Whimsy Designer Paper packs, Shape EZ templates and *new* Whimsy Prints pre-coloured toppers. From then until 27 November the Whimsy Stamps DT and Special Guests are showcasing these fabulous new goodies with a daily mini blog hop and I am part of today’s hop!

Each mini blog hop has a new release prize hidden somewhere along the way and you have 24hrs to enter each prize draw.

To be entered into today’s mini blog hop prize draw, be sure to leave a comment on ALL of the DT’s posts listed below by 12.00PM EST tomorrow. All winners will be announced on the Whimsy blog on 28 November.

For my card today I used the new Wee image Berry. It was stamped in Tuxedo Black Memento Ink on Neenah Solar White cardstock that had been cut and embossed with the second largest Spellbinders™ Label Twenty-Five Nestabilities® die and colored with Copic Markers (coat: BG11, BG13, BG15, BG18   coat/boots/scarf: E41, E42, E43, E44   Scarf/Berries: R32, R35, R39   Holly Leaves: G40, G43, G46   Skin: E50, E21, E34    Hair: Y21, Y23, E33   Cat: T0, T1, T3, T5, R20   Ground: BG10, BG11, T0, T1    Background: C0, C1, BV00o0). White Opal Liquid Pearl spots were added to the background, Stardust Glitter over the ground.

A 2″ x 3 1/4″ strip of  Whimsy Winter Blues paper were adhered over a 3 1/4″ x 5 1/4″ piece of the same paper pack. The bottom corners were rounded and the edges were sanded and stitched. May Arts white organdy ribbon was tied around the horizontal strip was tied around the paper before it was adhered to the card base, 3 1/2″ x 11″ solar white cardstock, folded in half. The ribbon was topped with a white button, tied on with silver cord.

A sentiment from Snowflake Mini Letter Seals was stamped in Tuxedo Black ink on white cardstock and cut and embossed with a Standard Circle Nestabilities die. The center was colored with Copic Marker BG10 and BG11. The image was adhered to the card base with foam adhesive squares, the sentiment was adhered to the upper right of the image. A rhinestone from a Sleek Strips Silver Rhinestones was added in the center of the snowflake and Stardust Stickles was placed over the colored part of the sentiment panel. Part of a Fancy That! Border Bling on the bottom right corner finishes off the card.

To take a peek at today’s fabulous new release creations, please click on the links below…

Bev RochesterSpecial Guest
Erin Bailey
Heidy
Simonne
Tammy Louise

Remember that the entire new release is available to buy right now from the Whimsy Stamps store along with all your Whimsy favorites.

Thank you so much for stopping by! Have a wonderful day!
Hugs and smiles

If you would like to join Whimsy Stamps as their Guest Designer for the January 2013 release, please CLICK HERE for all the details. Entries close at 12.00pm on 28 November.

I have a new video to share with you on the Spellbinders Paper Arts blog today.  I love the reindeer image from Frosty Forms Spellbinders™ Shapeabilities® and used it along with a Label Twenty-Eight Spellbinders™ Nestabilities® die to create my tag.

I hope you have time to check out the entire tag and video, especially about the video. I bought a new tripod (since my plastic one was a little fragile for the new arm) and Tripod extender arm to create videos that are filmed directly above my hands. I love how much better it looks. Let me know what you think.

Thanks so much for looking! Have a wonderful weekend!
Hugs and smiles

I get to share another card on the Spellbinders Blog today. It showcases the new Shapeabilities® Die D-Lites™ Whimsical Tree. I hope you have time to check out the entire post.

Since last week’s little die give-away went so well, let’s do it again. I still have the Create-a-Flake Two die set. If you go to the Spellbinders blog and leave a comment, come back here and leave one on this post and let me know. That will enter you in the raffle for the Create-a-Flake Two die set. I will pick a winner on Friday with the help of random.org. Make sure to check back to see if you won.

Thanks so much for stopping by! Have a wonderful day!
Hugs and smiles


© 2012 fresh & fun Suffusion theme by Sayontan Sinha