It’s time for another Craft Friends Challenge. This time it’s all about Glitz and Glam. Add some sparkles to your project, anyway you like.

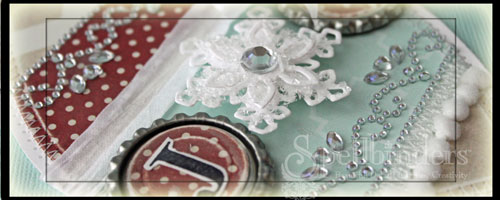
For my sample I created a CAS Christmas card. I started with a 3 1/2″ x 11″ piece of Neenah Solar White cardstock. The paper was folded in half and the bottom corners were rounded.  Two pieces of  Carta Bella Christmas Day Paper were adhered to the lower half of the card. A window was cut with the largest of the Standard Circle  (SM) Nestabilities dies at the right edge of the card. Acetate was adhered behind the card front and the edges of the window were stitched.

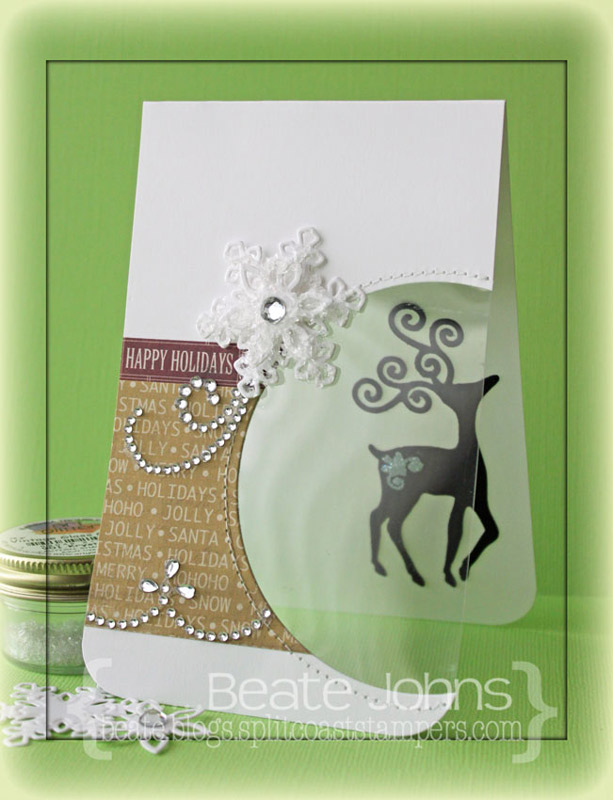
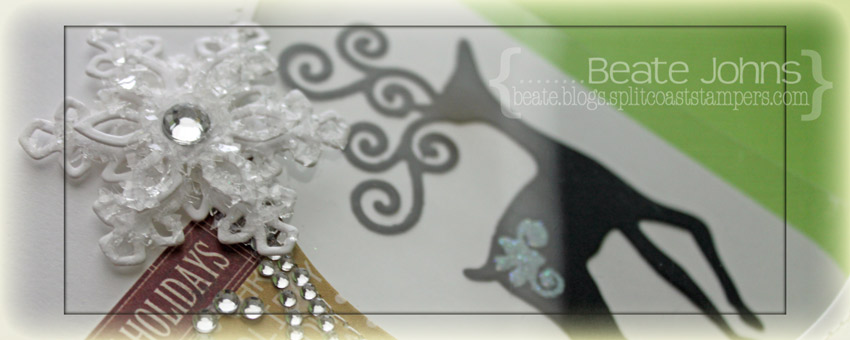
A piece of black cardstock was cut and embossed with the reindeer die from the new Frosty Forms die set from Spellbinders. Moonlight Brilliance ink was used on the embossed piece on it’s back and it was embossed with iridescent ice embossing powder. The reindeer was adhered on the inside of the card on the right, so it could be seen through the partical circle window.

A layered snowflake was created by cutting and embossing Solar White cardstock with the two smallest Create-a-Flake 4 dies. The smaller one was adhered to the bigger one with foam adhesive squares. A rhinestone was added in the center of the smaller snowflake and the rest of both snowflakes was covered with Glossy Accents. Vintage Glass Glitter Shards was added over the snowflake and it was adhered to the upper left side of the circle window. Part of a Fancy Waves! Border Bling was adhered to the lower edge of the patterned paper. Part of a Finesse Rhinestone swirl under the snowflake finish off the card.

Check out my fellow Crafty Friends for more Glitz & Glam inspiration:

I created this card for last week’s Featured Stamper challenge. I loved this layout from Cheryl’s card and decided to use it and just change it a tiny bit. I changed the colors, the direction of the stitching and made it a Christmas card.

I was too lazy to cut and emboss 9 circles with my Circle Nestabilities, so I used my 1 1/4″ circle punch to cut circles out of Carta Bella’s Merry & Bright patterned paper. They were adhered to the top of a 4 1/8″ x 5 1/4″ piece of Patina Bazzill Cardstock.  Two lines were scored at the 4 1/8″ and 4 3/8″ with my Scor-Buddy. Lines were stitched diagonally through the circles and the bottom corners were rounded.


A sentiment from Taylored  Expressions Very Merry stamp set was stamped on the bottom right corner of the cardstock with Jet Black Archival ink. The layer was adhered to the card base, a 4 1/4″ x 11″ piece of Neenah Solar White cardstock, folded in half.  White cardstock was cut and embossed with two small Create a Flake 4 Spellbinders dies. They were adhered together with more foam adhesive square. A rhinestone was added to the center of the flake. It was adhered to the lower left circle. More rhinestones from a Sleek Strips Silver Rhinestones were adhered in the center of each circle and to the left of the sentiment to finish off the card.

Thanks so much for stopping by! Have a wonderful weekend!
Hugs and smiles

Good morning and welcome to a very special blog hop!  I am excited to announce my participation and publication in the new Copic Coloring Guide, Level 3: People!

Authors Colleen Schaan and Marianne Walker have partnered up again with the team at Annie’s and some of the most talented artists and designers in the industry to bring you a quality publication packed full of techniques, theory, tutorials, and inspiration.  The 64-page book is the next step in the Coloring Guide series, offering information and educational material for crafters of all skill levels.

From the how and why behind picking colors and coloring skin to the tips and techniques for coloring hair to the helpful hints on how to create realistic looking clothing and fabric, this book presents information in an easy-to-follow format.

An included CD contains all of the hand-drawn images used in the tutorial section of the book, along with the assembly instructions for all of the projects, and a number of blank reference charts.

Each participating designer is hopping today to give you a peak at their favorite project from the book – and a chance to WIN your own autographed copy!
I have two cards in the book, one of them showcased here created with a darling Saturated Canary image, the other one with a darling Whimsy image.
To help kick off the celebration of the new book… each designer on the hop is giving away an autographed copy of the book…signed not only by Colleen and Marianne, but by the individual designer too!  Please comment on this post for your chance to win your copy of mine!  Commenting will be closed at midnight on Friday, October 26th. Winners will be announced on the individual designer’s blog.
Can’t wait for your copy?

Copic Coloring Guide Level 3: People is now available at many stamping and scrapbooking stores. Visit your local store today and ask about availability.  It is also sold through the Annie’s catalog, accessible online at Annie’s.

Thanks so much for stopping by! Good luck on winning a copy of that book! Have a wonderful weekend!
Hugs and smiles

Welcome to the monthly NinaB Designs team blog hop. NinaB Designs is a product designer for a few paper crafting companies including Spellbinders, Want2Scrap and Penny Black, and The Craft’s Meow.

For this month’s hop, Nina challenged the team to create an ornament or tags, which will come in handy in the upcoming holidays.

I created a little tag card that worked great for the Free For All Challenge on Friday, which was to use a negative die cut shape.  I started with a 2 3/4″ x 4″ piece of Kraft cardstock. The top corners were rounded and the Christmas Tree from Sweet Folk Art was cut and embossed in it’s center. Next a background strip from GinaK Designs Vintage Borders was stamped over it with Brilliance Moonlight White ink and the edges were sponged with the same ink.

A slightly smaller piece of Carta Bella Merry & Bright patterned paper was adhered behind the kraft cardstock. The tree kraft die cut was used as a template to add a pierced border on the patterned paper. The edges of the stitched and a piece of white pompom ribbon was adhered to the bottom. Gingham ribbon was taped behind the Kraft cardstock before it was adhered to the card base, a 3″ x 8 1/2″ piece of Neenah Solar White cardstock, folded in half with it’s top corners rounded.

A sentiment from Winter Mittens was stamped in Jet Black Archival ink and cut and embossed with an insert die from theFancy Framed Tag One dies. The sentiment panel was adhered to the card with foam adhesive squares. Yellow cardstock was cut and embossed with the small star die from Sweet Folk Art. It was adhered to the top of the tree. Parts of a Finesse Rhinestone swirl were added to the tree and one rhinestone from aSleek Strips Silver Rhinestoneswas added to the center of the star to finish off the tag card.

The NinaB Designs team is giving away these TWO PRIZE PACKAGES:

Prize #2 includes 2 retired sets from Layers of Colors stamps:
Christmas Verses 

Beautiful Lace

Winners will be picked randomly from 2 of the designers’ blogs:
Everybody is welcome to comment and be eligible to win. The winners will be announced on  October 22 on Nina’s Blog, where you will also find all the relevant info regarding the giveaways.Finally, please consider liking the following Facebook pages that are represented on today’s hop, so you don’t miss the latest news and happenings:

Penny Black Inc.
Thank you for stopping by! Have a wonderful day!
Hugs and smiles


I created this card for a color and sketch challenge on Splitcoast. I also wanted to try out the Eggshell Mosaic Background that was published  a few weeks back.

My heart started as a piece of Neenah Solar White cardstock, cut with a Classic Heart Nestabilities die. I adhered egg shells with Multi Medium Matte Glue.  Once the glue dried, I sprayed the shells with Perfect Pearls Glimmer Mist and added Alcohol Inks (Butterscotch, Sunset Orange, Wild Plum and Pool). More Perfect Pearls was sprayed and then the heart was set aside. Once it dried, another layer of Multi Medium glue was added, this time the glossy kind.

The card base is a 3 1/2″ x 11″ piece of Solar White cardstock, folded in half. The bottom corners were rounded. Marigold Tattered Angels Mist was sprayed in the center of the card front. Next a background script from My Favorite Things First Class Friend was stamped in Dandelion Memento Ink.

One of the little circle images was stamped in Jet Black Archival ink on white cardstock and punched out with a 3/4″ circle punch.  The wavy part of the post mark was stamped on the left side of the card. The heart was adhered to the right hand side , the circle sentiment placed so hangs slightly off the left of the card, right over the postmark wave.

First class was stamped in Jet Black on white cardstock and cut out. Friend is part of a sentiment and was stamped to the left side. The First class was adhered slightly over it. A paper pierced row on the right next to the heart finish off the card.

Thanks so much for stopping by! Have a wonderful day!
Hugs and smiles

I am exciting to have a couple of cards to share with you on the Simon Says Stamp Blog. I have been purchasing and linking to the store for several years now. I LOVE their huge selection of product and their customer service. For a few month now they have monthly card making kits with Simon Says Stamps exclusive stamps and dies.

The first card was the card I made for Rick for our 19th wedding anniversary. I loved the colors in this kit and how it works for masculine cards.

The second card was created for last week’s Technique Lover Challenge on Splitcoaststampers. We were to use paper weaving on our projects. I love how the papers look together.

I hope you have time to check out the entire cards on the Simon Says Stamp Blog!  If you do, you may win a  prize pack worth over $25!!! Have a wonderful day!
Hugs and smiles

It’s time to post on the Spellbinders blog today. This week’s theme is to show you “Things you can do with the Grand Calibur”. For me it’s mostly cutting paper and cardstock, but today I pulled out bottle caps that had been in my stash for quite a while and used them as part of a Christmas Ornament.

I hope you  have time to check out the entire ornament and the step by step instructions on the Spellbinders Blog. Thanks so much for stopping by! Have a wonderful day.
Hugs and smiles

I created this card for a Free For all Challenge on Splitcoaststampers. We were to create a card with fall leaves. I had seen so many negative die cuts on Pinterest and love the look. I decided to create a card like that for this challenge.

A piece of 3 1/2″ x 4 3/4″ piece of Neenah Solar White cardstock and cut and embossed with one of the Spellbinders Foliage dies. A piece of BBP All Hallow’s Eve patterned paper was adhered behind it before the layers were stitched to a 3/16″ bigger piece of Kraft cardstock.

A sentiment from JustRite Stamper’s Antique Autumn Tags One was stamped in Jet Black Archival Ink to the lower left of the layers. A button was tied on with Linen Thread before the layers were adhered to the card base, a 4 1/4″ x 11″ piece of Solar White cardstock, folded in half. Three black Rhinestones were adhered to the top right to finish off the card.

Thanks so much for stopping by! Have a wonderful day!
Hugs and smiles

The new Crafty Friends Challenge is super easy. Charmaine is the hostess and she is asking you to incorporate dry embossing into your project. I combined the challenge with yesterday’s Hope You Can Cling to Challenge.

I started out by embossing a 3″ x 5″ piece of Neenah Solar White cardstock with the Simplicity M-Bossabilities folder. The bottom right and top left corners were rounded. The layer was stitched to a 3/16″ bigger piece of black cardstock, before it was adhered with foam adhesive squares to the card base, a 3 1/2″ x 11″ piece of textured Kraft cardstock, folded in half.

Three butterflies were cut out of My Mind’s Eye Honey patterned paper, topped with rhinestones from a Sleek Strips Silver Rhinestones. Another piece of Honey paper was cut and embossed with a Spellbinders Nested Pennants die. The edges were sanded and stamped with a sentiment of MFT’s Thanks a Bunch Stamp set in Jet Black Archival ink.

A flourish was cut out of black cardstock , adhered to the left hand side of the Pennant sentiment strip and topped with a yellow button.

Check out my fellow Crafty Friends for more Halloween inspiration:


Thanks so much for looking! I hope you have time to join us in the challenge. It’s easy and fun! Have a wonderful week!
Hugs and smiles

It’s Friday that means it’s Friends with Flair time at the Unity Blog.  I thought I share a card I made during the last VSN. This one was for Lori’s Glitter Window Challenge. I stamped the cute snow man family image from the Stamp of the week club Just Chillin’ stamp set  in  Tuxedo Black Memento Ink on Neenah Solar White cardstock. It was colored with Copic Markers (YG01, YG03, YG17, R05, R27, R39, BG70, Bg72, BG75, C00, C1, C3, BG0000, BG10) and cut and embossed with one of the Resplendent Rectangles Nestabilities die.

After cutting a frame out of Kraft cardstock with the same and the next size up Resplendent Rectangle dies, I realized that the regular glitter window technique wouldn’t work so well for these shapes. So instead I ran the image layer face down through my Xyron machine and rubbed loose glitter all over.  The frame and the image layer were adhered on another piece of Solar White cardstock and cut down to the size of the Kraft cardstock layer.

The card base was created out of a 9 1/2″ x 6″ piece of white cardstock, folded in half with the edges rounded.  the card front was covered with My Mind’s Eye Winter Wonderland paper patterned paper. White organdy Ribbon was tied around the layers and the bow was topped with a button tied on with embroidery thread.

The image was adhered over the card front with foam adhesive squares. The sentiment was stamped in Tuxedo Black ink on white cardstock, cut out and adhered to the lower right of the image. The lower part of the sentiment panel was colored with Copic Marker BG10 and topped with Stardust Stickles.

White cardstock was cut and embossed with two small Create a Flake 4 Spellbinders dies. They were adhered together with more foam adhesive square. A rhinestone was added to the center of the flake. It was then covered with Glossy Accents and Vintage Glass Glitter Shards were sprinkled over it. The snowflake was adhered to the top left of the image to finish off the card.

Thanks so much for stopping by! Have a wonderful weekend!
Hugs and smiles

© 2012 fresh & fun Suffusion theme by Sayontan Sinha