I am sorry I was super quiet this weekend. I fun weekend filled with my favorite things: friends, family, good movie, great food and beach!

Saturday was girls day! Two friends and I first went to the movies (Maid of Honor! Great girl flick) and to P.F. Changs. Sunday mornings are always blocked out for work on the SCS newsletter. In the afternoon I took Lucas and Rebecca to the beach! The waves were awesome. Perfect for boogy boarding.  We had a great time.

unity-gratitude-joy-gift.jpg

Here is a gift card holder I made out of a Wild Wasabi carousel Note.

I made it as a variation for the Trifold Pocket card tutorial.

I scored the Carousel Note at 1 3/4″ on the left and right of the round Note card.

Then I scored 2″ on the bottom, and cut the two outer panels off.

I stamped a leaf from the Unity Stamp set Graditude = Joy on the outside flaps, sponged the edges and used my Crop-a-dile to add holes in each scallop.

For the sentiment panel I inked up the stamp with Creamy Caramel, Bravo Burgundy (shading) and Wild Wasabi ink. The sentiment is stamped in Bravo Burgundy. The Vanilla cardstock was punched out with the 1 3/8″ circle punch and layered on a sponged Bravo Burgundy scallop circle.

The speckles were added with the Burgundy Marker and the Color Spritz Tool.

Today’s tutorial on Splitcoast is another oldie, but goodie: Gate Fold Card. I used a stamp from the stamp set Butterfly Beauty from Unity Stamp Company.

s unitystampsgatefolddragonfl.jpg

I promise to use Stampin’ Up! stamps again on my next card.

I have been a bit sidetracked since those Unity stamps are on my stamp table in a little wicker basket. They will go in big SU clear cases, as soon as I receive them. They are already ordered.

I am sorry to say that I forgot to write down which Copics I used.

The Wasabi panels were stamped with the Tea Time Pattern background in Chocolate Chip and the edges were sponged.

The main image was stamped in Brown Palette Ink on an  Shimmery White oval cut with Oval Nestablities and layered on a Chocolate Scalloped oval that was created the same way.

Now…how I got those Unity Stamps early.

Nope, I am not on their design team. I am not on any design team. With being a single mother until the end of the year, working for SCS and the upkeep of this blog, I just can’t commit to something like that. Besides, I am first and formost still a Stampin’ Up! demonstrator who LOVES Stampin’ Up! products (I just don’t like the long summer lull of no new stamps!!!).

Splitcoast is introducing a new feature with today’s newsletter: Product Review.
Once a month a team of six stampers will review a product and tell you what they think about it. Our first product to review: Unity Stamp Companies great new Mounting system.

That’s how I got handles and some stamps before they are available! To check out the whole review team and what we thought about the product, click on product review. 

Sorry! No scrapbooking again! I am such a slacker!

This will be a short post, because I have another super bad migraene. I just wanted to share a project of yesterday’s stamp camp.

embrace-life-joyfully.jpg

The card base is Groovy Guava, the designer paper from Ginger Blossom.

The set is Embrace Life.

The flower is stamped with Brown Stazon on Shimmery white cardstock and colored in with Aqua Painter and Classic inks (Groovy Guava and More Mustard). The flower center is an Antique Brass Jumbo Eyelet.

Click here for a step by step tutorial with measurements for this Joy fold card.

I have some good personal news. Rick will be coming home for two weeks during spring break. He has one week of, then goes to a week long class right here! We are so excited. He is already planning a short trip (that’s my man, he loves to take trips) to the Smoky Mountains. I will be roughing it with my family for a few days in a log cabin! Wohoo (not on the roughing it part)!!!

Yesterday’s Featured Stamper on SCS was Carolyn, aka. Cammie! I love her work. When you have a minute, check out her gorgeous gallery.

Carolyn has several gate fold cards in her gallery that she closed with a card band. I decided to case that design.

broncu-buster-cammie-style.jpg

I am sure you aren’t shocked when I tell you that I made a square gatefold, instead of the rectangle ones Carolyn made. LOL

And you are probably aren’t surprised about the cardbase color either. Yep….Chocolate chip.

I took my 5 1/4″ piece of Chocolate Chip cardstock and scored it at 2 5/8″ and 7 7/8″. I sponged all the edges with chocolate chip.

For the layers on my two flaps I took two 2 3/8″ x 5″ pieces of Sage Shadow and stamped the outer part with the Paisley from Wanted in Chocolate Chip. Then I sponged around the edges, distressed the sides with the cutter kit and taped them down.

Next were two  2 1/8″ x 4 3/4″ pieces of Outlaw designer paper. I sponged the edges of the striped paper just a tad with chocolate chip and then the rest of the paper a bit with Creamy Caramel. I distressed the edges again, taped the paper down and added faux stitching with the All in a Row Argyle stamp.

For the main image I stamped the Cowboy from Bronc Buster in Chocolate Chip craft ink  on a 3″ x 3 1/4″ piece of Natural Ivory cardstock and then embossed him with the retired chocolate embossing powder (Earth Element Embossing powder stack). I inked up the Paisley from Wanted in Creamy caramel, stamped it off once and then stamped it over the image. I repeated it all over the main panel. Next the edges of the cardstock were distressed with the cutter kit, sponged first with creamy caramel, then with Really Rust and last with Chocolate Chip. I added a bit of Creamy Caramel sponging to the entire piece to age it.

The photo corner was punched out of Really Rust cardstock with the Photo corner punch. I stamped the medaillon from Wanted over it, sponged it first with Really Rust, then with Chocolate chip and adhered it to the top right corner.

The next two layers are made with Sage Shadow and Really Rust cardstock. Each layer is a 1/4″ bigger then the last. The Sage shadow cardstock was stamped and sponged like the panels for the gate folds. The Really Rust cardstock was sponged with Really Rust and Chocolate chip. Both layers were distressed. 

I taped all three layers together, added three Pewter brads from the vintage brads to the corner and flipped over the top right corner of the ivory layer.

I was asked how I keep my brads in such a staight line. I use my Paper piercing template from stamping up for all brad placements. It’s easy and it will keep them straight and in the right distance between each other. Remember, I am German. I like ORDER! LOL

bronc-buster-cammie-inside.jpg

For the card band I scored a  1 1/2″ x 11″ piece of Really Rust cardstock strip at 5 3/8″  and 10 3/4″.

I taped it shut on the 1/4″ scored end, distressed the edges and sponged it first with Really Rust, then with Chocolate Chip.

 The next layer was a 1 1/4″ x 5 1/4″ piece of sponged and distressed chocolate chip strip.

The last layer was a 1″ x 5 1/4″ strip of Natural Ivory cardstock. It was stamped with Creamy Caramel and the Paisley stamp, then sponged with Creamy Caramel and the edges with Chocolate Chip. I stamped the star/swirl image in chocolate chip far to the left. I stamped another one of those image on a scrap piece of Ivory cardstock cut out the star and then sponged it with Really Rust and Chocolate Chip. That was layered on top of my image on the band.

All three layers were taped together and a Pewter brad was added in the center of the star.

On the inside I stamped the Medaillon and Paisley from Wanted in chocolate chip on the flaps. For the center I cut a 5″ square of Natural Ivory cardstock, sponged and stamped it to match the rest of the card. I also added the bigger Really Rust photo corner. It was sponged and stamped just like his little brother on the main image.

After all that sponging, which took quite a while, my finger tips were DARK. I really enjoyed making this card and like how it turned out. Sorry this entry was like…FOREVER long!

Hugs and smiles

baroque-motifs-gate-fold-op.jpg

If you would like to see some step by step pictures on how to make this card, click on more.


Continue reading »

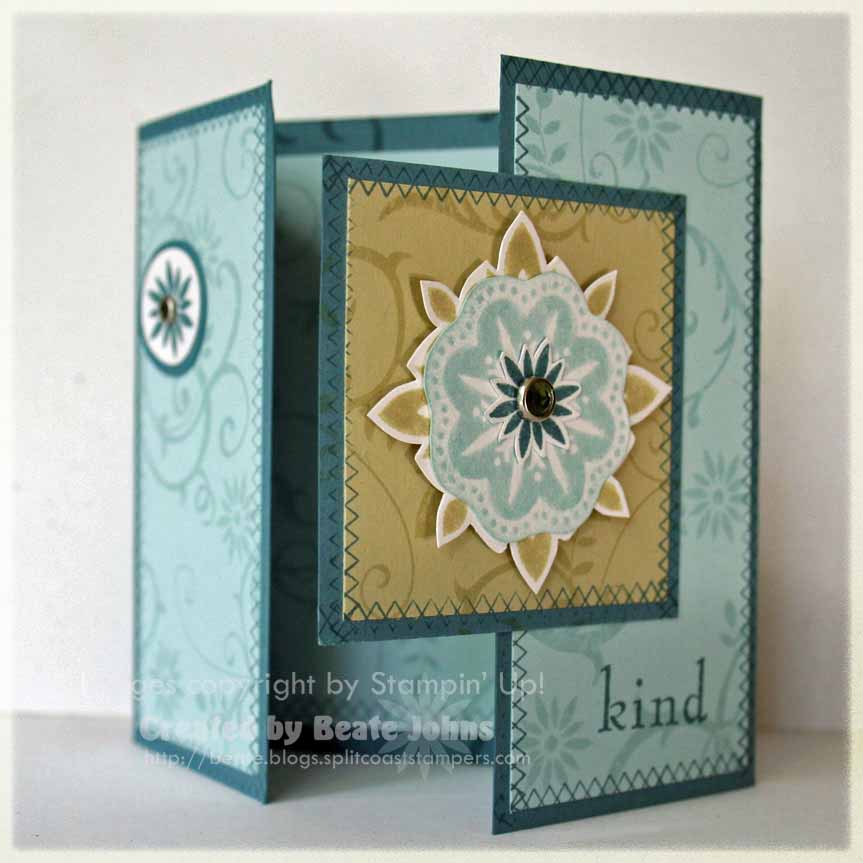
I thought for this weekend it would be nice for us to make Gate cards. I will write a short tutorial for them later today (we have hair cuts and doctor appointment in the morning. Rebecca’s ear hurt. Murphy’s law is hitting us. You are getting ready to fly – your child is getting sick. She woke up crying hysterically last night because of it).

untitled-1.jpg

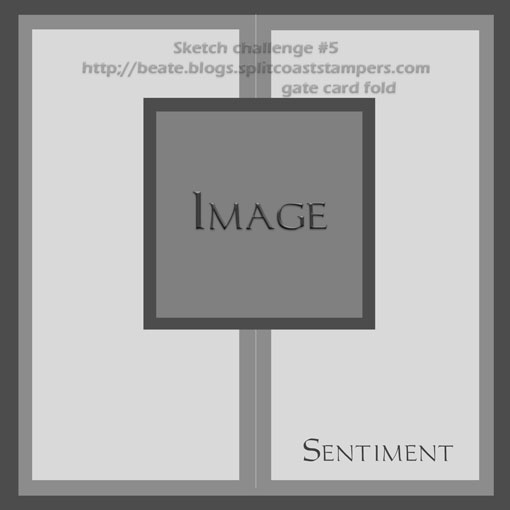
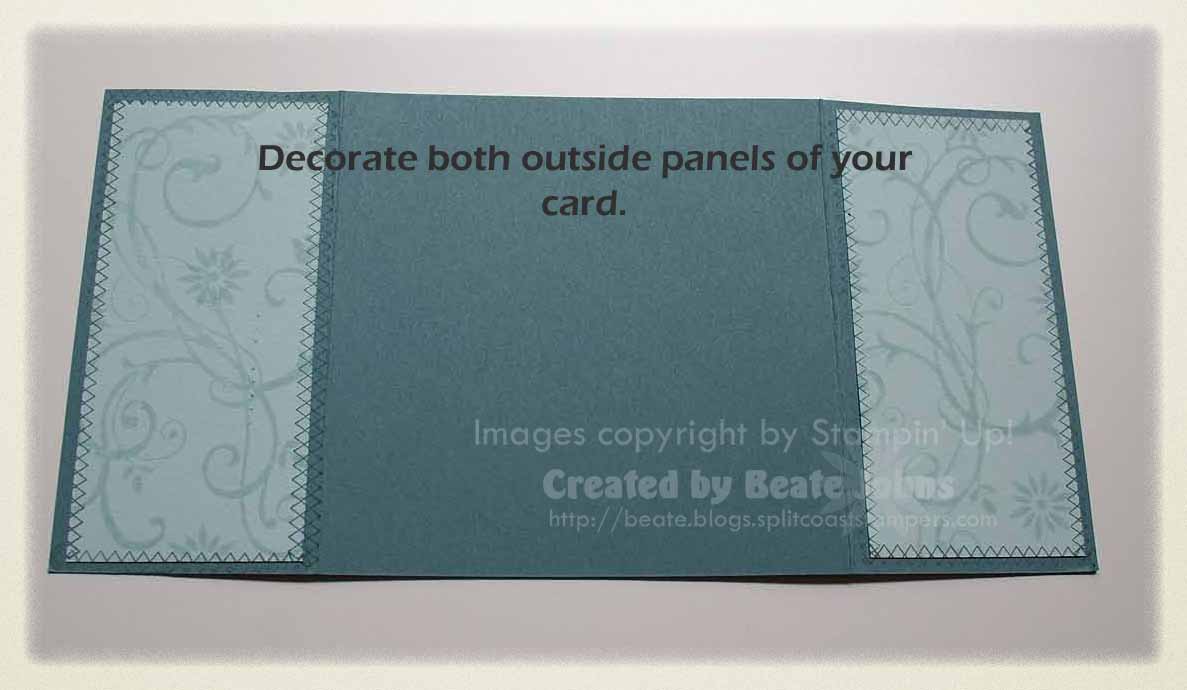
Gate cards are easy. You just need to score a bit differently then regular cards since this fold opens in the middle of the card.

Here is the math:

Card width divided by 2 = your back

Back width divided by 2 = your side width

So, for a 4″ square card you need a 4″ x 8″ piece of cardstock that you score at 2″ and 6″

4 1/4″ width card: 8 1/2″ piece scored at 2 1/8″ and 6 3/8″

Did I make your head hurt yet? It’s really not hard and those are fun.

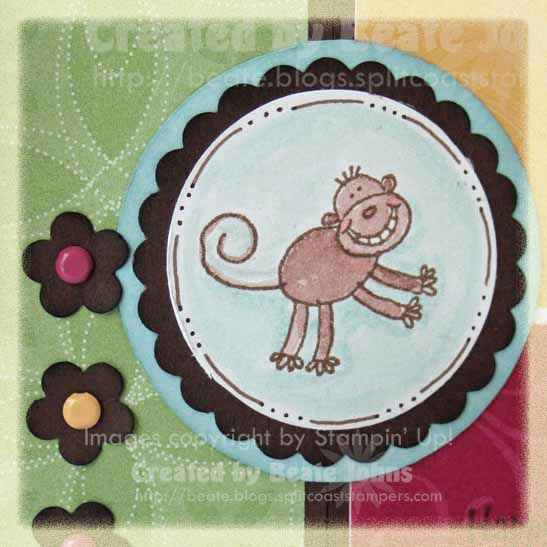
I made three cards yesterday. I need to be frugal with them though and only show you one a day so I have new stuff on my blog everyday while I am gone. Let’s just say I had a blast with the monkey from Zoofari. Here is a Gate fold card I made with him.

zoofari-trifold-monkey-open.jpg

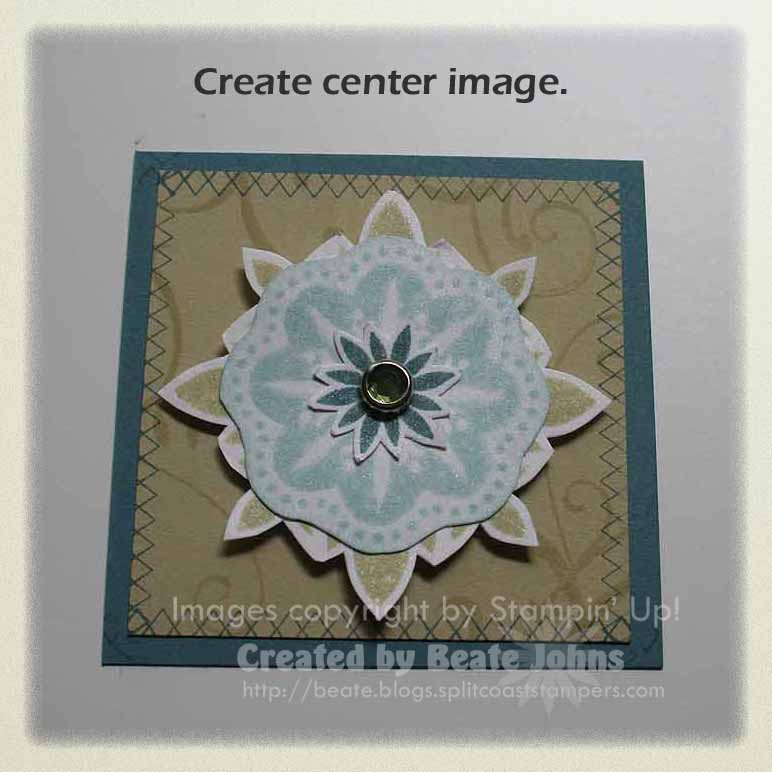
My card started out as a 3 1/2″ x 7″ strip of chocolate chip cardstock. I scored at 1 3/4″ and 5 1/4″. I cut some smaller strips of my POP scrap to match the folds. The monkey is stamped with brown stazon on shimmery white cardstock. I added the doodle border with my brown Micron pen. The monkey is colored with Aqua painter and Soft Sky, Chocolate Chip and a tad of Rose Red classic ink. Doesn’t he look like he just jumped off one branch and is flying to the next?

I layered the image on a chocolate Chip scallop circle punch out . I just won a Super Jumbo scallop circle punch from Marvy Uchida over at Gina K.’s blog. I was blown away. I think that’s the first time in my entire life that I ever won something. I love it. It’s  2″ size and perfect for smaller images. Thank you Gina!!!

I cut the Soft Sky Layer with my Coluzzle and sponged the edges a little.

I used part of the Happy Valentine’s Day from Holidays & Wishes to make my Happy Day greeting

I punched three flowers out of chocolate chip cardstock with the new Three for you Punch, sponged the edges and added Rose Red and Apricot brads in it.

The inside has a 3 1/4″ Rose Red cardstock sqare layered with a 3″ POP designer square taped in the center. I have on more chocolate chip flower with Rose Red brad on the bottom right.

Now those who know me or have read this blog for a while know that I like my stuff neat. So Gate Folds, or Joy Fold cards need to have a closure mechanism (for little anal me) so they won’t flap open. For this card, I just slide the monkey image under one of the tiny flowers.

zoofari-gatefold-closing.jpg

This sketch challenge will be open until Wednesday. I don’t know what time. With time difference and jet lag…who knows when I get to pick a winner. But I thought I still raffle away something. I can not not do that with a challenge. I just have too much fun doing it.

The price this time will be some large heart eyelets Stampin’ Up! used to sell in white, Real Red, pretty in pink and pink passion. I won’t be able to mail the prize out to the winner until the 26th of June.

Okay! Igot to run. So much to do my stomach is in knots! Catch you all later. Have fun with this!

To participate in the raffle, upload your card in your splitcoast gallery or on your blog. Then go to the comment section, add the link to your card along with the Entry #. So far we have one link added in the comment section. If you are the next person with a link, add Entry #2, then Entry #3 and so on!

We just got back from the doctor run. No ear infection. Seems like her ear ache comes from her allergies. Rebecca’s nose tissue (or whatever it’s called is swollen), putting pressure on the sinus. The doc said that could cause the ear ache. Since she is already on Claritin, she now got nose spray to go with it.  I am just grateful she doesn’t have an ear infection and we are still good to go on Monday! Thank you all for your well wishes. 

Julia’s challenge for us this week was perfect: Use coasters in your project.

I love working with coasters so that was an easy peasy challenge for me. I had cut a coaster in half about a week ago to make a gate card with it. Well…it’s been sitting on my desk ever since. Today was the day to work with it and get it off my table! LOL

natural-beauty-coaster-card.jpg

I started by adding Crate paper from the Seaweed collection to the coaster pieces. I punched out a Mega scalloped circle from that paper as well. I used Stampin’ Up!s glue stick to adhere the paper to the coasters. It worked great. I sanded all patterned paper with Stampin’ Up!s sanding block.

Next I took one of my new Fabriano Notecards and punched out a Giga circle and a 1″ circle. I still can’t get myself to use those notecards just like they are. I need to gather more courage for that. I stamped the bird from Natural Beauty on it and colored it in with So Saffron, Marigold Morning, Really Rust and Close to cocoa. I kept on layering the colors on top of each other. The outside is colored with Certainly Celery and Always Artichoke as well as Bordering blue.

On the 1″ circle I stamped Joy from the Natural Beauty background. I inked up just Joy with Stampin’ Up!’s journaling marker. After it was dry I doodled the border and colored around it with Bordering Blue.

The ribbon is from May Arts.

natural-beauty-wt112-coaste.jpg

For the inside I stamped the flower from Natural beauty on a 3 1/2″ square piece from the Fabriano Notecard. I lined the outside with bordering blue and colored the flower with the same colors used as for the bird, plus a touch of Pumpkin Pie.

I used my Bind it All to bind the front to the back piece. I used a 1/4″ wire, but that’s a bit too small. I tried my 7/16″ wire which was too much. I will have to order me some 3/8″ wire next time when I order from Eclectic Paperie.

© 2012 fresh & fun Suffusion theme by Sayontan Sinha