Today’s featured new CAS-ual Fridays Stamps set is called Snowflake Greetings. As the name says it has quite an assortment of snowflakes as well as greetings. My card was created out of  5 1/2″ x 7″  piece of Neenah Solar White cardstock. It was folded in half and  a 3/4″ border was masked off with Eclipse Tape.

The center of the card was sponged with Evergreen Bough and Broken China Distress inks. Snowflakes were stamped with those same colors as well as Tumbled Glass Distress ink.

A border was drawn with a Copic Multiliner and a sentiment was stamped in the lower right corner of the sponged area with Jet Black Archival Ink.  Three rhinestones from Sleek Strip Silver Rhinestones were adhered to the left of the sentiment.

White cardstock was cut with the Faceted Snowflake die. A green button was tied on with silver cord before the snowflake was adhered to the upper right hand corner of the sponged area.

Make sure you check the CAS-ual Fridays Stamp blog to see more samples created with the new set.  Thanks so much for stopping by! Have a wonderful day!

Hugs and smiles

Today’s featured new CAS-ual Friday stamp set is called Merry Kiss-mas.  As soon as I saw the little gifts, I knew I wanted to line them up and dress them up with patterned paper.

I used my favorite Christmas Paper Pack Carta Bella’s Merry & Bright for that.  The card base is a 5 1/2″ x 7 1/2″ piece of Neenah Solar White cardstock folded in half. Five presents were stamped in the center of the card with Tuxedo Black Memento Ink.

The bottom right corner was rounded and a sentiment was stamped right under the presents.  Don’t you just love that font? Three rhinestones from Sleek Strips Silver Rhinestones next of the sentiment finish off the card. Now this is one quick Christmas card.

For my second card I had to use Debby Hughes amazing layout again. I can see this becoming one of my go to sketches for CAS cards. For this one I started by cutting the edge of a 3″ x 5 1/2″ piece of white cardstock with the Notebook Edge Die-namics die. The mistletoe image was stamped in Tuxedo Black Memento Ink. It was colored with Copic Markers (G24, G28) and Liquid Pearls were added to create the berries.

The long thin sentiment was stamped in Tuxedo Black Memento Ink along the notebook edge before red ribbon was tied around the top of the layers. The bow was topped off with a button, tied on with silver cord. The layers were adhered to the card base, a 3 1/2″ x 11″ piece of Kraft cardstock folded in half. The bottom corner was rounded to finish off the card.

Make sure you check the CAS-ual Fridays Stamp blog to see more samples created with the new set.  Thanks so much for stopping by! Have a wonderful day!

Hugs and smiles


I am super excited to be guest designing for the CAS-ual Friday Stamps new release this month. Today and the next three days the design team will showcase the new gorgeous sets from the second CAS-ual Friday Stamps release and they are sweet enough to let me play along. The set being showcased today is called 8 Happy Nights. It’s a stylish and fun Hanukkah set! I couldn’t help myself and made two cards.

Both of my cards are CAS, both use Summer Sky Memento Ink for the background sentiment, and Paris Dusk Memento Ink for the darker blue ink.

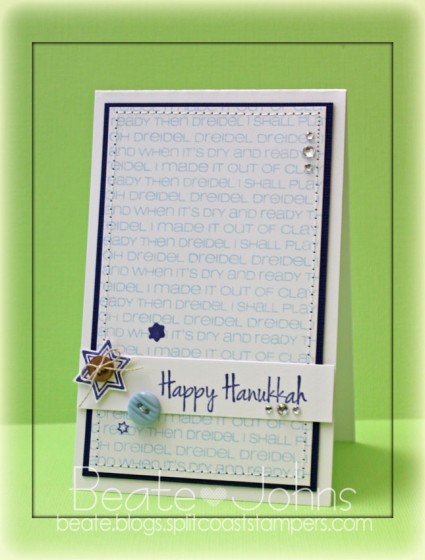
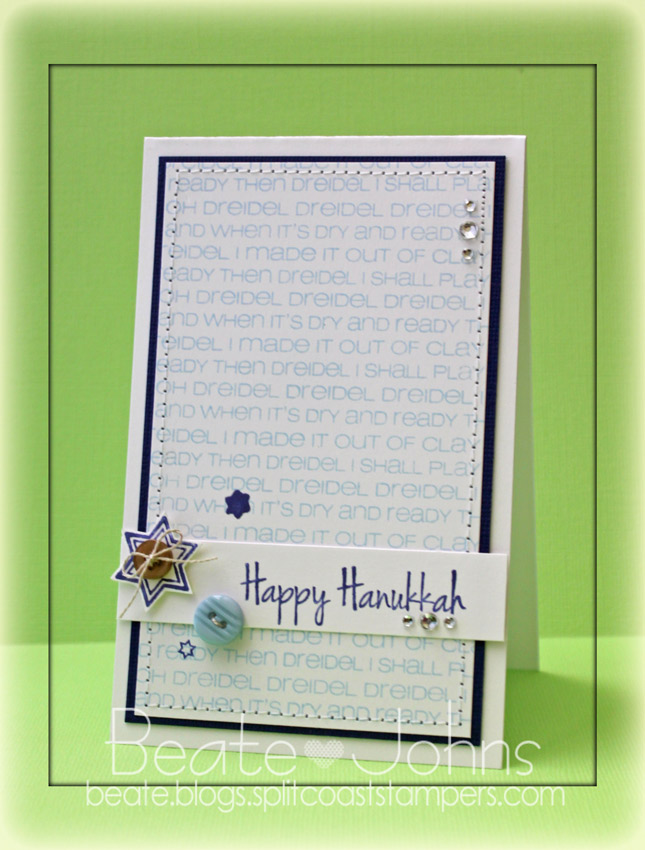
My first card base is a piece of  3 1/2″ x 11 piece of Neenah Solar White cardstock, folded in half.  A 3″ x 5″ piece of Solar White cardstock was stamped with a long sentiment stamp of that set in Summer Sky Memento ink. That layer was stitched to a slightly bigger dark blue Core’dination cardstock piece, before it was adhered to the card base.

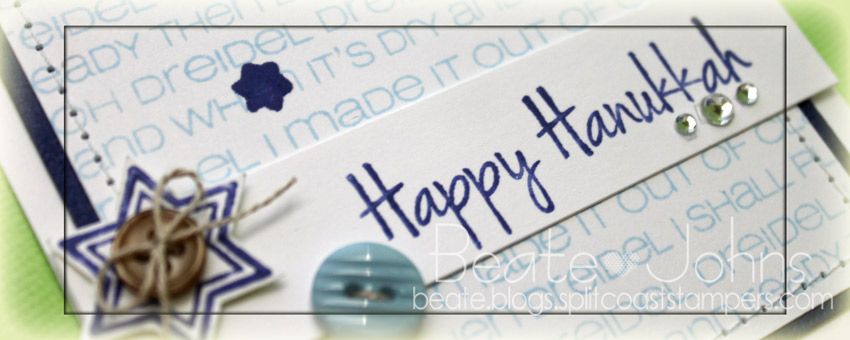
The layout for this card is from the current sketch challenge form Operation Write Home. The sentiment was stamped on a 3 1/2″ x 3/4″ white cardstock strip in Paris Dusk Memento Ink.  The big star was stamped also in Paris Dusk ink, cut out and stitched to the upper left hand side along with a button and Linen Thread. A second, light blue button was stitched to the lower edge of that strip.

Two smaller stars were stamped around the buttons. Rhinestones from a Sleek Strips Silver Rhinestones strip finish off this card.

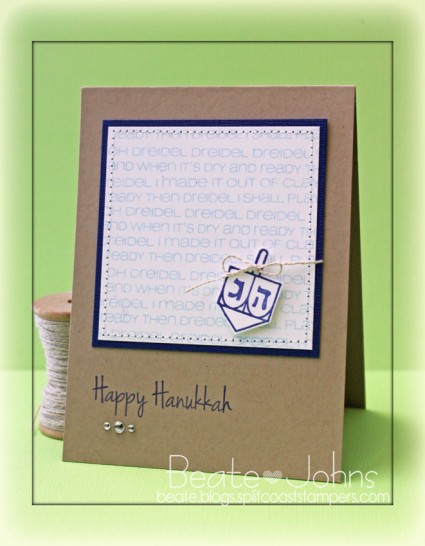
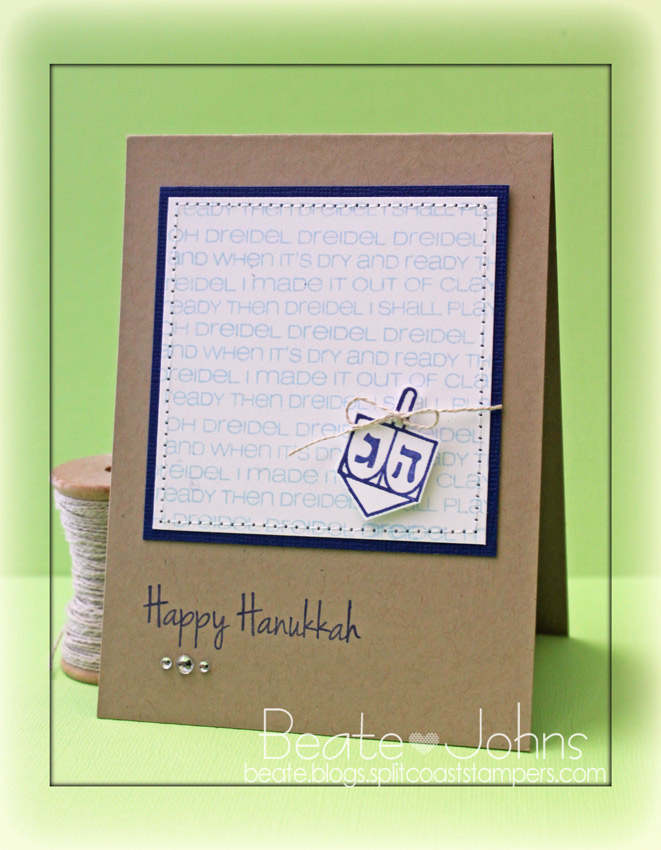
A 3″ square of Solar White cardstock was stamped with the same stamp and ink as the background for the first card. Again it was stitched to a slightly bigger piece of dark blue Core’dinations cardstock.  The layers were adhered to the card base, a 4″ x 10 1/2″ piece of Kraft cardstock, folded in half.

The dreidel image was stamped in Paris Dusk Memento Ink  on white cardstock and cut out. Linen thread was tied around the handle and the image was adhered to the layer with foam adhesive squares.  The sentiment was stamped under the background layer. More Sleek Strip Rhinestones finish off the card.

Make sure you check the CAS-ual Fridays Stamp blog to see more samples created with the new set.  Thanks so much for stopping by! Have a wonderful day!

Hugs and smiles

I created a quick tutorial on how to fold half circles into a Christmas tree for today’s tutorial on Splitcoaststampers.  I started out by cutting a circle out of Teresa Collins Christmas Cottage with the smallest of the Grand Circle Nestabilities die.  The circle was cut in half, folded and decorated with rhinestones.

A stamp from the Lollipop Treat stamp set was stamped in Jumbo Java VersaMagic Ink on Neenah Solar White cardstock. It was cut out and adhered under the tree.

The upper right and lower left corner of a 3″ x 5″ piece of Kraft cardstock were rounded. The bottom was stamped with a background stamps from the Lollipop Treat set and a sentiment from  Document It – December in Moonlight White Brilliance Ink. The edges were pierced before the Christmas tree was adhered with foam adhesive squares.

A piece of black polka dotted Washi Tape was adhered to the top right corner of the kraft cardstock. It was topped with a button, tied on with silver cord. The layer was adhered to the card base, a 3 1/2″ x 11″ piece of white cardstock. A sentiment from Christmas Ornaments was stamped to the lower right edges of the card with Tuxedo Black Memento Ink.

Here is a video for the visual learner:

[youtube]https://www.youtube.com/watch?v=7u8oJd3g384[/youtube]

Thanks so much for stopping by! Have a wonderful day!
Hugs and smiles

I created this card for a Way to Use it Challenge (no fall colors) and a CASE study challenge.  I just LOVED the card we had to case and it made me create not just one but several cards. For this one I paired 3/4″ x 3 1/4″ wide strips of different colored blue Bazzill cardstock were adhered to a slightly bigger white base. I used the new Simon Says Stamp Curvy Snowflake die to cut a negative image in the center.  The edges were stitched and the snowflake die cut was adhered over the negative cut.

The layers were adhered to the card base, a 3 3/4″ x 10″ piece of Limeade Bazzill cardstock, folded in half. The bottom corners were rounded.

A piece of Solar White cardstock was cut and with Holiday Folded Banner die. The sentiment and frame is from the same named Simon Says Stamps exclusive stamp set and was stamped on the banner with Jet Black Archival ink. The banner was adhered to the lower right edge of the snowflake panel. Rhinestones on the snowflake and next to the banner finish off the card.

Thanks so much for looking! Have a wonderful day!
Hugs and smiles

P.S.: Today’s Holiday Blitz tutorial on Splitcoaststampers was created by Theresa Momber. She shows you how to turn a circle die cut into a darling basket.


I created this card for a Featured Stamper challenge last month. Cheryl has such a wonderful gallery, I wanted to case another card of hers. This time I chose this CAS washi tape card.  I created my Washi Tape strips out of Tissue Stock from Canvas Corp. I cut strips in different sizes.

The biggest strip was stamped with the the smallest diamond images from Distressed Diamonds stamp set in Pear Tart Memento Ink. The thin strip was stamped with the snowflake background from Christmas Ornaments in Bahama Blue Memento Ink.  The last strip was sponged with Pear Memento Ink and stamped with a background stamp from By the Numbers in Jet Black Archival ink.

The card base is a 3 1/2″ x 11″ piece of textured Whisper White Stampin’ Up! cardstock folded in half. The bottom corners were rounded. A line was scored at 3/4″ on the bottom. Then the Faux Washi tape strips were adhered with a Xyron glue stick. Another line was scored right above the tissue strips, as well a partial strip 1/8″ under the lower score line.

A sentiment from Merry Kissmas was stamped on the right hand side partially on, partially off the highest tissue paper strip.  Neenah Solar White cardstock was cut with the two largest Let it Snowflake die-namic dies. They were stacked with foam adhesive squares and topped with a button.

Thanks so much for stopping by today! Have a wonderful day!
Hugs and smiles


P.S.: Today’s Holiday Blitz Tutorial on Splitcoaststampers was written by the wonderful Clare Buswell. She is showing how to create a pierced Luminaria.  I hope you have time to check it out!

It’s my turn to share a video post on the Spellbinders blog today. Next week it’s all about Edgeabilities on the Spellbinders blog. I thought it would be cool to create Chevron strips with the Ric Rac die from the Classic Edge One die kit.

The current CAS-ual Fridays challenge called us to make a masculine card. I think even with the rhinestones I added, this card fits the bill.

I hope you have time to check out the card and video. Thanks so much for stopping by! Have a wonderful weekend!
Hugs and smiles


I received my Holiday Card Kit from Simon Says Stamp and had to play with it right away. I made two quick cards with it. I can’t wait to color the cute Gnome that comes in the stamp set. I am sure I will get to that soon.  For the first one I started by cutting the Mod tree in a 3 1/4″ x 5″ piece of Shallows paper (came in the kit). The edges were sanded and the side and top edge pierced.

Two 3 1/4″ strips of white cardstock were torn, adhered to the lower part of the layer and the edges were topped with Diamond Stickles.  The layers were adhered to the card base with foam adhesive squares, a 3 3/4″ x 11″ piece of white cardstock (from kit), folded in half. More white cardstock was cut with the Holiday Shapes die. Three stars were added to the tree and topped with a rhinestones.

A sentiment from Gnome for the Holidays (included in the kit) was stamped in the banner outline from the same set, cut out and adhered under the tree to finish off the card.

For my second card I stamped the label image from Gnome for the Holidays in Jet Black Archival ink on white cardstock, that had been cut with Simon Says Stamps exclusive Apothecary Label dies.  A little silver glitter brad (included in kit) was added on the top of the label.

Part of a Doodlebug Francy Frills cardstock sticker (included in the kit) was adhered to a 1 3/8″ x 5″ piece of Aspen Frost Basic Grey (one sheet of each design included in the kit)  paper strip. Both were adhered to a 3 1/4″ x 5″ piece of the same paper kit. Black Doodlebug Twine (from the November kit) was tied around the layers and topped with a button  before the layers were adhered to the card base, a 3 3/4″ x 11″ piece of white cardstock, folded in half.

Faux stitching was added with a white gel pen. The tiny holly image from Gnome for the Holidays was stamped in Tuxedo Black Memento Ink on Neenah Solar White cardstock and colored with Copic Markers (R24, R29, R39, YG93, YG97). The imag was cut out and adhered to the lower right of the label to finish off the card.

There is only a limited amount of those card kits available. I am glad I got mine!

Thanks so much for stopping by! Have a wonderful day! It’s Friday!!!! Wohoo
Hugs and smiles

I created this card last week for the CAS challenge on Spitcoast, the CAS-ual Friday challenge and that week’s CAS(E) this Sketch!. I started by cutting three leaves with the new MFT Falling Leaves Die-namic dies out of 7 Gypsies Conservatory paper. The edges of the leaves were sponged with Vintage Photo Distress Ink, layered together with foam adhesive squares and tied on top with black embroidery thread.

The bottom right and top left of a  3″ x 5″ piece of Teresa Collins Spring Fling patterned paper were rounded, the edges were sanded and the paper was stitched to a 1/8″ bigger piece of black cardstock. The layers were adhered to the card base, a 3 1/2″ x 11″ piece of Kraft cardstock folded in half.

A sentiment from the new Falling Leaves stamp set was stamped in Jet Black Archival ink on the bottom right of the card. The leaves were adhered to the upper right hand side of the card. Black Baby Bling Rhinestones were adhered above and underneath the leaves to finish off that card.

Thanks so much for looking! Have a wonderful day!
Hugs and smiles

Today’s tutorial on Splitcoast is written by the wonderful Stacy Morgan. She is showing us how to create little treat holder that look like Hershey’s Kisses. I shot the video and create a Halloween treat holder…What else but a Halloween project can I showcase today, right?

I started by cutting two hearts out of Kraft cardstock with the largest of the Classic Heart Nestabilities dies. They were first stamped with the smallest Distressed Diamonds background in Cloud White VersaMagic Ink. Once that dried, I stamped the star banner from Primitive Pumpkins over it in Jet Black Archival ink.

A pumpkin was cut out of Neenah Solar White cardstock with one of the Primitive Pumpkin Die-namic dies, and one of the pumpkins was stamped over it in Tea Leaves and Pumpkin Spice VersaMagic Ink. Lizard Bazzill Textured Cardstock was cut with the Flourish Die-namics die. The flourish and the pumpkin were adhered to the treat holder front and a button was tied to the pumpkin with silver cord.

A sentiment of the Primitive Pumpkins set was stamped in Jet Black Archival Ink on a white strip of cardstock and tied on to the Hershey’s Kiss with more silver cord.


Here is a video for the visual learner:

[youtube]https://www.youtube.com/watch?v=gpXJFFNNEfo[/youtube]

Thanks so much for stopping by! Have a wonderful Halloween!
Hugs and smiles

© 2012 fresh & fun Suffusion theme by Sayontan Sinha