My post on the Spellbinders blog today is all about summer time. I hope you have time to check it out. I always appreciate comments there.  The cherries were colored with Copic Markers (Cherries: YR15, R08, R24, R29, R39   Leaves: YG01, YG03, YG17   Branch: E23, E25, E27, E29   Background: B0000, B000).

Talking about summer time. With the kids being home from school now, I don’t think I can post a daily blog post. I hope you understand. I will post as often as I can.

Thanks so much for stopping by! Have a wonderful day!
Hugs and smiles

Little Darlings stamps is releasing a new collection today called Spring is in the Air. To introduce the four new darling stamps, the design team and a few guest designers are having a blog hop. The hop coincides with the Little Darlings challenge and the theme Spring Colors.

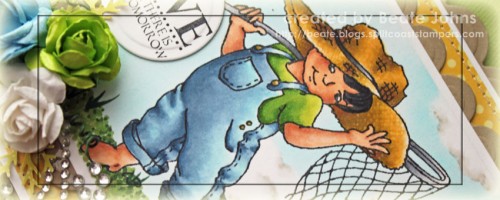
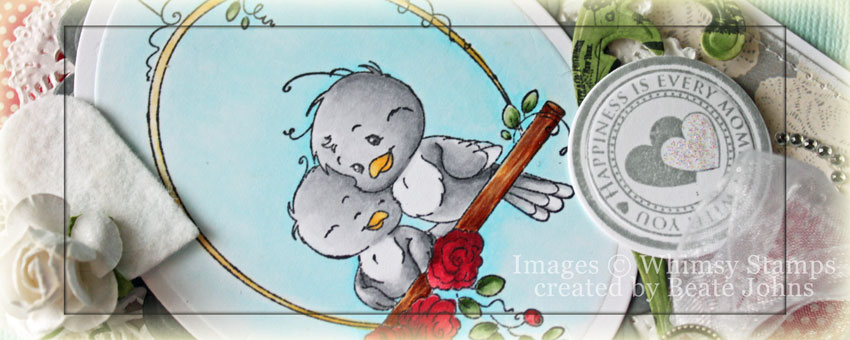
For my first sample I used the new image called Buddies. It was stamped in Tuxedo Black Memento Ink on a piece of white cardstock, cut and embossed with the largest Classic Square Nestabilities die. The image was colored with Copic Markers (Skin: E00, E11, E13  Hair: N5, N7, N9   Jeans: B0000, B91, B93, B95, B97   shirt/frog: YG21, YG23, YG17   Hat: Y23, Y26, Y28, E33   Net: C00, C1, C3, C5    Ground: G43, G46, E31).

It was masked, cloud masks were added and the background was airbrushed with Copic Marker BG01.  Shading was added to the clouds with Copic Markers W00, W0 and W1. The square was adhered to a piece of Kraft cardstock, cut and embossed with the largest Scallop Square Nestabilities die.

A 2 3/4″ x 4 1/2″ strip of Pebbles Happy Go Lucky Patterned paper was adhered to a 4 1/2″ square of Pebbles May Bouquet Collection. The layers were stitched to a 3/16″ bigger piece of Solar White cardstock. Blue Organdy Ribbon was tied around the horizontal strip before the image was adhered over the center with dimensionals.

The wires of three Zva Creative flowers were twisted together. The ends were rolled up with the help of my paper piercer. Branches punched out of Pebbles paper were added to the flower bouquet and it was adhered to the lower left corner of the image. Part of a Finesse Rhinestone Swirl was adhered next to the flowers.

A sentiment from Whimsy’s Treasured Moments Tickets stamp set was stamped in Tuxedo Black Ink over a piece of cardstock that had been cut and embossed with a Standard Circle Nestabilities die. The sentiment was adhered above the flowers. The layers were adhered to the card base, Kraft cardstock cut and embossed with the second smallest  Grand Scallop Square Nestabilities die.

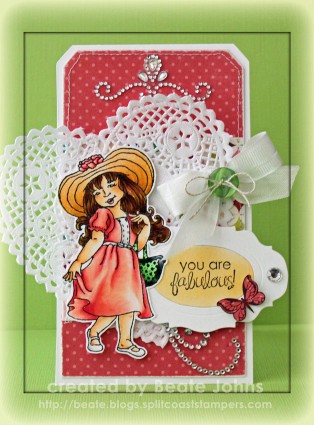
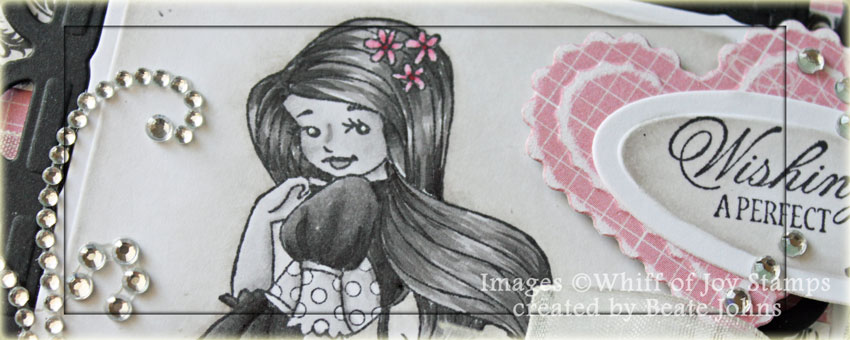
For my second card I used the image Isn’t She Lovely. The girl was stamped in Tuxedo Black Ink on Solar White cardstock and colored with Copic Markers (Skin: E50, E51, E53    Hair: Y26, E33, E35, E37   Dress: R30, R32, R35    Shoes and Trim: W00, W0, W1   Hat: YR20, YR21, YR23    Purse: YG11, YG13, YG17). The image was cut out and set aside.

The card base was cut out of Solar White cardstock with the Tim’s large tag die. A piece of the new Echo Park Graceful This & That paper was cut slightly smaller. The edges were sanded and another piece of the same paper pack was added as a horizontal strip. The edges were then stitched and seam binding was tied around the strip. A heart doily was adhered to the left hand side of the card. The image was adhered over the doily with dimensionals.

A sentiment from Whimsy’s Friendship Ticket Sentiments was stamped over the oval that had been cut with the Large Tage and bookplates die. The oval was airbrushed with Copic Marker YR20, placed back into the bookplate frame and adhered partially under the girl frame. A butterfly from the same set was stamped on the same paper used for the card base and cut out. It was adhered to the lower right of the sentiment panel.

To finish off the card a button was tied on over the bow with Linen thread. One of Nina’s gorgeous new Fancy That Want2Scrap Border bling was adhered to the top of the card. A Rhinestone was added the right hand side of the bookplate and part of a Finesse Rhinestone Swirl underneath it.

Check out what the other designers have created with the new stamps:

Little Darlings Challenge Blog
Jane
Angela
Alberto
Vicky
Janiel
Mindy
Sheri
Sara
Ruby
Angela

Make sure you stop by the Challenge blog. One of the commenters there will receive blog candy!

Do you like the images I used today? Leave me a comment and I will pick a winner on Thurday morning with the help of random.org.

Thanks so much for stopping by! Have a wonderful day!
Hugs and smiles


Today’s tutorial on Splitcoaststampers was written by Joan Boardee. She shows us how to use both Copic Markers and Distress Inks to color an image.

For my sample I used Sweet n’ Sassy Everyday Miracles. I stamped the butterfly in Black India Ink on Neenah Classic White cardstock. Part of the image was colored with Copic Markers Y15 and Y17. Next Worn Lipstick Distress Ink was applied directly with the ink pad. The image was misted with water. After the paper dried, the image was cut out and embossed with clear embossing powder.

Three pieces of Solar White cardstock were cut and embossed with a Lotus Pendant die, a Fancy Tag 3 die and a Classic Oval Nestabilities die. A sentiment from the Everyday Miracles was stamped in the center of the the Classic Oval die cut and the edges were sponged with Tumbled Glass Distress Ink. The oval was adhered over the Fancy Tag die cut and that was adhered to the Lotus die cut.

Pieces of Echo Park Country Drive Patterned Paper were cut and embossed with the smallest Grand Circle Nestabilities die. The edges were sanded and stitched before the layers were adhered to a scallop circle card base, cut and embossed with Grand Scalloped Circle Nestabilities die. A couple of Baby Bling Rhinestones and parts of a Finesse Rhinestone Swirl finished off the card.

Here is a video for the visual learner:

[youtube]https://www.youtube.com/watch?v=f_1dAy-D5dU[/youtube]

Thanks so much for stopping by! Have a wonderful day.
Hugs and smiles

Today’s Whiff of Joy Challenge is to create a black and white image. The Dare to Dream image was stamped in  Tuxedo Black Memento Ink on  Neenah Solar White cardstock. It was cut and embossed with the Classic Frame die and colored with Copic Markers (Skin: T0, T1, T3    Hair: T2, T3, T5, T7    Skirt: T3, T5, T7, T9    Flowers: R81, R85, R89    Ground:W3, W5, W7    Background: W00, W0, W1). Another frame was cut and embossed, this time out of black cardstock and the image was adhered inside.

Three 4″ wide strips of Echo Park Yours Truly patterned paper were sanded and adhered to a 4″ x 5 1/4″ piece of the same paper pack. The paper was stitched to a 3/16″ bigger piece of white cardstock. Ivory Organdy Ribbon was tied around the paper layers and the image was adhered to them with dimensionals.

A Prima Flower was adhered to the lower left corner of the image. Parts of a Finesse Rhinestone Swirl were adhered around the flower. A sentiment from the General Sayings stamp set was stamped in Tuxedo Black ink on a piece of Solar White cardstock that had been cut and embossed with the smallest Petite Oval Nestabilities die. The embossed part was colored with Copic Markers (W00, W0, W1). A piece of Yours Truly Paper was cut and embossed with the second smallest Classic Scalloped Heart die and the edges were sanded. The sentiment was adhered over the heart and both were taped to the upper right corner of the image.

The layers were adhered to the card base, a 4 1/2″ x 11 1/2″ piece of textured Crumb Cake cardstock and Baby Bling Rhinestones were adhered to the left hand side of the heart.

I hope you have time to participate in the challenge. It’s fun to color images in black and white. Plus as always, if you use Whiff of Joy images for your challenge card, you could win a prize.

Have a wonderful day!
Hugs an smiles

Today Whimsy Stamps is combining forces with One Crazy Stamper to bring you a Crazy Whimsical blog hop filled with lots of inspiration and some PRIZES!!

Whimsy Stamps is a family owned rubber stamp company located in the United States. We carry a large variety of exclusive rubber and digital stamps, custom rubber and digital designs, our Shapeology metal crafting dies, and many different crafting embellishments. We have new releases each month for both rubber stamps and dies as well as new digital images. Hop by the shop and see what’s new!

One Crazy Stamper is a fantastic Canadian crafting store with an online site as well as a brick and mortar store located in Bolton, Ontario! One Crazy Stamper has the latest products you are looking for! Be sure to check out the One Crazy Stamper shop as well as the OCS blog for your daily inspiration.

Please join our hop featuring projects from the Whimsy and One Crazy Stamper Design Teams. Be sure to hop around from blog to blog and leave a comment at each stop, because some lucky random commenter are going to win some crafty goodies!!!


Well….when I started stamping, I remembered new images, I remembered what paper to use, but I forgot about the sketch we are using today.  I had most of the card done before I remembered. So my card doesn’t match the sketch 100%, but I think it still kind of works.

I stamped the new Bird Swing image in Tuxedo Black Ink on Neenah Solar White cardstock. It was cut and embossed with the largest Classic Oval Nestabilities die and the Out of the Box technique and colored with Copic Markers (Birds: N0, N1, N2, N3, Y21, Y23   Swing: E31, E33, E35, E37, Y21, Y23, Y26   Roses: R43, R46, R59    Leaves: YG61, YG63, YG67   Sky: B0000, B000, B00). The image was first adhered to a piece of gray cardstock, cut and embossed with the largest Scallop Oval Nestabilities die, then on a paper doily.

The edges of a 2 1/2″ x 5 1/4″ piece of Echo Park Yours Truly Patterned Paper were sanded before the strip was adhered to a 4″ x 5 1/4″ piece of the same paper pack. The bottom corners were rounded and the edges were first sanded, then stitched. Organdy Ribbon was tied around the vertical strip before the image was adhered with dimensionals. The layers were adhered to a card base , a 4 1/4″ x 11″ piece of Neenah Solar White cardstock, folded in half.

Two pieces of Yours Truly paper were cut and embossed with a die from the Twisted Metal Accents & Die collection and colored with Copic Markers (YG61, YG63). They were adhered next to the bow (and would have to count for the horizontal strip on the sketch). Parts of a Finesse swirl were adhered slightly under the paper swirls and the ribbon bow was topped with a Rhinestone brad.

A sentiment from the Everyday Circle Sentiments was stamped in London Fog Memento Ink on a piece of Neenah Solar White cardstock, cut and embossed with a Standard Circle die. It was adhered to the lower right of the image layer. A heart was cut out of felt with a Classic Heart Nestabilities die. A Flower was stuck through the left side and the flower end was twisted. The heart was adhered to the upper left of the image. Three Rhinestones on the top right edge finish off the card.

Check out the creations of my fellow blog hop participants:

One Crazy Stamper Blog

Jacilynn

Debbie Eastman

Michelle

Alberto Gava

Sue

Heidy Blom

Joni

Simonne Clay

Madge

Iris Wiechmann

Sharon

me

Lisa

Tammy Louise Cunliffe

Lora

Thanks so much for stopping by! Have a wonderful day!
Hugs and smiles

I thought it would be nice to have a video for the Acetate Box Tutorial. It’s a great project to dress up Valentine’s treats.

The finished box measures 2″ wide, 2″ deep and 3 1/2″ wide. Because it’s so little, there isn’t much room to decorate. The patterned paper strip are from  Echo Park Little Girl Patterned Paper. One edge was cut with the Stampin’ Up! Scallloped Edge Punch.

A tiny tag was cut with MFT’s Notched Tag die out of Neenah Solar White cardstock. Two small hearts were cut with dies from the same stamp set/die combo out of Little Girl paper as well as red cardstock. The hearts were adhered to the tag and a sentiment was stamped on it with Tuxedo Black Memento ink. Silver curling ribbon was tied into a double bow and adhered on top of the tag.

Here is a video for the visual learner:
[youtube]https://www.youtube.com/watch?v=HCfWNFyfkRU[/youtube]

Thanks so much for stopping by! Have a wonderful day.
Hugs and smiles

Last newsletter we ran Cami’s Trifold Card as “From the Archives” tutorial. Cambria Turnbow started using the slot punch from Stampin’ Up! years ago to hold folds from a trifold down…hence the name.

For my sample I chose Bella’s Ketto Phoebe image. My way of celebrating that Stamping Bella is back as a Member Company on Splitcoaststampers. I stamped the image in Tuxedo Black Memento Ink on Neenah Solar White cardstock, cut and embossed with a Standard Circle Nestabilities die and colored with Copic Markers (Skin: E50, E51, E53   Hair: C5, C7, C9   Wings: R000, R00   Dress: Y13, Y15, Y17    Hearts: YR07, R08, R27, R39   Leaves/grass: YG11, YG13, YG17   Background: B0000, B000). The image was adhered to a piece of back cardstock, cut and embossed with a Standard Scallop Circle Nestabilities die.

The trifold part was created out of a 5″ x 11 5/8″ piece of textured white cardstock. The strip was scored at  3 3/4″ and 7 1/2″ and the corners were rounded. A 3/8″ x 3 1/2″ piece of Echo Park Little Girl Patterned Paper was adhered to a 2 3/4″ x 3 1/2″ piece of paper from the same paper pack. The bottom corners were rounded and the edges were stitched before they were adhered to the card base.

A window was cut into the card front with a Standard Circle Nestabilities die and a frame cut with the same die and the second largest Beaded Circle Nestabilities die out of black cardstock. The frame was adhered over the window with dimensionals. Rhinestones from the 72 Count Rhinestone pack were added to the beaded circle frame and part of a Finesse Rhinestone Swirl was adhered to the upper right corner.

The slot punch (unfortunately retired now) was used on the lower part of the left edge and a brad from Stampin’ Up! was added over it. The layers were adhered to a 1/4″ bigger piece of black cardstock. A sentiment from the new Whimsy Stamp set Thank You Tabs was stamped in Jet Black Archival ink on Neenah Solar White cardstock, cut out and adhered to the next to the flower brad.

Here is a video for the visual learner:

[youtube]https://www.youtube.com/watch?v=Vl5MTZk2i6Y[/youtube]

Thanks so much for stopping by! Have a wonderful day.
Hugs and smiles

This morning I checked the Tiddly Inks Challenge blog and I saw that they had a blog hop going on that everyone can join. I was looking for something to stamp and was itching to ink up the new Wryn – Grow A Little Love image.  I printed out the image on Neenah Classic White cardstock, cut and embossed with the largest Label 18 Nestabilities die and colored it with  Copic Markers ( Skin: E000, E00, E01, BV00   Hair: Y26, E35, E37, E47   Dress: Y11, Y13, Y15, Y18, Y38   Shirt: YG21, YG23, YG17   Stockings: C0, C1, C3    Pot: BG000, BG01, BG02, C3    Hair: YR07, R08, R39   Background: R0000, R000, R00, R01   Ground: W3, W5, W7, W9). I added dots to the dress with Copic Marker 0 and added Stardust Stickles over the dots.


A 4″ wide strip of white cardstock was cut with a Lacey Eyelet Border dies and adhered under a 3″ x 4″ piece of Echo Parks Summer Days. The strips were stitched to a 4″ x 5 1/4″ piece of paper from the same paper pack. Yellow Striped May Arts Ribbon was tied around the horizontal paper strip, a paper doily was adhered to the upper right corner and the image was adhered to the layers with dimensionals.

Parts of a Finesse Rhinestone Swirl were adhered to the upper left and lower right corner of the layers and everything was adhered to the card base, a 4 1/4″ x 11″ piece of Solar White cardstock, folded in half.

A sentiment from Whimsy’s Friendship ticket sentiments was stamped in Tuxedo Black Memento Ink on a piece of white cardstock, cut and embossed with a Classic Heart Nestabilities die. The embossed part was airbrushed  with the Copic markers YR07 and R29 and the sentiment was adhered under the bow.

Thanks so much for stopping by! Have a wonderful day!
Hugs and smiles

Hi all and welcome to the final day of Flourishes’ Release Week!

On to today’s special treat! This next set is just that — a sweet treat for those you love! Want to see what I mean??

Introducing….

Love, Sweet Love offers a sweet way to honor your Valentine! From a cookie bouquet to a beautiful box of chocolates, to a basket of flowers complete with a darling, heart-adorned love note, this set illustrated by Marcella Hawley is sure to warm your heart. This 4 by 6″ set even comes with 3 beautifully scripted sentiments to tell your love how you feel! The Flourishes DT has been busy at work trying to sweeten up some Valentine creations with this set!

For my sample today I used the basket image from Love, Sweet Love. It was stamped in Tuxedo Black Memento Ink on Neenah Solar White cardstock and cut and embossed with a Standard Circle Nestabilities die. The image was colored with Copic Markers (Letter: E40, E442, R08, R29, R39, Lipstick Spica pen   Tulips: Y13, Y15, Y18, YR15 , YG11, YG13, YG17   Lavendar: RV63, RV55, RV66   Basket: E42, E43, E44, E47   Ground: W3, W5, W7, W10    Sky: B0000, B000) and adhered to a Paper Doily.

A 1 3/4″ x 5″ strip of Echo Park Springtime Paper was adhered to a 5″ square of the same paper pack. The paper was cut and embossed with a Grand Circle Nestabilities die and stitched to a slightly bigger, hand-cut white cardstock circle. White Organdy Ribbon was colored with Copic Marker RV55 and tied around the vertical strip. The bow was topped with a white button, tied on with silver curling ribbon. The image layers were adhered over the layers with dimensionals.

A sentiment from the new set was stamped in Tuxedo Black Memento Ink on a piece of white cardstock that had been cut and embossed with the smallest Petite Oval Nestabilities die. The embossed part was colored with Copic Marker B0000. The sentiment was adhered to the upper left of the image.

Rhinestones were added underneath the sentiment and part of a Finesse Rhinestone swirl above the bow. The layers were adhered to the card base, Kraft cardstock cut and embossed with a Grand Scalloped Circle Nestabilities die.

Would you like to win the Love, Sweet Love set? All you need to do is leave some love in the form of a comment on the blogs below! Why? You need to try to figure out…..


One of the ladies on our link list below will be picking a name from the comments on her blog post today. We don’t know which one it is… so the more blogs you leave comments on, the more chances you have to win!

Barbara Anders

Julie Koerber

Christine Okken

Cindy Lawrence

Danielle Kennedy

Dawn Burnworth

Stacy Morgan

Tammy Hershberger

Sharon Doolittle

Heather Jensen

Cindy Haffner

Mona Pendleton

Jan Marie Caruso


DID YOU KNOW YOU COULD WIN OUR ENTIRE JANUARY RELEASE? Have you checked out our New Year Challenge? Just click HERE to find out how to play! You can also play in our Noon Time Challenges! Check out yesterday’s noon time challenge – The Year of the Dragon Challenge. Or, how about the 2-0-1-2 Challenge HERE? All challenges will close this Friday at 5 PM EST and winners will be announced Saturday in our Winner’s Circle blog post! So get those fingers inky and good luck!

Thanks so much for stopping by! Have a wonderful day.
Hugs and smiles

Today Timeless Tuesday hostess is Tammy. She challenged us to be inspired by this photo.

For my card I knew I wanted to use Pink and Orange as the main colors with a bit of grey from the planter. I started by stamping the heart from the soon to be released From the Heart stamp set in Embossing Ink on a piece of Echo Park Victoria Garden Patterned Paper. The heart was cut and embossed with a Classic Heart Nestabilities die and adhered to a piece of Neenah Solar White cardstock, cut and embossed with a Classic Scalloped Heart die.

Next I stamped the scroll image in Tuxedo Black Memento Ink on Solar White cardstock. A sentiment was stamped inside the scroll before it was colored with Copic Markers (YR00, YR01, YR02, YR04) and cut out. The scroll was adhered to the center of the heart with dimensionals.

The card base is a piece of 4 1/2″ x 9 1/2″ white cardstock folded in half. The card front was embossed with the Brocade Embossing Folder and the bottom corners were rounded. The edges of a 1 3/4″ x 4 3/4″ strip of Victoria Gardens Paper were stitched before the paper was adhered to the left hand side of the card front. White organdy Ribbon was tied around the front and parts of a Finesse Rhinestone Swirl were adhered to the upper right and lower left of the card base. The heart was adhered over the ribbon and a button was tied on over the bow with dimensionals.

Check out my fellow Timeless Tuesday Challenge Members for more inspiration:

Cindy Haffner
Heather Jensen
Maki Jones
Mona Pendleton
Silke Ledlow
Tammy Hershberger
and
January Guest Designer Cheryl Lea

Check back with the Flourishes Designer tomorrow for more sneak peeks of this set. Thanks so much for stopping by! Have a wonderful day!
Hugs and smiles


© 2012 fresh & fun Suffusion theme by Sayontan Sinha