Today’s tutorial on Splitcoaststampers is created by Monique Trappeniers. She shows us how to create a Six Fold Card. I used the technique to create a sample for today’s Whiff of Joy Challenge, which is to use Charms or Bling. Since I love Bling, I went with Bling.

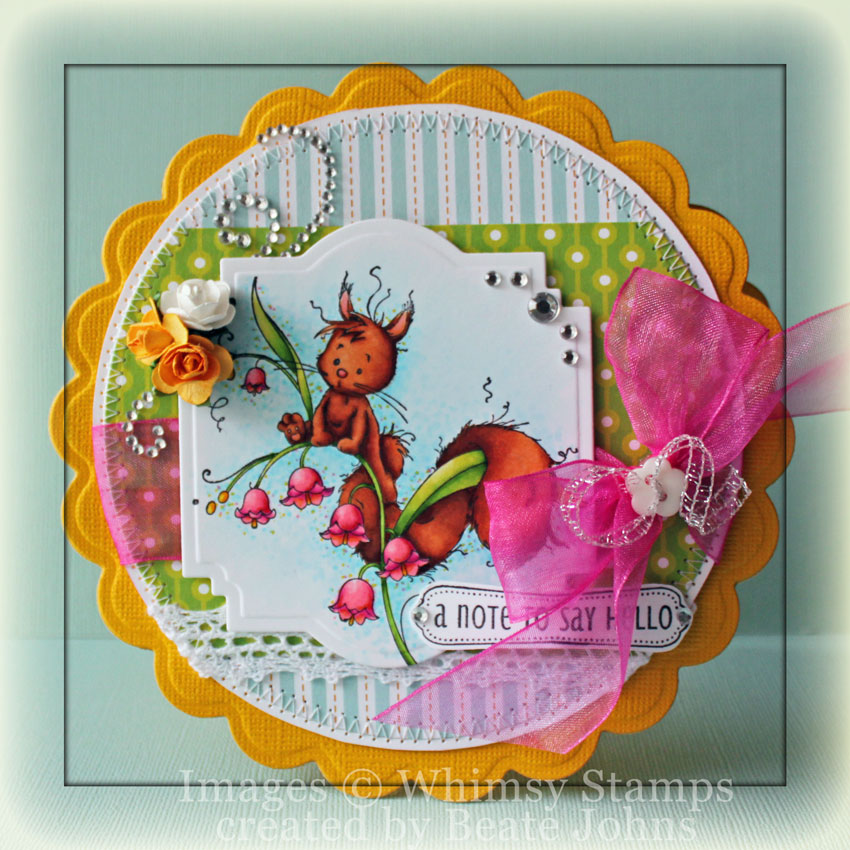
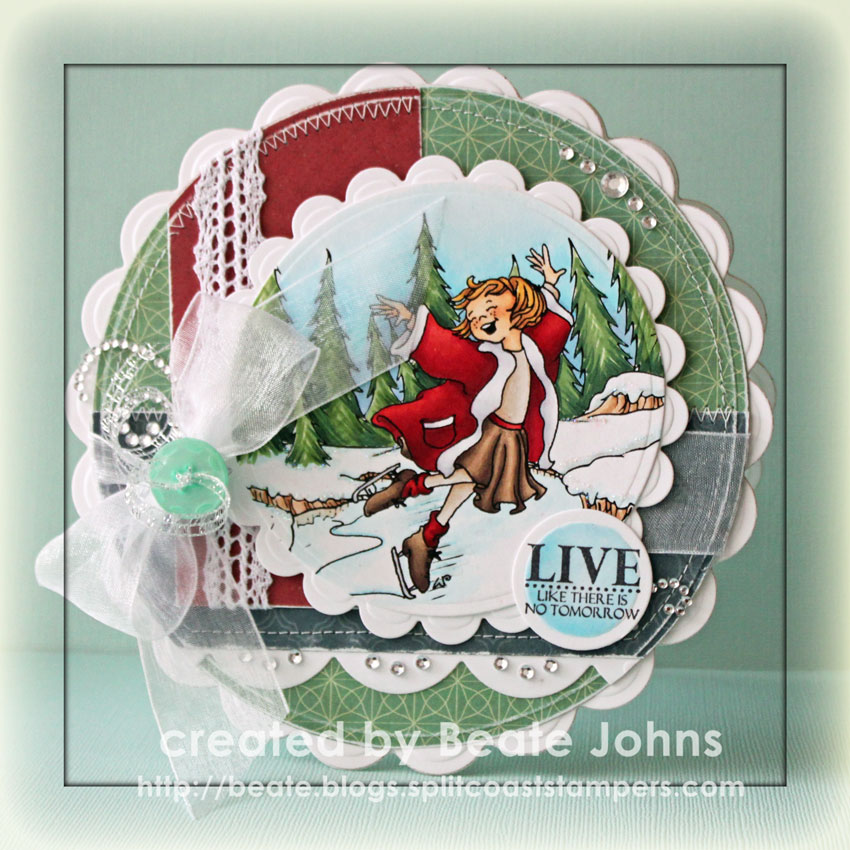
I started by stamping Henry with Heart in Tuxedo Black Memento Ink on a piece of Neenah Solar White cardstock with Tuxedo Black Memento Ink. The image was cut and embossed with a Standard Circle Nestabilities and colored with Copic Markers (Henry: E30, E31, E33, E00, E93, E95   Heart: YG21, YG23, YG17   Ground: W3, W5, W7   Sky: B0000, B000). The circle was adhered to a piece of brown cardstock, cut and embossed with a Lacy Circle Nestabilities die. The edges of the image circle were paper pierced.


The card base was created out of textured Espresso cardstock and decorated with Echo Park Victoria Garden Patterned Paper. The card base measures 4″ square when folded. I cut a 3 3/4″ square of white cardstock and a 3 1/2″ square of patterned paper. Pieces of a Finesse Rhinestone Swirl were adhered to the top left and bottom right of the card front and brown Organdy ribbon was used to tie the card shut. The image layer was adhered to one part of the card front with dimensionals.

A sentiment from Elisabeth Bell Accessories and Sentiments was stamped in Tuxedo Black Memento ink on a piece of Solar White cardstock, cut and embossed with the smallest Petite Oval Nestabilities die.  The center was colored with Copic Marker B0000 and the sentiment was adhered to the lower left of the image circle.

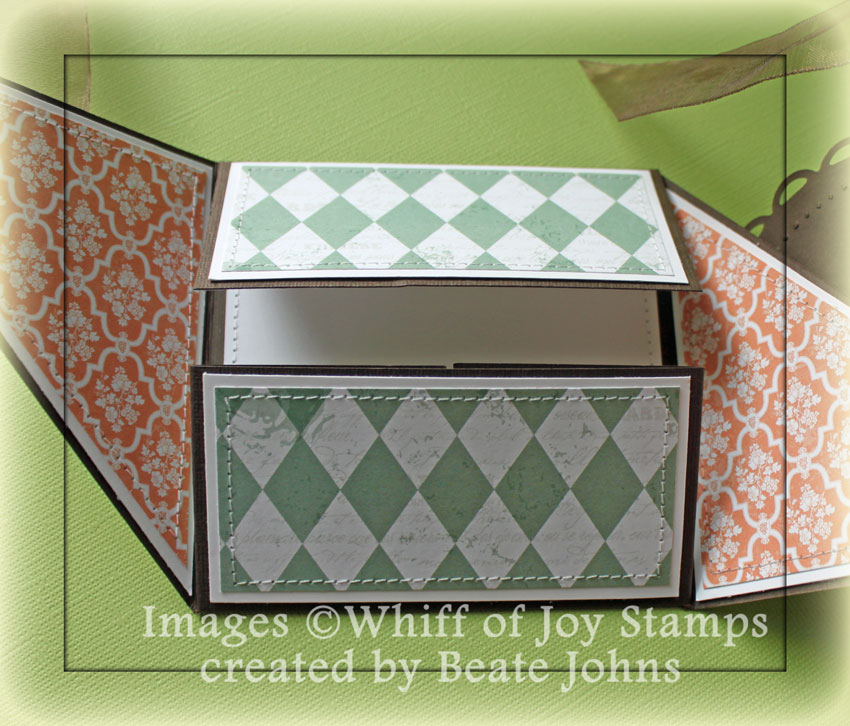
When you open the diagonal panels, you will find two horizontal strips that were also lined with Victoria Gardens paper. You fold those layers down…

to unveil the inside panel of the card. The front horizontal strip has two little gatefold doors that can be unfolded as well.

Here is a video for the visual learner:

[youtube]https://www.youtube.com/watch?v=r-fPo9_tNXM[/youtube]

Thanks so much for stopping by! Have a wonderful day!
Hugs and smiles

Today’s Timeless Tuesday challenge hostess is Mona Pendleton. Her challenge is to create a Trifold card. There are a lot of different tri-fold cards to choose one. I selected the Triangle Trifold.

I created the base out of a 4″ x 12″ piece of white cardstock. A piece of  Neenah Solar White cardstock was cut and embossed with the largest Beaded Square Nestabilities die  and cut diagonally. A 3 3/4″ square of Basic Grey cardstock  and a 3 1/2″ piece of Echo Park Yours Truly patterned paper were cut in half as well and stitched together. The layers were first adhered over the scalloped triangles, then over the card base fronts.

The sold heart from Fanciful Flourishes was stamped in Spun Sugar Distress ink on Neenah Solar White cardstock and cut out. The flourished heart was stamped over the solid one in Fired Brick Distress ink and embossed with Iridescent Ice Embossing Powder (Stampin’ Up!). The heart was adhered to another piece of white cardstock, cut and embossed with the second largest Beaded Circle Nestabilities die. Pink and Red Baby Bling were adhered to the beaded parts of the circle.

White Organdy ribbon was tied around the card base to keep it shut. The image layers were adhered above one part of the card front with dimensionals after parts of a Finesse Rhinestone Swirl was adhered to the upper right and lower left of the card. A sentiment from Fanciful Flourishes was stamped in London Fog Memento Ink on a piece of cardstock, cut and embossed with a retired tag die. The inside part of the tag was sponged with Spun Sugar before the tag was adhered slightly under the heart.

The inside panel of the card base was decorated to match the outside. I hope you have time participate in the challenge. Like I said, there are lots of different trifold cards out there and they are all not hard. Thanks so much for stopping by!
Check out my fellow Timeless Tuesday Challenge Members for more inspiration:

Cindy Haffner
Heather Jensen
Maki Jones
Mona Pendleton
Silke Ledlow
Tammy Hershberger
and
January Guest Designer Cheryl Lea

Have a wonderful day!
Hugs and smiles

I created this card a while back for a Featured Stamper Challenge at Splitcoaststampers. The featured stamper that day was Tenia Sanders-Nelson. She has an amazing gallery of CAS cards. While those are not easy to make for me, I gave it a whirl. I picked Tenia’s Trick or Treat card and used Winter images from Lawn Fawn’s Cute Critters in the Snow.

I cut and embossed three circles out of Neenah Solar cardstock with Classic Circle Nestabilities dies. The small penguin image was stamped in each center with Tuxedo Black Memento Ink and colored with Copic Markers (Y15, Y17, YR15, C0, C1, C3, C5, C7, BG10, BG11). Glitter was added underneath each Penguin.

The card base is a 6″ x 6″ piece of Kraft cardstock folded in half. The card front was embossed with a Snowflake Embossing folder from Sizzix. A 3/4″ x 5 3/4″ piece of Echo Park Walk in the Park was stitched to a 1 1/2″ x 5 3/4″ piece of Echo Park Holly Jolly Christmas cardstock, after the bottom corners were rounded. Before the layers were adhered to the card base, May Arts Organdy Ribbon was tied around the paper strips. The ribbon was topped with a Basic Grey Button tied on with May Arts Silver Curling Ribbon.

The images were adhered over the ribbon with dimensionals. Silver Rhinestones and part of a Finesse Rhinestone Swirls finish off the card front.

Thanks so much for stopping by! Have a wonderful day!
Hugs and smiles

Merry Christmas! I hope you have a wonderful time with your family today! My wish for you is health and happiness for the entire next year!

Here is another card that you can find in the new Whimsy Magazine. I love the new Wee Images from Whimsy Stamps. They are just soooo cute and so much fun to color. For this card I used the image called Christmas Bunny. It was stamped in Tuxedo Black Memento Ink on Neenah Solar White cardstock and colored with Copic Markers (Bunny: E30, E31, E33, R30, R20, R22   Gifts: Y15, Y17, E97, R05, R08, R29, R39, YG21, YG23, YG17   Glove: BG10, BG11, BG13   Sled: E23, E25, E27). The image was cut and embossed with the largest Classic Circle Nestabilities die.

It was masked, cloud masks were added and the background was airbrushed with B02. To make the clouds look more dimensional, the bottom edges were colored with Copic Marker W00, W0 and W1. The image was stitched to a piece of Crayon Brown Cardstock that had been hand cut into a slightly bigger layer. Stardust Stickles was added the the snow on the ground and some of the snowflake circles in the image.


Strips of Echo Parks Holly Jolly Christmas paper were adhered to a 4″ square of the same paper pack. The paper was stitched to a 1/4″ bigger square of Canyon Brown cardstock.  More paper strips from that paper pack were adhered to a 5″ square which was in turn stitched to a 5 1/4″ square of Canyon Brown cardstock. White Organdy Ribbon was tied around the vertical strips before the paper layers were adhered to the card base, yellow Core’dination cardstock, cut and embossed with a Grand Scallop Square Nestabilities die.

A sentiment from the new Winter Notables stamp set was stamped in Tuxedo Black Memento ink on Neenah Solar White cardstock. The center oval was cut out and colored with Copic Marker B0000 and B000. It was adhered to the upper right of the image. Baby Bling Rhinestones were adhered underneath the sentiment and part of a Rhinestone swirl was adhered to the upper right and lower left of  layers.

Thanks so much for stopping by! Have a wonderful day.
Hugs and smiles


I created this card for the latest Whimsy Magazine edition. It is out today and you can download it for free. The image I used is from the latest Whimsy Stamps release. It is a Wee stamp called Let it Snow. The image was stamped in Tuxedo Black Memento Ink on Neenah Solar White cardstock.

The image was cut and embossed with a Label 22 Nestabilities die and colored with Copic Markers (Bunny: E30, E31, E33, E 34, R30, R20, R22     Mouse: N0, N1, N3, N4   Clothes: RV21, RV23, RV25    BG11, BG13, BG15     C00, C1, C2   Pants: BG75, BG78   Sled: E23, E25, E27   Skin: E50, E51, E53    Hair: Y23, E31, E33).  The image was masked , cloud masks were added and the image was airbrushed with Copic Marker B12. The Clouds were colored with Copic Markers W00, W0 and W1. The layers were adhered to a piece of Canyon Brown cardstock and hand cut into a slightly bigger layer.

A 4 3/4″ long strip of white cardstock was cut and embossed with a Lace Doily Accent die. It was adhered under a 2″ x 4 3/4″ piece of Echo Parks Holly Jolly Christmas patterned paper. The strips were adhered to a 4 3/4″  square of the same paper pack. The layers were stitched toa a 1/4″ bigger piece of white cardstock. White Organdy Ribbon was tied around the horizontal strip and topped with a Recollection Glitter Brad.

The card base was cut out of Core’dination cardstock with a Grand Label 23 Nestabilities die. The edges of the cardstock were sanded before the the layers were adhered. A sentiment from the new Winter Notables was stamped in Tuxedo Black Memento Ink and colored with Copic Markers used on the main image. It was adhered on the top right of the image. Parts of a Finesse Rhinestone Swirl were added to the card front.

Thanks so much for stopping by! Have a wonderful day!
Hugs and smiles


Hello and welcome to Day two of our December Rubber Die Release Showcase!

On Wednesday (14 December) Whimsy Stamps released this month’s rubber designs and new shapeology dies. From then until 21 December the Whimsy Stamps DT and Special Guests are showcasing these fabulous new stamps and dies with a daily mini blog hop.

Each mini blog hop has a new release prize hidden somewhere along the way and you have 24hrs to enter each prize draw. To be entered into today’s mini blog hop prize draw, be sure to leave a comment on ALL of the DT’s posts listed below by 12.00PM EST tomorrow. All winners will be announced on the Whimsy Inspirations blog blog after 12.00PM EST on 21 December.

For my first sample of this new release I used the darling Fluffy on the Lily stamp from Wee stamps. It was stamped in Tuxedo Black Memento Ink on Neenah Solar White cardstock. The image was cut and embossed with a Label 22 Nestabilities die and colored with Copic Markers (Fluffy: E93, E95, E97, E99    Leaves: YG21, YG23, YG17    Flowers: RV21, RV23, RV25, Y13, Y17, YR15   Background: B0000, B000, B00, B01).

Two pieces of Echo Parks Summer Days paper were cut and embossed with a Grand Circle Nestabilities.  The layers were stitched to a slightly larger hand cut white cardstock circle after White Crochet Lace was adhered over the lower edge of the horizontal strip. White Organdy ribbon was colored with Copic Marker RV25, tied around the horizontal layer and topped with a white flower button, tied on with Silver Curling ribbon. Three Zva Creative Mini Flowers were tied together and adhered under the upper left hand corner of the image layer, which was then adhered over the ribbon with dimensionals.

A sentiment from Whimsy’s new Friendship Notables 2 was stamped in Tuxedo Black Memento Ink on Solar White cardstock cut out and adhered to the lower right edge of the image. The layers were adhered to the card base, a piece of Coredinations cardstock, cut and embossed with a Grand Scalloped Circle die. Rhinestones and part of a Finesse Rhinestone swirl finish off the card.

To take a peek at today’s fabulous new release creations, please click on the links below…

Ellie Stover
Erin Bailey
Pops 

Remember that the entire new release is available to buy right now from the Whimsy Stamps store along with all your Whimsy favorites.

Thanks so much for stopping by! Have a wonderful day.
Hugs and smiles

It’s Virtual Stamp night over on Splitcoaststampers. The first challenge is hosted by Lydia. She is asking us to create a card with something that gives us the “Warm Fuzzies”. Who wouldn’t get the warm fuzzies looking at this darling image. Plus the sweet penguin has a warm looking hat on.

To start out I stamped the Penguin’s first Snow image in Tuxedo Black Memento Ink on Neenah Solar White cardstock. The image was cut out with a Classic Square Nestabilities die and colored with Copic Markers ( Penguin: C00, C1, C3, C5, C7, C9, Y17, YR15, YR18   Hat: YG41, YG45, R30, R32   Snow: BG10, BG11). I covered the main image with a mask cut with Eclipse tape. But the snow flakes were too small for that, so I used Liquid Masking Fluid. The image was airbrushed with Copic Marker B04.

Stardust Stickles was added to the snow and snow flakes. Sugar Sparkly Fluff was added to the hat rim and pom-pom. The image was adhered to a piece of Solar White cardstock, cut and embossed with the largest Postage Stamp Nestabilities die.

A 1 1/4″ x 4 1/4″ strip of Echo Park Holly Jolly patterned paper was adhered to the lower part of a 4 1/4″ x 5 1/2″ piece of the same paper pack. The lower corners were rounded. White Crochet Lace was adhered above the paper strip before White Organdy Ribbon was tied above teh paper strip. The image was adhered over the ribbon with dimensionals.

The sentiment is from Whiff of Joy’s Seasonal Greetings. It was stamped in Tuxedo Black Ink on Neenah Solar White cardstock, cut and embossed with Standard Circle Nestabilities die. The center of the circle was colored with Copic Markers B0000 and B000. The layers were adhered to a card base a 4 1/4″ x 11″ piece of Solar White cardstock, folded in half.  Part of a Finesse Rhinestone Swirl and additional Rhinestones finish off the card.

Thanks so much for stopping by! I hope you have time to play with us tonight.
Have a great evening.
Hugs and smiles

CardMaker Magazine is launching a new blog and is featuring Little Darling Stamps today. Little Darling stamps will be included in CardMaker Magazine’s “Our Favorite Products” in the January issue that is on sale in stores now. To celebrate this occasion, Angie Hunt is giving away five Little Darling Stamps, one from each of the five releases so far, to a random commenter on her blog.

For my card I did something for the first time. I merged digital images. When I agreed to help out for this event, I got to pick a Little Darlings image, but as digital image. I picked the darling Ice Dancer. To give her an area to skate on, I purchased this Ice Skating Lake digi image from Make it Crafty. I followed the excellent tutorial on merging images from Crafty Cardmakers, which made it very easy to merge my images.

I printed them out on Neenah Solar White cardstock and cut the image with the largest of the Standard Circle Nestabilities dies. The image was colored with Copic Markers (Coat and socks: R24, R29, R39   Coat Trim: C00, C1, C3   Skirt and shoes: E42, E43, E44, E47   Shirt: E40, E42   Skin: E50 E51, E53, BV00   Hair: Y21, Y23, E33   Trees: G21, G24, G28   Sky: B0000, B000, B00, B91) before it was layered on to a piece of Solar White cardstock, cut and embossed with the largest scallop circle from the standard circle collection. Stardust Stickles was used to add sparkle to the snow and Glossy Accents on part of the lake.

For my card layout I used the current Sketch Saturday Sketch. Little Darlings is sponsoring it this week. The winner will be receiving a $15 merchant gift voucher from LovetoStamp.

I cut a circle with a Grand Circle Nestabilities die out of  Echo Park’s Times & Seasons paper and sanded the edges. One 2 1/8″ and a 2 3/8″ wide strip from the same paper pack were also cut and embossed with the same die and had their edges sanded.

A white cardstock strip was cut and embossed with one of the Jumbo Scalloped Borderabilities dies and adhered under the blue layer. A piece of White Crochet Lace was adhered to one side of the red layers. Both of the strips were adhered to the circle layer and the edges were stitched.

White Organdy ribbon was tied around the horizontal strip, topped with a button tied on with Silver Curling ribbon. The layers were then adhered to a card front, cut and embossed with a Grand Scalloped Circle die out of Solar White cardstock.  A sentiment from Whimsy’s Treasured Moments Tickets was stamped in Tuxedo Black Memento ink on a piece of Solar White cardstock, cut and embossed with a Standard Nestabilities circle die. The sentiment center was colored with Copic Markers B000, B00. Part of a Finesse Rhinestone swirl and more silver Rhinestones finish off the card front.

Thank you so much for stopping by! Good luck winning those stamps.
Have a wonderful day!
Hugs and smiles

Wohoo! Today is the first day of me being officially on the Whiff of Joy Challenge team. This week’s challenge is easy. It’s a beautiful sketch from Katharina.

I had just received my latest order and new right away I wanted to ink up the darling Ice-Beary Greetings stamp right away. The image was stamped in Tuxedo Black Memento Ink on Neenah Solar White Cardstock, colored with Copic Markers (Bear: C00, C1, C3   Scarf: YG41, YG45   Hat/Mittens: B41, B52, B45) and cut and embossed with a Standard Circle Nestabilities die. The image was then masked and airbrushed first with the medium nib of Copic Marker B93, then with the Brush tip of Marker B95 (brush tip gives a more speckled look).

Sugar Sparkly Fluff was added the hat trim and pom pom, Stardust Stickles over the snow. Subtle highlights were added with Copic Opaque White. The circle was then adhered to a piece of Solar White cardstock, cut and embossed with the largest Tear Drop Circle Die.The image layers were adhered to a 4″ square of Winter Park Paper after that was stitched to a 1/4″ bigger piece of Kraft cardstock.

A 5″ square of Echo Parks Holly Jolly Christmas Paper was cut in half diagonally. The triangles were stitched to triangles cut out of a 5 3/8″ square of Kraft cardstock.  On the triangle going on the right side of the card front I punched a hole on the lower left side and tied White organdy ribbon through it. The bow was topped with a button, tied on with Silver Curling Ribbon.

Next I cut a piece of felt with Spellbinders 2010 Snowflake Pendant. I put a piece of scrap paper underneath the felt. I help cut the felt right through. The snowflake was adhered to the upper right corner of the image layers. A piece of white cardstock was cut and embossed with the smaller dies of that pendant pack, airbrushed with Copic Marker R00 (I used that for the little bears cheeks). That snowflake was adhered to the lower left corner of the image layers.

The card base was cut and embossed with a Grand Square Nestabilities die out of Solar white cardstock. The layers were adhered to that and dressed up with part of a Finesse swirl and Silver Rhinestones.

A sentiment from Whiff of Joy’s Seasons Greetings was stamped in Tuxedo Black on a piece of Solar White cardstock, cut and embossed with a die from Spellbinders Ribbon Banners. The inside of the banner was sponged with Pumice Stone Distress ink. The sentiment was adhered with dimensionals over the felt snowflake and part of the image.

The inside was dressed up to match the outside of the card The white square measures 5″. It was topped with a 1 5/8″ wide strip of Holly Jolly paper and stitched to a 3/16″ bigger piece of Kraft cardstock. A partial snowflake was added to the lower left corner, topped with a Basic Grey button that was tied on with silver string. Three Silver Rhinestones finish off the card.

Thanks so much for stopping by. Please check out my fellow team members listed on my right side bar. I hope you have time to participate in the challenge. It’s a fun sketch and you could win prizes, if you use a Whiff of Joy stamp on your card.

Have a wonderful day! Hugs and smiles


During the Mini VSN a few of weeks ago, the first challenge was to create a card with an image of a warm clothing along with some felt on your card. I had just shot the video tutorial for the Pocket Card ,and had a finished pocket, that just needed an image to be finished off.

I stamped an image from the super cute There She Goes Clear Stamps Wonderful Winter Wishes set in Tuxedo Black on Neenah Solar White cardstock as well as a  patterned piece from Echo Parks Holly Jolly paper pack. The jacket was cut out of the patterned paper and shaded with Copic Markers ( R35, R37, R39). The image on the cardstock was cut and embossed with a Classic Circle Nestabilities die and also colored with Copic Markers (mitten and boots: G000, G00, G02 Skin: E0000, E00, E01, R20 Pants: E40, E41, E42 Snow: BG0000, BG000, B01 Hair: E97, E25 carrot: YR15, YR18). The jacket was adhered to the main image and the background was airbrushed with Copic Marker B02. The cloud that had been masked, was shaded with Copic Markers (W00, W0, W1).


The card base was created out of a 4 1/4″ x 11″ piece of cardstock, scored at 1 1/4″ and 5 1/2″. The four corners were rounded. A 3 3/4″ square of Holly Jolly paper was stitched to a 1/4″ bigger piece of whtie cardstock. A quarter of a paper doily was adhered to the lower left of the the stitched layers and three buttons were tied to it with Linen Thread.

Part of a Finesse Swirl was adhered over the buttons and more Rhinestones were adhered to the lower right corner. The layers were adhered to the card base. Before the flap was taped down, May Arts Organdy Ribbon was tied around it. Pink felt was cut with a small Heart Nestabilities die and stitched to the top of the bow.

The image circle was adhered to a piece of Solar White cardstock, cut and embossed with a Tear Drop Circle Nestabilities die. The layers were adhered to the card base with dimensionals.

The inside tag is a 3 1/2″ x 5″ piece of Solar White cardstock. The top corners were rounded and a 1 1/8″ wide strip of Holly Jolly paper was adhered to the lower half. A sentiment from the Wonderful Winter Wishes set was stamped above the strip with Tuxedo Black ink. Another pink felt heart was topped with a clear button and stitched to the tag with embroidery thread.

The card works great for this weeks DYSU Challenge, so I will be entering it there. It’s an easy challenge that I could enter all my cards into. Use ribbon. It would be harder for me if the challenge was NOT to use ribbon. LOL

Here is a video for the visual learner:

[youtube]https://www.youtube.com/watch?v=PrH-I8Op-O0[/youtube]

Thanks so much for stopping by! Have a wonderful day!
Hugs and smiles


© 2012 fresh & fun Suffusion theme by Sayontan Sinha