I am excited to be a guest designer for Kraftin’ Kimmie Stamps this month! My gig starts out easy with today’s Kraftin’ Kimmie challenge . Use heat or dry embossing on your project. Since making my first tag for the Flourishes Timeless Tuesday challenge this week, I was itching to create another tag.

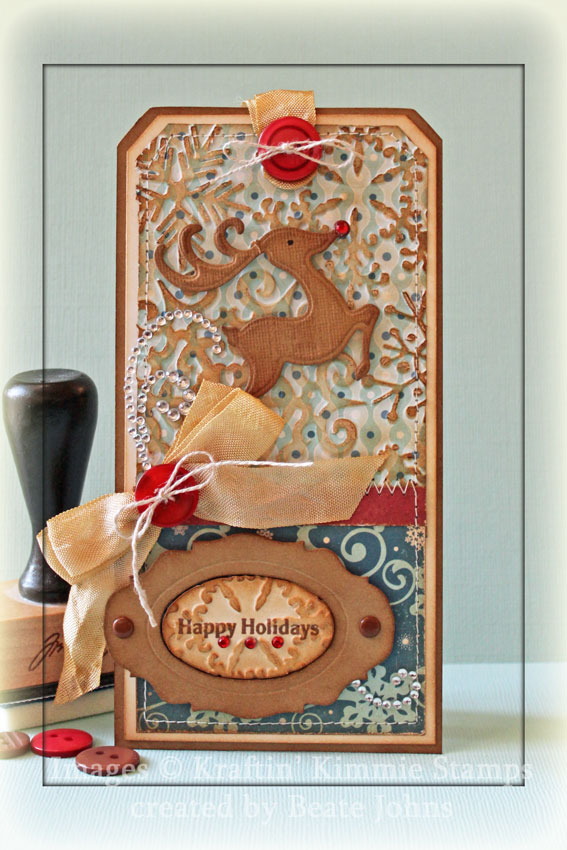
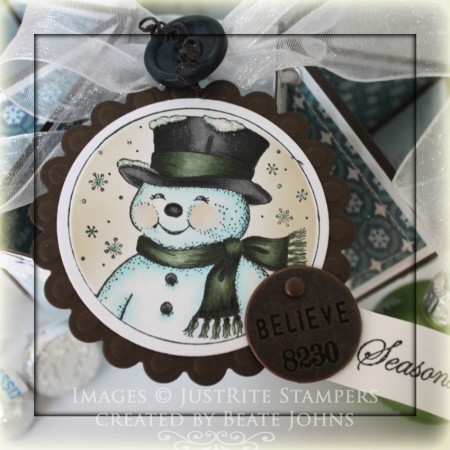
For this one I started out with embossing a 2 /3″ x 4″ piece of Winter Park Patterned paper with a Snowflake  Embossing Folder. The raised snowflakes were sanded and the sponged with Vintage Photo Distress ink. Two more 2 3/4″ wide pieces of the same paper pack were sanded and stitched to a 3″ x 6″ piece of Neenah Solar White cardstock that had been sponged with Vintage Photo ink. The layers were adhered to a piece of Kraft cardstock that had been cut with Tim’s large tag die.

For the sentiment panel I cut a piece of white and Kraft Cardstock with Tim’s Tag die. From the white piece I used the inner oval of the sentiment label. A sentiment from Kraftin’ Kimmie’s Holiday Sentiments was stamped in Rich Cocoa Memento Ink in it’s center. Then it was embossed with the same embossing folder used for the Winter park paper and sponged with Vintage Photo Distress ink. From the Kraft cardstock I used the outer part of the label. It was also sponged with Vintage ink and two brown brads were added. The panel was adhered with dimensionals to the lower part of the card.

I dyed some seam binding with Vintage Photo Distress Re-inker and water. It was turned into a bow and a button was tied on with Linen Thread. Parts of a Finesse Swirl were added above the bow and underneath the sentiment label. Three red Baby Bling Rhinestones were added under the sentiment.

As focal point for the upper part of the tag, I cut and embossed a piece of textured Kraft cardstock (Stampin’ Up!) with a Fanciful Holiday Shapeabilities die. It was sponged with Vintage Photo ink and a red Baby Bling Rhinestone was added to it’s nose. More dyed seam binding was attached to another red button and adhered to the top of the tag.

Thanks so much for stopping by! I hope you have time to participate in the challenge.
Have a great weekend!
Hugs and smiles

I am excited to be a Guest Designer for Little Darlings new rubber stamp release. I stamped the image called Snowy Friends in Tuxedo Black Memento Ink on Neenah Solar White cardstock. It was cut and embossed with a Classic Circle Nestabilities die and colored with Copic Markers (Skin: E0000, E00, R20 Hair: E99, E37, E29 Pants: E42, E43, E44 Jacket: G0000, G00, G00 Shoes: R24, R27, R39 Hat: YR15, Y18, R24, R28 Snowman Scarf: G03, G05, G07 Snowman hat: C3, C5, C7, C9 Branch: E25, E29 Eyes: E99, E39, E27).

The image was masked and two cloud masks were added before the circle was airbrushed with Copic Marker B41. The bottom was covered with Polar White Flower Soft.   The bottom of the clouds were colored with Copic Markers (W00, W0, W1). The layer was adhered to a piece of Canyon Brown Cardstock, cut and embossed with a Big Scalloped Circle Nestabilities die.

A white paper strip was cut with MFT’s  new Icicle Border die. It was adhered under a 4″ square of Echo Park Holly Jolly Paper and a slim strip of white cardstock was adhered on top. The layers were stitched to a 4″ x 5 1/4″ piece of Holly Jolly paper. The bottom two corners were rounded and white organdy ribbon was tied around the horizontal layers before the image was adhered with dimensionals.

Two snowflakes were cut out of white cardstock with Whimsy Layered Snowflake die, stacked and topped with a brad, that had been colored with Copic Marker G02. The snowflake was adhered to the upper right edge of the layers, part of a Finesse Rhinestone Swirl to the top right.

Another snowflake was cut with the smallest of the MFT Snowflakes die-namic dies. It was adhered to the top of the bow with Glossy Accents. A Baby Bling Rhinestone was adhered in the center of the snowflake.

A sentiment from The Cats Pajama’s Bearing Flowers was stamped in Tuxedo Black ink on a piece of Neenah Solar White cardstock, cut and embossed with a Classic Circle Nestabilities die. It was airbrushed with Copic Marker B41 and adhered to the lower right  of the image.

If you like this image and the others from this release, check out the Little Darlings Challenge Blog. Participate in the challenge and you could win a $10 Gift certificate if you win and made a project without their stamps, or a $20 Gift certificate if you made a project with Little Darling stamps.

Thanks so much for stopping by! Have a wonderful day.
Hugs and smiles

I hadn’t played with MFT stamps for a while. So when I saw this VSN Mini challenge, I  got out Pure Innocence Snow Angel, stamped it in Tuxedo Black Memento Ink, once on Neenah Solar White cardstock and twice on small patterned Holly Jolly Echo Park Patterned Paper.

The image was colored with Copic Markers (bear: E55, E57, E59   Holly & Berries: R08, R17, R29, G02, G05  Hat rim: C2, C0, C00   Snow: B0000, B000). The scarf hat and mitten patterned paper pieces were shaded with G0000, G000, G00, the boots and coat with R02, R05, R08). Before the paper pieces were added to the main image, The image was cut and embossed with a Classic Circle Nestabilities die. Two cloud masks were added, the image was masked and the background was airbrushed with Copic Marker B02. The Clouds were shaded with Copic Markers W00, W0, W1.

The image layer was adhered to a slightly bigger Canyon Brown cardstock circle and then to a piece of Neenah Solar White cardstock, cut and embossed with the largest Tear Drop Circle Nestabilities die. Turquoise Baby Bling was added to the Tear drop circle.

A 2 3/4″ x 4 1/4″ piece of Holly Jolly paper was adhered stitched to a 4 3/4″ x 4 1/4″ Holly Jolly paper piece. A small strip of white cardstock was adhered to the top of the paper layers and brown May Arts Organdy Ribbon was tied around the horizontal layer. The bow was topped with a button, tied on with Linen Thread. The layers were adhered to the card base, a 4 1/4″ x 11″ piece of Kraft cardstock, folded in half. The bottom two corners were rounded.

A sentiment from Snow Angel was stamped on a piece of Solar White cardstock that had been cut and embossed with the smallest Petite Oval Nestabilities die. The center of the oval was colored with Copic Markers R000 and R00.

Thanks so much for stopping by! Have a wonderful day!
Hugs and smiles

Hello and welcome to Day Five of our November Rubber Die Release Showcase!

On Wednesday (16 November) Whimsy Stamps released this month’s rubber designs and new shapeology dies. From then until 23 November the Whimsy Stamps DT and Special Guests are showcasing these fabulous new stamps and dies with a daily mini blog hop.

Each mini blog hop has a new release prize hidden somewhere along the way and you have 24hrs to enter each prize draw.

To be entered into today’s mini blog hop prize draw, be sure to leave a comment on ALL of the DT’s posts listed below by 12.00PM EST tomorrow. All winners will be announced on the Whimsy Inspirations blog after 12.00PM EST on 23 November.

Here is another card I created it for one of the VSN challenges last week. I made with a newly released Wee Stamps called A Letter to me.

The image was stamped in Tuxedo Black Memento Ink on Neenah Solar White Cardstock. It was colored with Copic Markers ( (Jammies: G000, G00, G02, C00, N0, N1 Kitty: C00, N0, N1, R20, R21 Puppy: E55, E57, E59, E40, E42 Letter, Envelope: E40, E41, E42 Skin: E50, E51, E53 Hair: E99, E39, E29   Ground: W3, W5, W7) and cut out and embossed with the Spellbinders Scallop Frame die.

The image was airbrushed with Copic Marker B000 and stitched to a piece of Canyon Brown cardstock, cut and embossed with a Long Scallop Rectangle die. The layers were adhered to the rest of the Scalloped Frame.


A 2″ x 5 1/4″ piece of Holly Jolly Christmas Echo Park was adhered to a 4″ x 5 1/4″ piece of the same paper pack. The paper was stitched to a 4 1/4″ x 5 1/2″ piece of Canyon Brown Cardstock . White Organdy Ribbon was tied around the horizontal paper and a pink button was tied on with brown waxed Linen.

The image was adhered over the layers with dimensionals and all layers were adhered to a 5 1/2″ x 8 1/2″ piece of Canyon Brown cardstock, folded in half (so you don’t see the stitching and the ribbon on the inside of the card).

A sentiment from the new Winter Notables Stamp set was stamped in Tuxedo Black on Solar White cardstock. It was cut out and adhered to a piece of Canyon Brown cardstock cut with the new Elegant Notables die. Parts of  a Finesse Rhinestone Swirl and a couple Baby Bling Rhinestones finish off the card.

To take a peek at today’s fabulous new release creations, please click on the links below…

Debbie Eastman
Deb Routledge {Special Guest}
Ellie Stover
Erin Bailey
Simonne Clay
Stephanne Maraver
Sylvia Blum  

Remember that the entire new release is available to buy right now from the Whimsy Stamps store along with all your Whimsy favorites.

Thanks so much for stopping by! Have a wonderful day!
Hugs and smiles

A little while ago Libby Hickson asked me if I was interested in being a guest designer for Hambo Stamps. I had met Tim and Monica at a Copic Certification last year and of course was excited and honored to say yes!

For my sample I picked the digital image Silly birds of Hats. I printed it out on and cut it with a Neenah Solar White cardstock Classic Circle Nestabilities die. The image was colored with Copic Markers (sorry, I colored it during vacation and I can’t find the piece of scrap paper I wrote down the color codes).  The circle was then adhered to a piece of black cardstock, cut and embossed with the largest Eyelet Circle Nestabilities.

A 2″ x 5″ strip of Echo Park Summer Days paper was adhered to a 4 1/2″ x 5″ piece of a different paper pattern of the same line. The layers were stitched to a 1/4″ bigger piece of black cardstock. Turquoise ribbon was tied around the horizontal strip before the layers were adhered to the card base, a 5″ x 11″ piece of More Mustard cardstock, folded in half.

A another pattern from the same pack was cut and embossed with a smaller circle Nestabilities die and adhere to the upper right corner of the card base. A swirl was created out of Silver Kaisercraft Rhinestones on the upper left side before the image layers were adhered to the center with dimensionals.

The sentiment is also from Hambo Stamps. It was stamped in Tuxedo Black Memento Ink on Solar White cardstock before it was cut and embossed with Petite oval Nestabilities and adhered to the lower left hand side.

Thanks so much for stopping by! Have a wonderful day!
Hugs and smiles

Welcome to the 10th week of JustRite Stampers’  Wednesday feature, 12 Weeks of Christmas Blog Hops!  Every Wednesday up until Thanksgiving we have been showcasing JustRite’s entire Christmas Collection of stamps!  Don’t forget that JustRite has some Christmas stamps in their newly released CLING line of stamp sets, too — you can find them HERE.

For the month of November we thought we would also throw in some holiday gift ideas for any of your JustRite stamps so be watching for those, too, on November’s hops!  And in celebration of JustRite’s 10th week of Christmas Blog Hops, they have a huge surprise for you — through November 29 take 25% off all JustRite Original Christmas stamp sets, with free shipping within the U.S. on orders over $50 — Don’t forget to tell Santa!

For today’s blog hop I created a circular tag with JustRiteStampers Vintage Christmas set. I stamped the darling snowman in Tuxedo Black Memento Ink on X-Press It Blending Card and colored it with Copic Markers (snowman:  B0000, B000 Hat, nose and buttons: N3, N5, N7, N9, Cheeks: E000, E00, Scarf: BG93, BG96, BG99). The image was cut and embossed with Classic Circle Nestabilities, airbrushed with Copic Marker E40 and layered on a piece of Early Espresso Cardstock cut and embossed with Eyelet Circle Nestabilities. Glossy Accents was added over the snow on the snowman’s hat and snowflake. Fine Glitter was sprinkled over it.

The sentiment is from JustRite Stampers Christmas Nested Sentiments. It was stamped on a strip of X-Press It blending card. The cardstock was bend in shape of a waving banner and attached to the main image by adhering it to a Tim Holtz Philosophy Tag with Glossy Accents.

The box base is a 8 ¼” square of Early Espresso cardstock. It was scored at 2 ¾” and 5 ½” on each side. The corner square were scored diagonally and folded in. The folded corners were layered with white cardstock triangles that were cut by cutting  a 2 3/8” square in half. That square had been topped with a triangle cut out of a 2 1/8” square of Echo Park Wintertime. The layers were stitched together before they were adhered to the box with Scor-Tape. For the full squares,  2 ¼” pieces of Echo Park Winterland patterned paper were stitched to a 2 ½” square of white cardstock.

Organdy Ribbon was threaded through silver eyelets, was tied into a bow and topped with a navy button.

Here is a video for the visual learner:

[youtube]https://www.youtube.com/watch?v=vvMMIY3NHKc[/youtube]

Please visit these designers’ blogs to see what fabulous JustRite Christmas inspiration they have for you on the hop today!

JustRite Inspiration Blog
Sharon Harnist
Debbie Olson
Beate Johns
Kazan Clark
Stephanie Kraft
Michele Kovack
Angela Barkhouse
Sankari Wegman
Heidi Blankenship
Kathy Jones
Eva Dobilas
Thanks so much for stopping by! Have a wonderful day! Hugs and smiles

© 2012 fresh & fun Suffusion theme by Sayontan Sinha