
Here is the promised tutorial for the double pocket card.
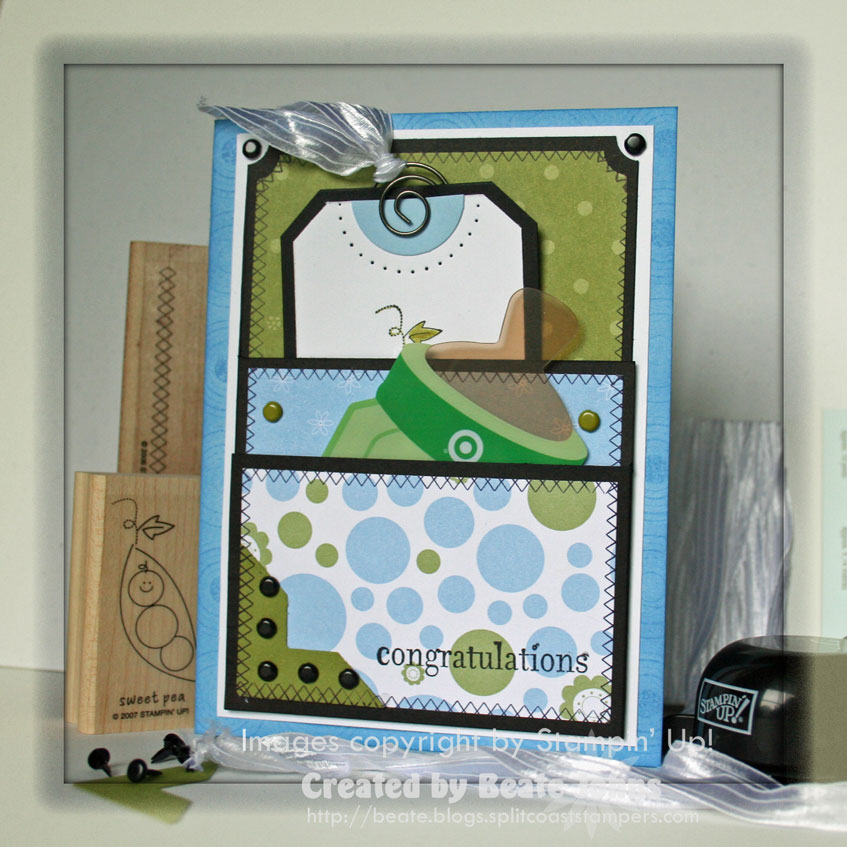
I made this card for my downline Stephanie, who is expecting her first baby in November.
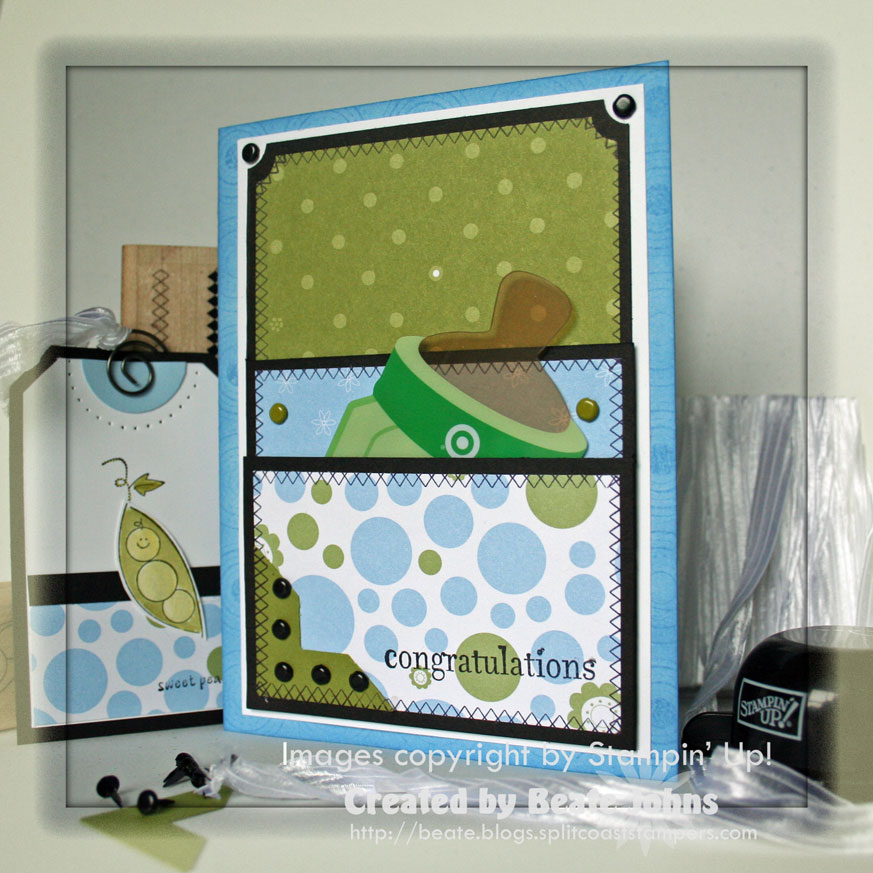
The bottle in the front pocket is a Target gift card.
Stamps: Event Full, All in a Row, Hugs & Wishes, Dot Spot (on the card base)
Ink:Black Stazon; Classic inks: Bashful Blue, Summer Sun and Old Olive
Paper: Bashful Blue, Whisper White, Old Olive and Basic Black cardstock, Cutie Pie and Petals & Paisley designer paper
Acc.: Sponges, ticket corner punch, photo corner punch, tag corner punch, 1″ circle punch, vintage brads, EE brads, sticky strip, Bella Fibers, Paper piercing tools, Pewter paper clip, Aqua painter
If you are interested in checking out the step by step instructions, click on more:
Supplies:
-
Paper cutter with scoring blade, or extra scoring tool (I used Scor Pal)
-
One 5″ x 10 1/2″ piece of cardstock for your pocket base
-
Designer paper to decorate the pockets if wanted
-
Card base and extra cardstock if needed
-
Stamps
-
Ink
-
Sticky Strip
-
Embellishments
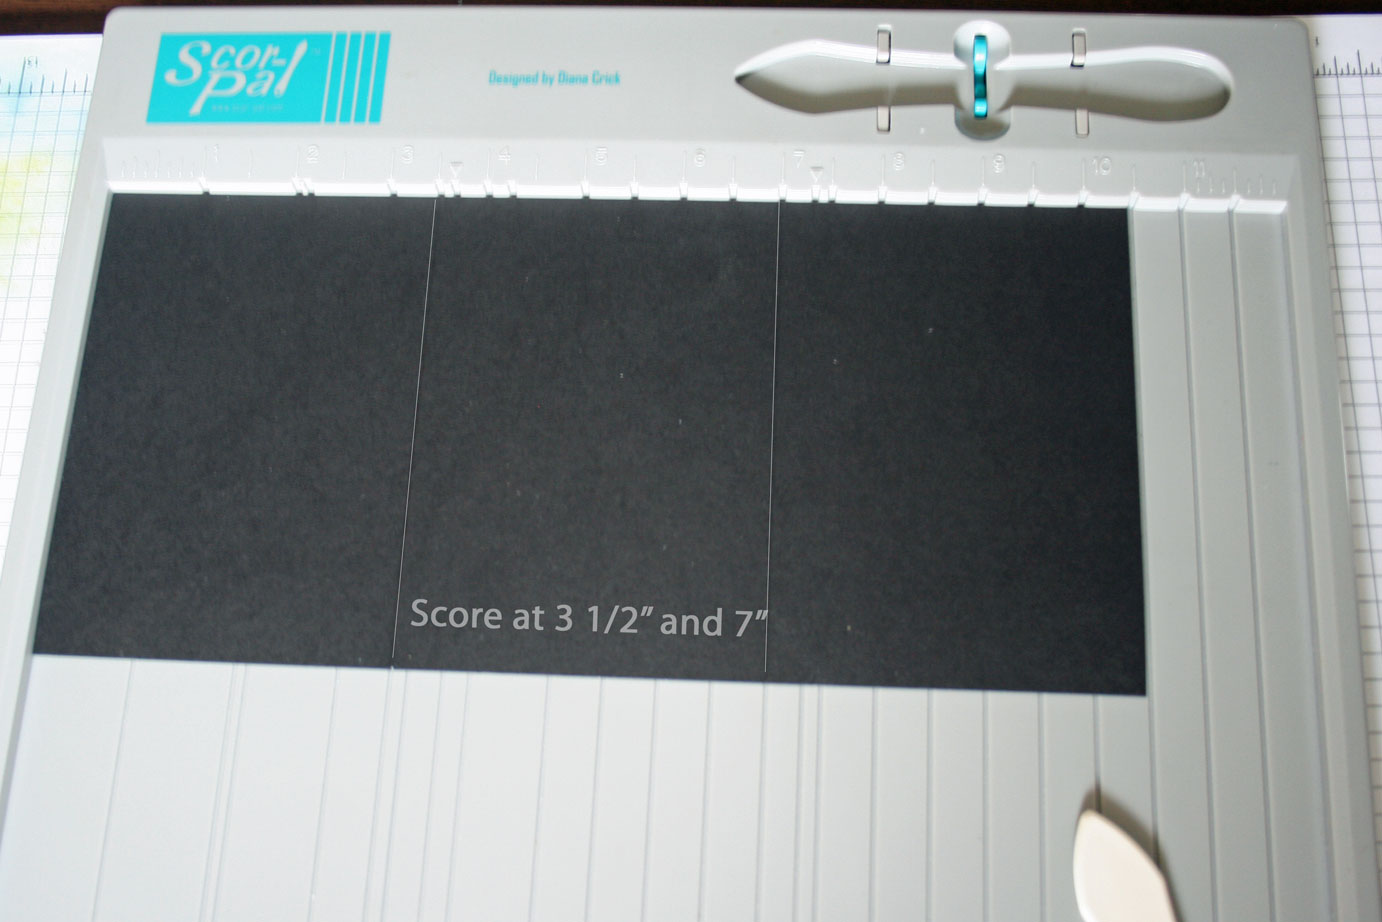
Step one:
Score your paper at 3 1/2″ and 7″ on the long side.
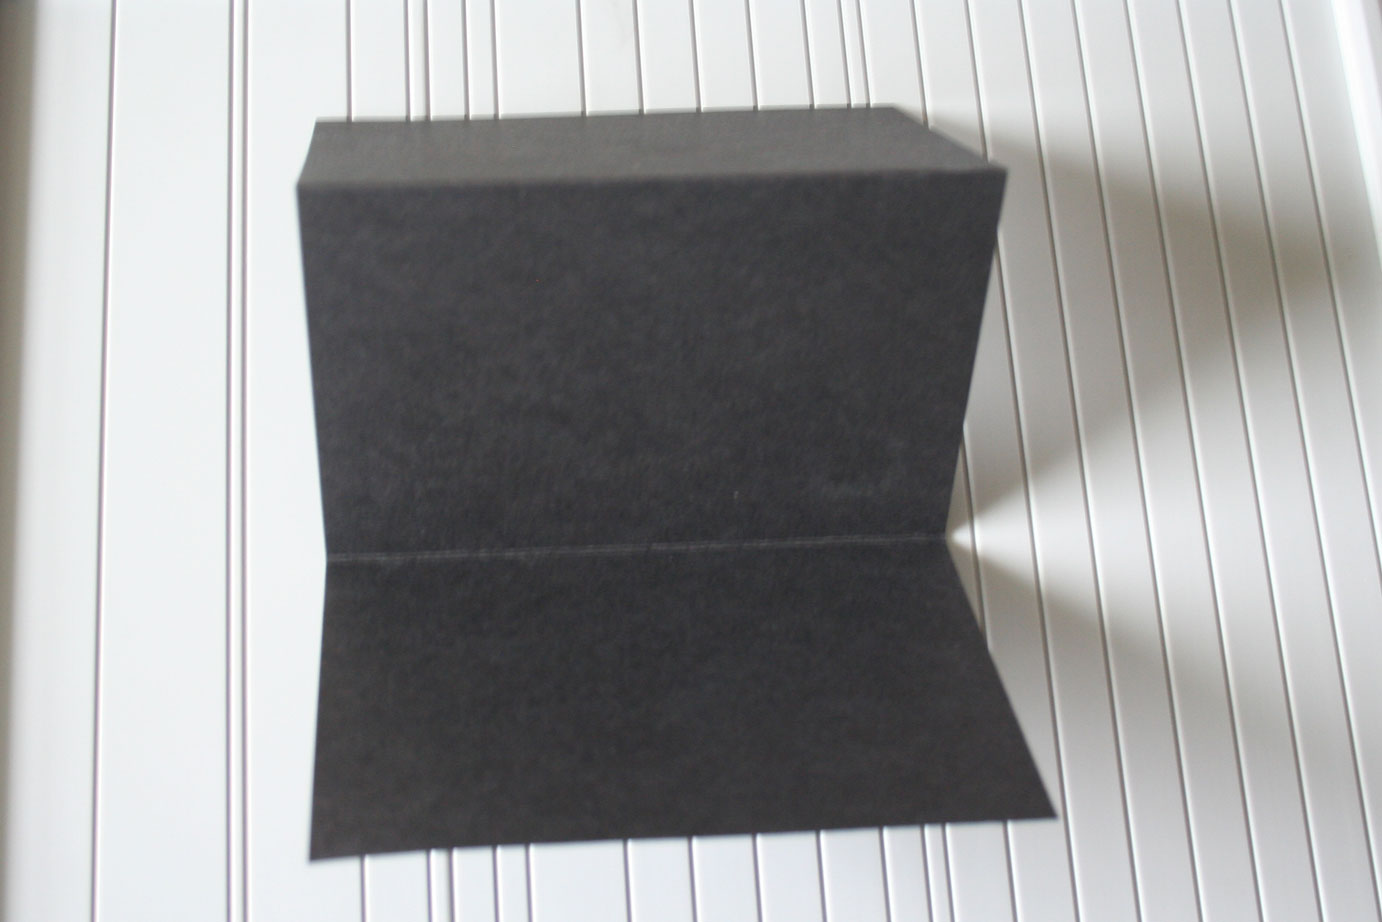
Step two:
Fold your cardstock accordion style.
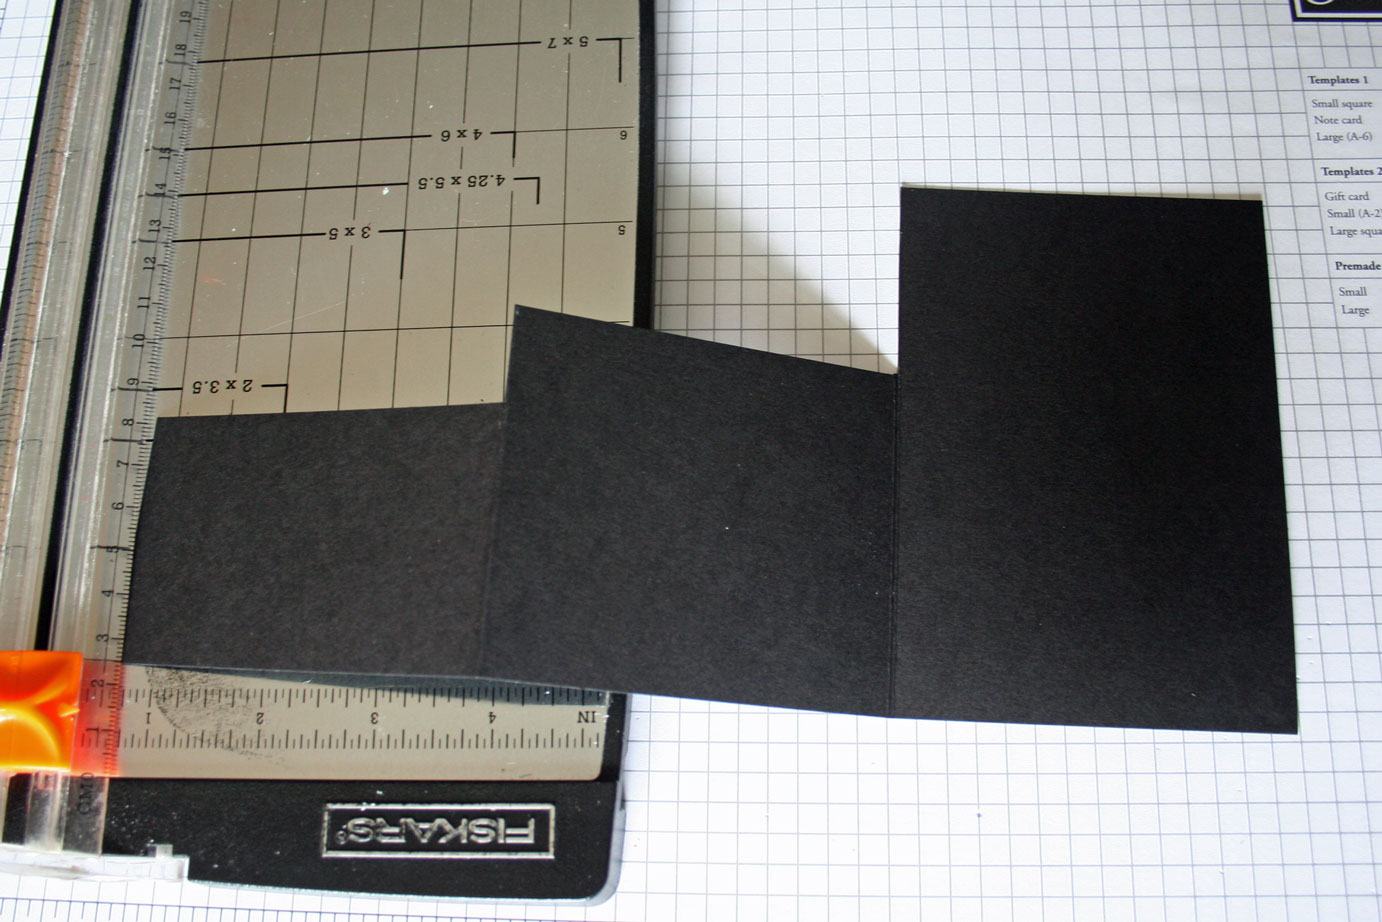
Step three:
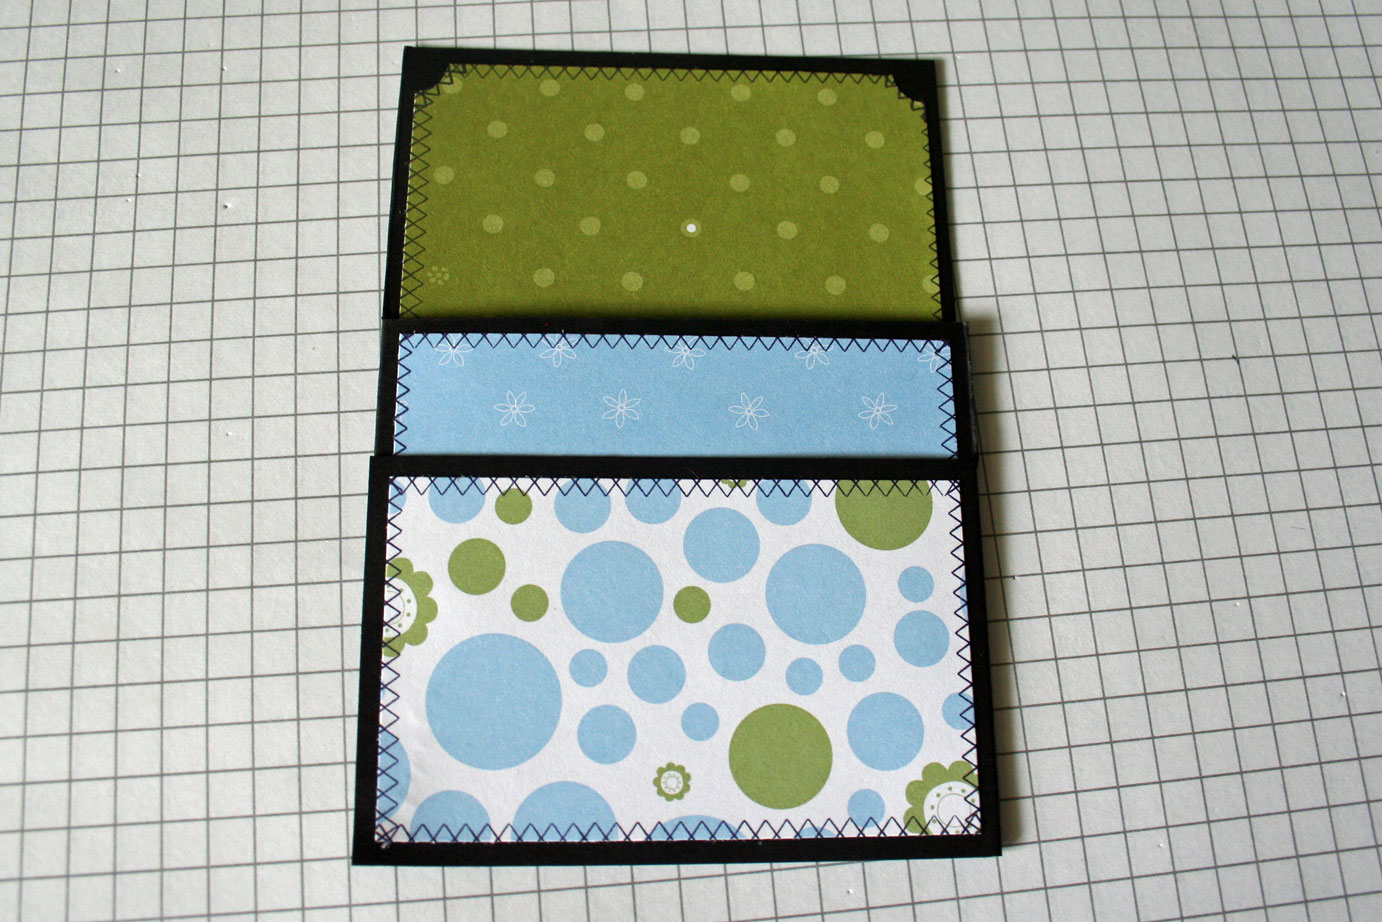
Cut down your panels. Leave one full size, cut the middle panel down a bit and the outer panel down even more.
My panels measure 2 1/4″, 3 1/8″ and full size in height. But you can make them any size you want.
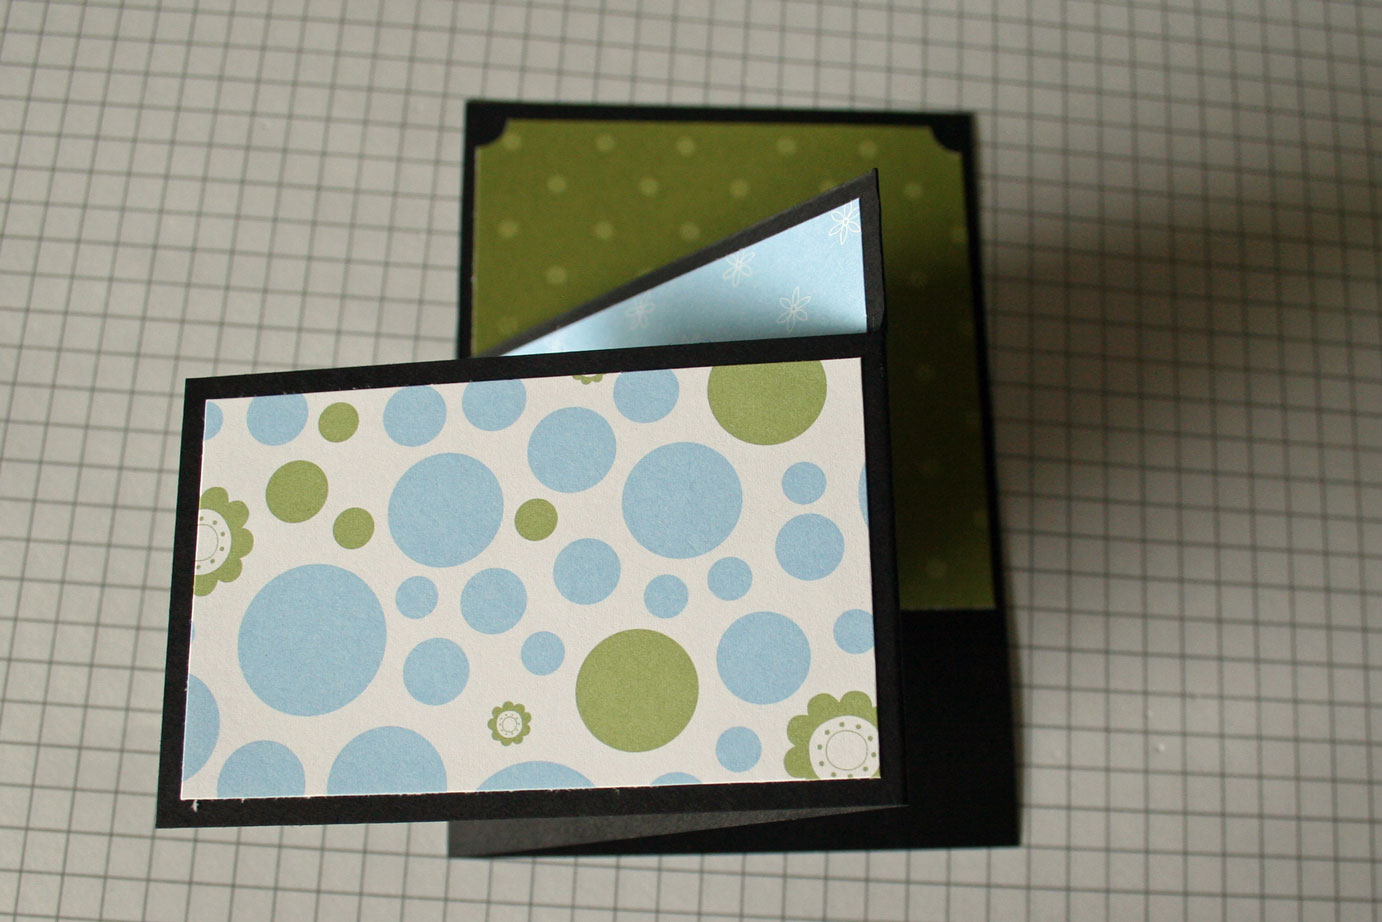
Step four:
Add patterned paper to your panels if wanted. You could also stamp your panels, if you choose a lighter color then the black in this sample.
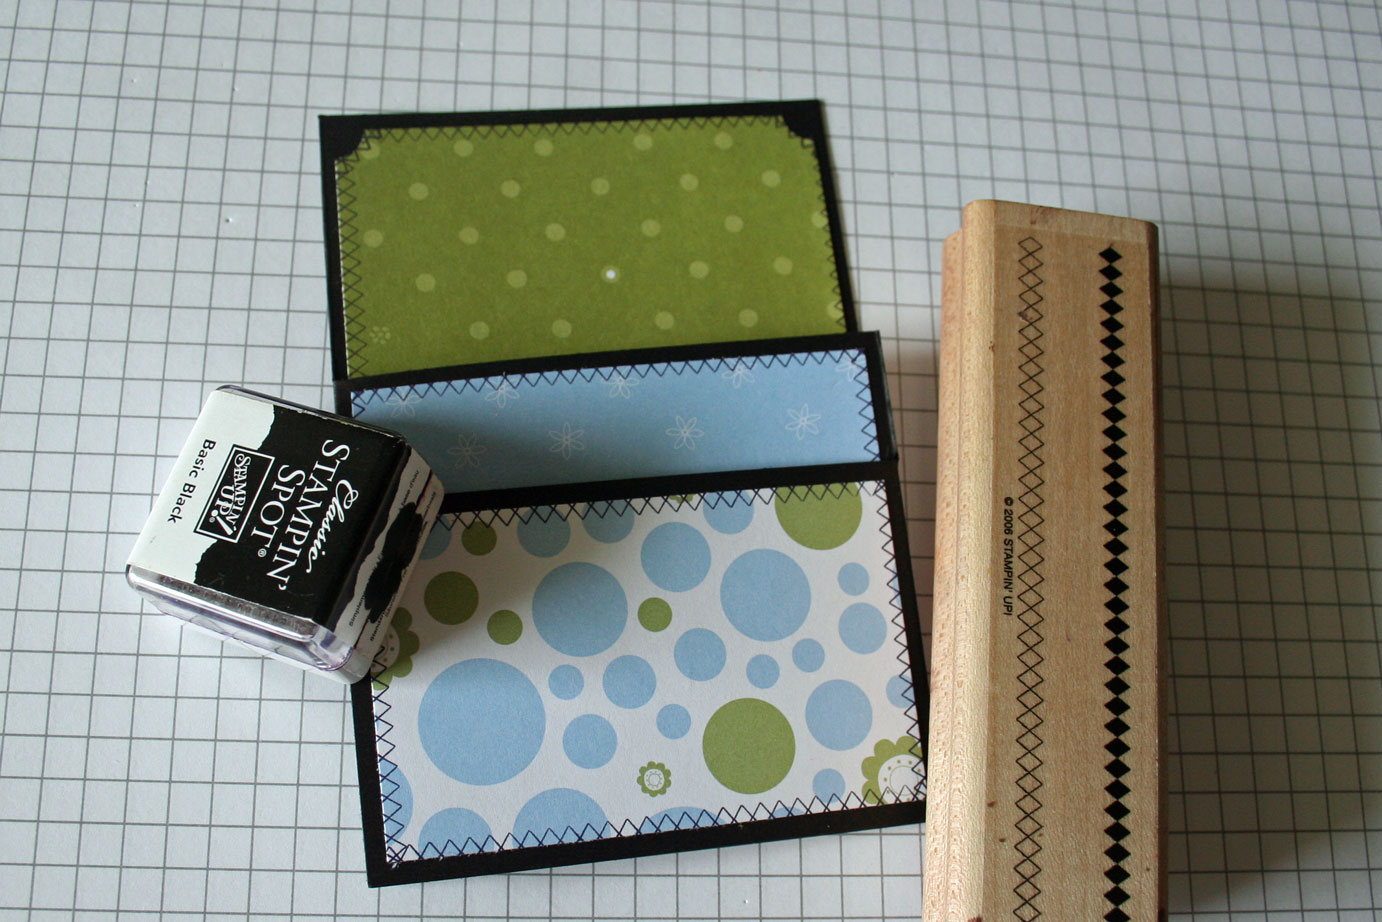
Step five (only for All in a Row addicts):
Add Faux Stitching now, if you want to add it. It’s easier then trying to make it look good over all the different layers.
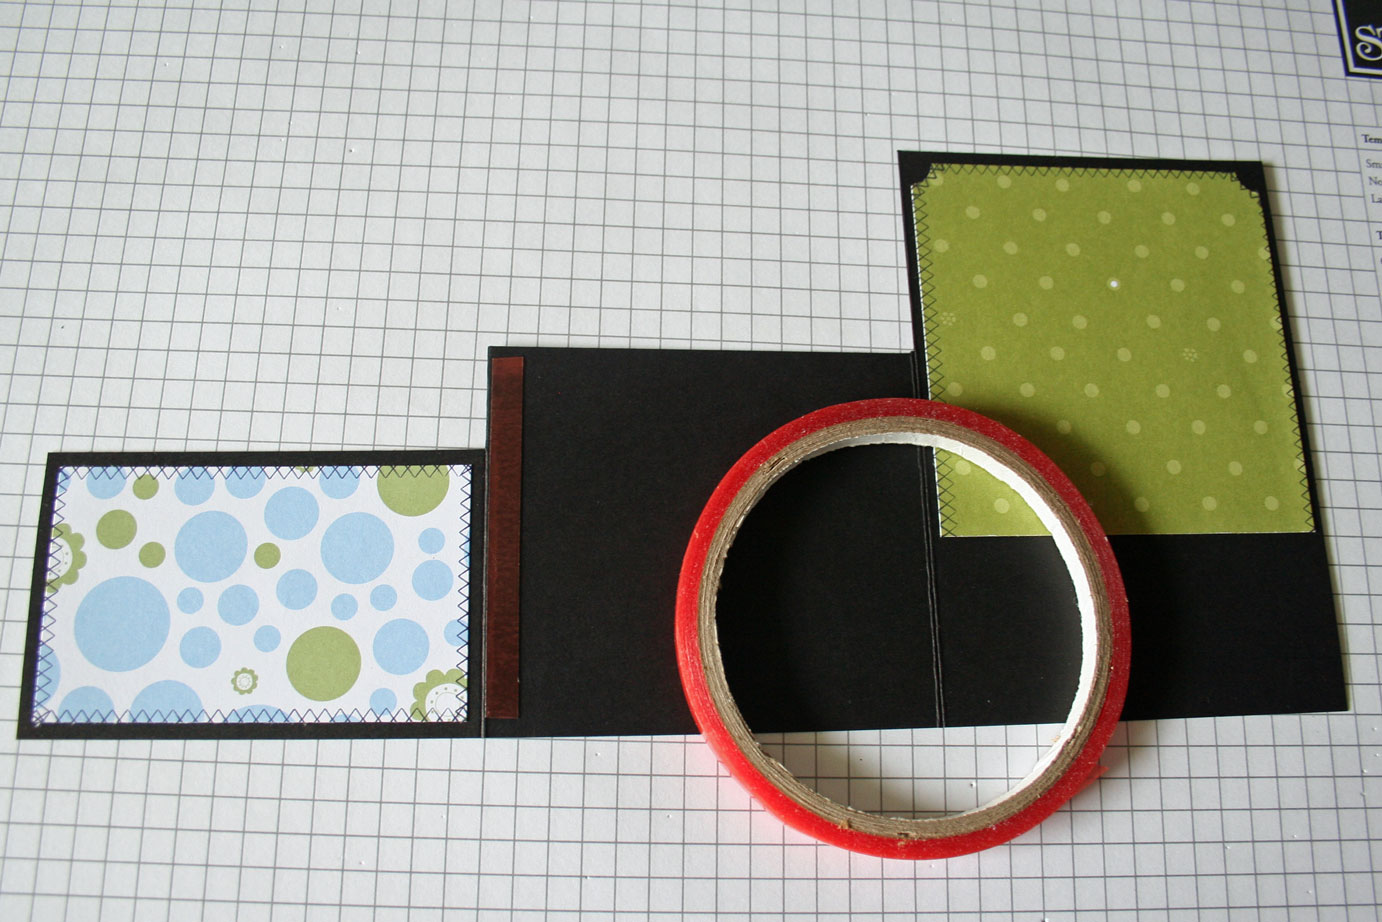
Step six:
Add Sticky Strip to the left side of the middle panel as well as on the bottom (NOT SHOWN, sorry). Tape middle panel to your full panel.
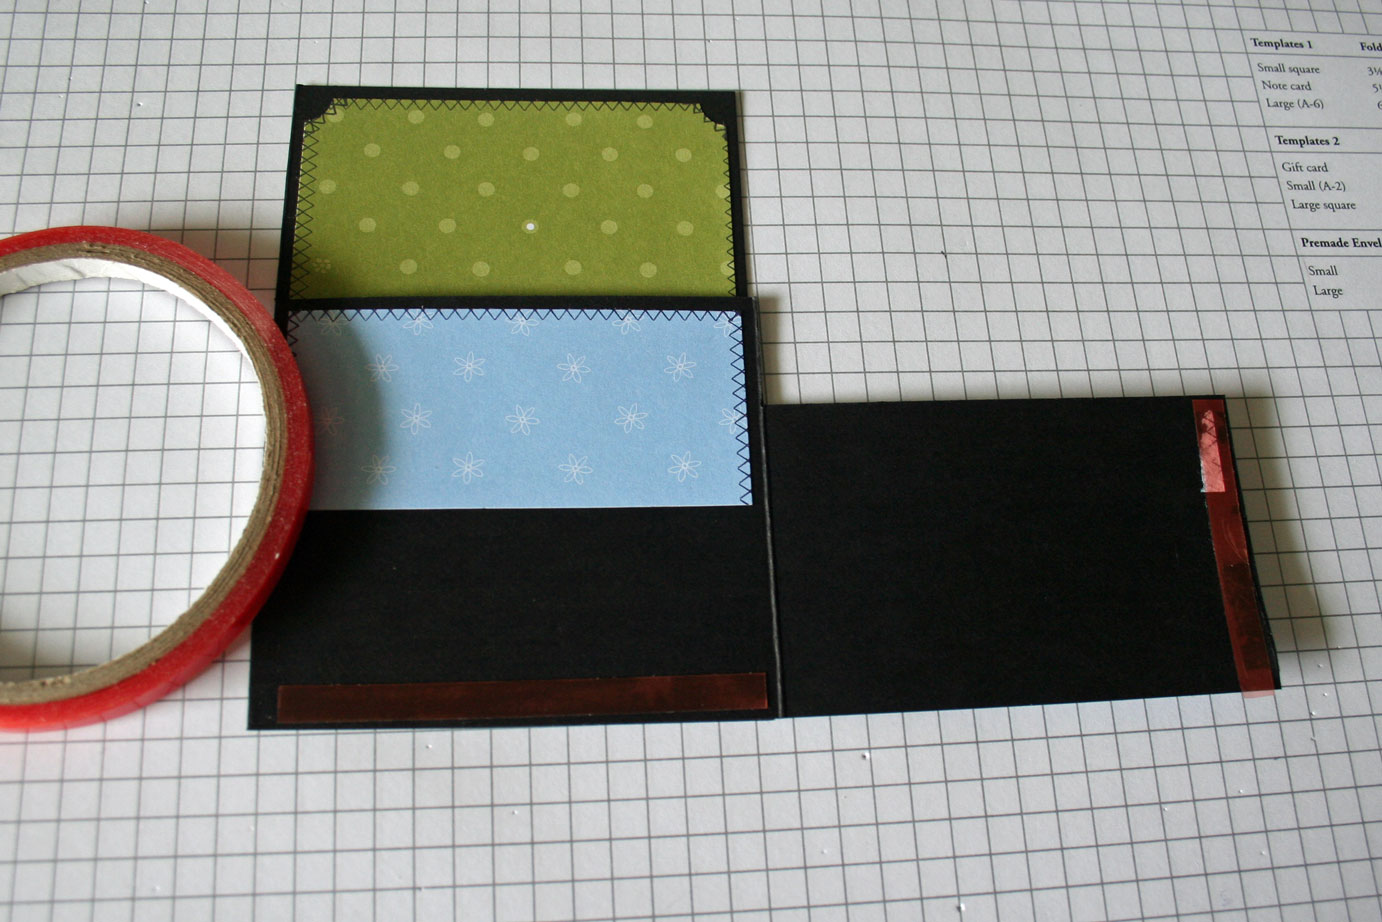
Step seven:
Add tape to the right and bottom of your smallest layer. Tape down.
Your double pocket is now done. Make tags and either give away like this, or add to card front.
Play with it. Change the size up. I can’t wait what you do with it. If you make one…link to this thread so we can all see it.
Beate
48 Responses to “Double Pocket card Tutorial”
Sorry, the comment form is closed at this time.


I love this!! And isn’t that baby bottle the cutest little accent?!?! I will certainly be trying this one out, hopefully this afternoon. Thanks for the inspiration!
Absolutely cute card. Your downline will love it!
I love this Beate, what a great idea! One can never have to many pockets, lol! I’ll be trying this out for sure! Thanks again!
That is an awesome card. I love the double pocket. Maybe one more and you will totally convince me to try and make one myself~LOL!!!
HUGS
your work is so inspiring.
Thanks for sharing
What a sweet card! Very CUTE!
This is such a great tutorial! I love the colors you used on the sample card.
oh my! Wonderful! I have such a headache from my BPA meeting last night, I’ll have to wait to do this. Can’t concentrate enough to follow directions…LOL…but I’ll let you know when I do!
LOVE this layout…especially since you added a gift card to one of the pouches. Genius idea. Thanks for the pictures and step by step tutorial!!! You rock!
Great card, Beate!!! I love the way you made the tag look like a shirt, awesome!!! I will get to the directions soon. TFS.
This is wonderful. TFS!!!
Thank you for the very clear instructions – would love to have a go at one of these. It looks so cool one it is done!
Thanks so much for sharing this tutorial! I love the double pocket cards you’ve done, and that little baby bottle in this one is just too clever!
Great tutorial. I just adore this card. Mahalo for sharing this with us!
What an adorable card and thanks for the tutorial!
Thanks so much. Now that I see it I can’t wait to try it. Have a great day! 🙂
ANOTHER GREAT PROJECT!!! I love how your instructions are so easy to follow, this is a project that I will pass on to my girls, which I know they will love.
Okies….did it! Will do another after getting Chloe from school! YAH! Super fast and easy too! Thanks so much for writing it!
Here’s mine:
http://treasureoilerdesignz.blogspot.com/2007/09/beates-tutorial-on-double-pocket-cards.html
Thanks for the awesome tutorial! I *must* try one of these.
Your card is adorable!!
This is just adorable! Man, you’re busy!
Here’s my twist on it!!!
http://www.splitcoaststampers.com/gallery/photo/673242?cat=500&ppuser=96315
This was fun – thanks for the tutorial!
OMGosh, I’ve been loving your double pocket cards. Now that you’ve got the tutorial posted I have no excuse not to try one. So I did: http://www.splitcoaststampers.com/gallery/photo/673746?cat=500&ppuser=48481. I definitely need more practice but it was fun and I think I’ll try more.
My card is from Issaquah, Washington.
Just had to give it a try. You can find my card on my blog, it will be the first entry (or should be) Thanks for sharing this great technique!
http://crystalsscrapshack.blogspot.com
Beate, you did it again!! Thank you so much sharing your fantastic work!! I had a great time with this one!! Here is the link to my blog for my attempt!
http://allenjeni.blogspot.com
I love the gift card in there…great idea! I’ll have to try this out!
Great tutorial. Love making cards with that little extra something – thanks for the inspiration and for sharing.
Just the thing I needed. How did you know? Wink. I’ve got a baby card that I wanted to send a gift card along with for my cousin in Indianna. This will be perfect! Great, an afternoon project all lined up for me!
okay I still love the one you did for me more but WOW I love this one too. Perhaps for my next baby right?
This was so fun to make! Thanks for the amazing tutorial. Your paper choice is amazing! So fun. Off to Target to get some gift cards! Here’s my try….. http://stampedbyhand.blogspot.com/2007/09/double-pocket-fun.html
I love this. I just found your blog…its great! Laurie
Hi girlie :
I thought I would let you know I finally got around to making a double pocket card following your Great tutorial .. Thanks so much, I just love making them .
xoxox
Dawn Griffith
i absolutely loved it and so did mike…thanks beate, you’re so good to us!! the card is on display! the little bottle gift card was a nice touch and really finished the card off – you (and rick) are so genius!
Wow! Another great tutorial! I finally had a chance to make one these cards and it was so much fun. Here is my take on it: http://fatcatstamper.blogspot.com/2007/10/double-pocket-card.html
Thanks for the tutorial!! You card is awesome and it inspired me to try this “technique”, check my (much simpler!) card out : http://dare2beecreative.blogspot.com/2007/10/following-tutorial-from-beate-i-made.html
I love your tutorials, thanks so much for sharing this with everyone! 🙂
Will have to try this double pocket card; love it, but I will wait until I get my All in a Row stamp set. Will share later.
Thanks for the wonderful tutorial, Beate!
This was so much fun to make!
Here’s my Double Pocket http://www.splitcoaststampers.com/gallery/photo/690189?cat=500&ppuser=69424
Have I mentioned I LOVE making these? This idea came in so handy for a project to use paper that intimidates you…and like you, I’m not a fan of purple, but I think this came out nicely in the end. Thanks for the continued inspiration Beate!
http://stampedbyhand.blogspot.com/2007/10/prettie-girls-are-back.html
Another amazing tutorial…thanks, Beate! Here’s my version: http://amycara.blogspot.com/2007/10/double-pocket-card.html
Your baby card is adorable Beate. Thanks for making the double pocket card tutorial and for sharing it with all of us.
Mary
Here’s my take on the double pocket card. Love the way all the DP from a color family from SU goes together. My SIL really seemed pleased with it so that made me happy. Even my brother seemed to notice. 🙂 Thanks for the great tutorial among so many!
Peg
http://www.splitcoaststampers.com/gallery/photo/720828?cat=500&ppuser=117084
This is awesome. Thanks for the instructions.
Okay, I have double pocket card sickness. I can’t stop making these! So fun!
http://stampedbyhand.blogspot.com/2007/11/dashing.html
[…] Workshop card I made using Beate’s tutorial found here. […]
[…] Fresh & Fun […]
[…] I definitely need more practice but it was fun and I think I??ll try more.http://beate.blogs.splitcoaststampers.com/2007/09/18/double-pocket-card-tutorial/Waxy&8217s WhimsThe tragedy at Virginia Tech has resonated with everyone, and I was&160glad to […]
[…] I definitely need more practice but it was fun and I think I??ll try more.http://beate.blogs.splitcoaststampers.com/2007/09/18/double-pocket-card-tutorial/Splitcoaststampers – ResourcesA community site for rubber stamp art, paper craft and scrapbook […]
[…] […]
[…] I definitely need more practice but it was fun and I think I??ll try more.http://beate.blogs …http://beate.blogs.splitcoaststampers.com/2007/09/18/double-pocket-card-tutorial/Read “RE: The Weekend” at Greeting Cards: Forum… working on anything exciting??� I went to a […]