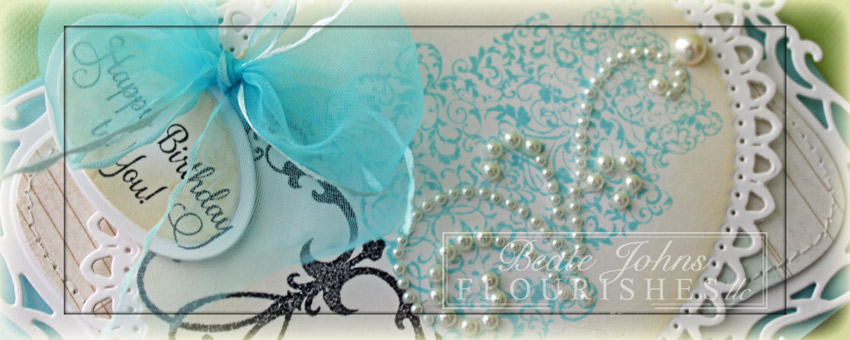
Can you you believe Flourishes is already turning 5 years old? Time flies!!! For my birthday project I created a card with the Let them Eat Cake stamp set. I cut and embossed a piece of white cardstock with the smallest of the new Grand Decorative Oval Nestabilities die. The cake stand was stamped in Tuxedo Black Memento Ink, the layers in Tumbled Glass Distress ink. The edges of the oval were sponged with Antique Linen Distress ink. Part of a Finesse Pearl Swirl was adhered to the cake layer part.

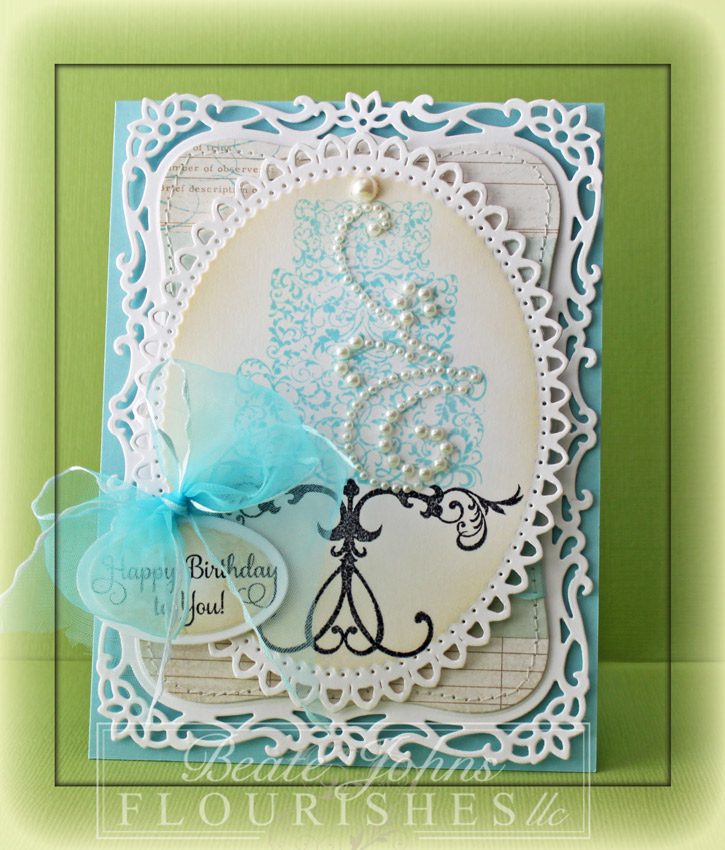
Two pieces of My Mind’s Eye Lost & Found 2 Breeze patterned paper were cut and embossed with the second largest Label Eight Nestabilities die. The edges were stitched before blue ribbon was tied around the layers and through a hole punched in the image layer.  A piece of white cardstock was cut and embossed with the largest of the new (and highly addictive) Decorative Label Eight dies. The layers were adhered to the decorative label die cut before everything was adhered to a blue card base.

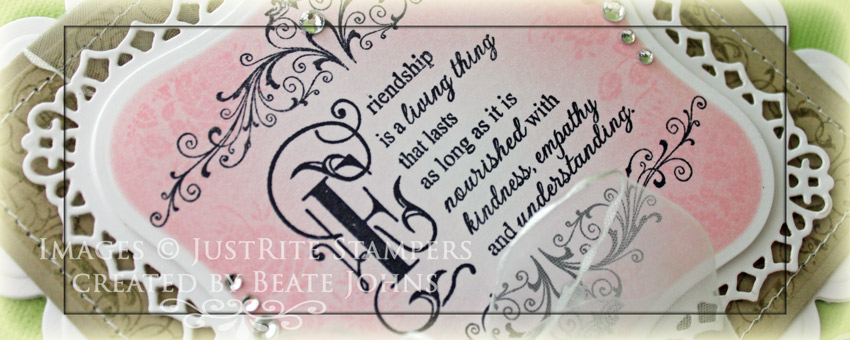
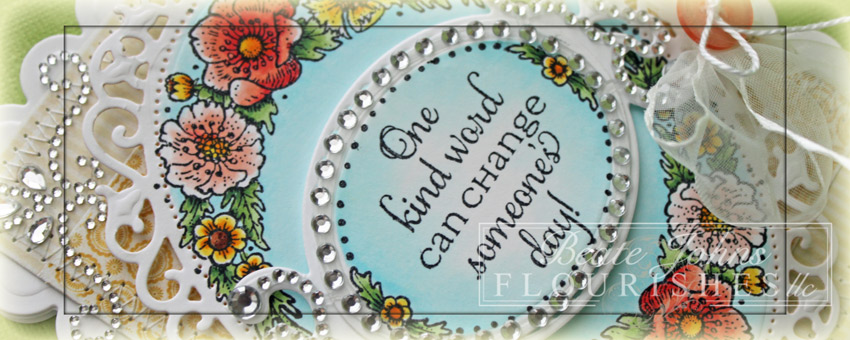
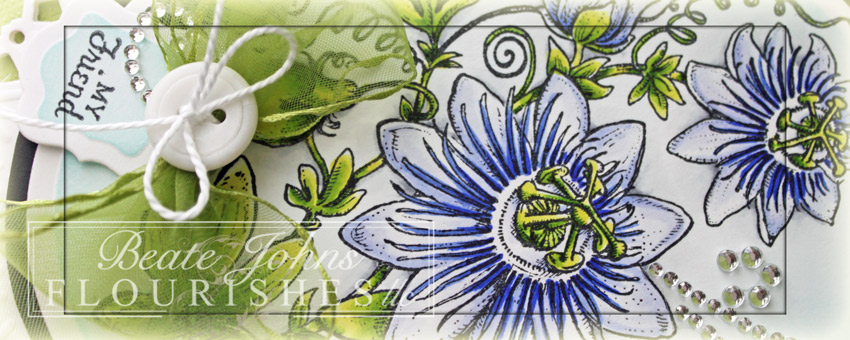
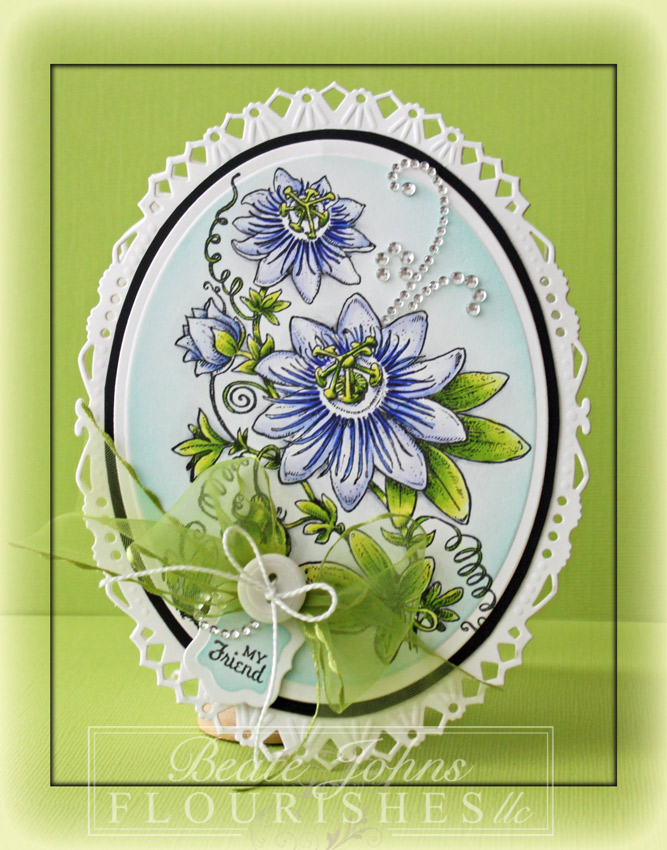
A sentiment from the Botanical Bookplates Vo. 1 was stamped in Tuxedo Black Memento Ink on a piece of white cardstock, cut and embossed with an inner die from one of the Fancy Framed Tags 2 die. The edges were sponged with Antique Linen ink before the tag was adhered right under the ribbon bow.

To get ready for next week’s big August Stamp Release, Flourishes is ushering in a festive challenge! Not only will it celebrate Flourishes 5th birthday, but it will give YOU a chance to win our new release! So, put on your best party attire and get ready for the….

HOW TO PLAY: This challenge is going to be super duper easy peasy. Why? All you need to do is create a birthday creation. It could be a card, a tag, a 3-D object, ANYTHING! As long as it celebrates a birthday, you’ll be in the running! Please remember, entries must be in by August 10th at 5PM EST to be eligible. If you upload to Splitcoaststampers, please use the key word FLLCAUG12. And, don’t forget to link up your creation right here on this post using the Inlinkz link widget below. Use Flourishes stamps if you have them — Flourishes entries will be counted twice! But, if you don’t have Flourishes, play along anyway, you could WIN some!

Need some inspiration? The design team created all kinds of birthday goodies – from decorations to cards to invites to treat boxes — you name it, they have been inspired! So, hop on over and see….

Thanks so much for stopping by! I hope you have time to play along! Have a wonderful day!
Hugs and smiles

My second project for the JustRite Stampers blog was created with the gorgeous new stamps Becca Feeken designed. I am so excited that she has her own stamp line now. I love her style!

I hope you have time to go to the blog and check out the entire card. Thanks so much for stopping by! Have a wonderful day!
Hugs and smiles

Today is the last day of the Flourishes sneak peek week. Lauren Pope created a gorgeous bicycle set that we got to show off today. I remember having a red bike when I was young, so I colored mine in that color.

I stamped the image in Tuxedo Black Memento Ink on white cardstock that had been cut and embossed with a Card Creator Matte Basics B die. The image was colored with Copic Markers (R30, R32, R35, R37, Y11, Y13, Y17, YG21, YG25, YG17). Cloud masks were cut and embossed with Whimsy dies and adhered over the image before the image was sponged with Tumbled Glass Distress ink.

The clouds were colored with Copic Markers W00 and W1 and the image was adhered to a piece of black cardstock, cut and embossed with a Card Creator Matte Basics A die.

A piece of white cardstock was cut and embossed with the largest of the new Card Creator Fancy Weaves die. It was adhered to a piece of green cardstock. A hole was punched in the upper right edge of the image layers and blue sheer ribbon was threaded through it and tied around the layers. The bow was tied into a bow.

A sentiment was stamped on a piece of white cardstock that had been cut and embossed with one of the Tailor-Made Classic Tag dies. The center had been sponged with Tumbled ink. The tag was tied to the bow with an embroidery thread and button. Part of a Silver Finesse Rhinestone swirl and Fancy That! Border bling were added. he layers were adhered to a card base, cut out of white cardstock with the second smallest Grand Scallop Rectangle Nestabilities die.

Want to win this set? All you need to do is leave some love in the form of a comment on the blogs below! Why? You need to try to figure out…..


One of the ladies on our link list below will be picking a name from the comments on her blog post today. We don’t know which one it is… so the more blogs you leave comments on, the more chances you have to win! So what are you waiting for? Head on over and see…..

DID YOU KNOW YOU COULD WIN OUR ENTIRE JULY RELEASE? Have you checked out our IT’S SKETCHY CHALLENGE? Just click HERE to find out how to play! You can also play in our Noon Time Challenges, which kick off today and continue noon tomorrow! Our noon time challenges are fast-paced chances to win our full July release!   All challenges will close this Friday at 5 PM EST and winners will be announced Saturday in our Winner’s Circle blog post! So get those fingers inky and good luck!

Thanks so much for stopping by! Have a wonderful weekend!
Hugs and smiles


Today’s sneak peek set is a gorgeous combination of frames, flowers and sentiments.  I love how you can layer these images to create your card.

For my sample I did just that. I stamped a frame and sentiment in Tuxedo Black Memento Ink on white cardstock. It was cut and embossed with a Classic Oval Nestabilities die. The floral half frame was stamped twice on a piece of white cardstock, cut and embossed with the largest Floral Oval Nestabilities die. The flowers and backgrounds were colored with Copic Markers (Y11, Y13, Y17, R11, R12, R14, G40, G43, G46, E33, E37, E39, B0000, B000).

The classic oval was adhered to a piece of white cardstock, cut and embossed with a Fancy Tag Three die. Matching silver rhinestone Nestabling was adhered over the layers. The tag layers were adhered over the Floral oval image with dimensional adhesive.

Two pieces of My Mind’s Eye Lost Two Sunshine patterned paper where cut and embossed with  the second smallest Grand Rectangle Nestabilities die. The edges were sanded and stitched before Sheer ribbon was tied around the layer and through one of the Floral Oval openings of the frame.  The bow was topped with a button, tied on with embroidery thread.

The layers were adhered to a card base, cut out of white cardstock with the second smallest Grand Scallop Rectangle Nestabilities die. Part of a Fancy That! Border bling on the top right finish off my card.

Want to win this set? All you need to do is leave some love in the form of a comment on the blogs below! Why? You need to try to figure out…..


One of the ladies on our link list below will be picking a name from the comments on her blog post today. We don’t know which one it is… so the more blogs you leave comments on, the more chances you have to win! So what are you waiting for? Head on over and see…..

DID YOU KNOW YOU COULD WIN OUR ENTIRE JULY RELEASE? Have you checked out our IT’S SKETCHY CHALLENGE? Just click HERE to find out how to play! You can also play in our Noon Time Challenges, which kick off today and continue noon tomorrow! Our noon time challenges are fast-paced chances to win our full July release!   All challenges will close this Friday at 5 PM EST and winners will be announced Saturday in our Winner’s Circle blog post! So get those fingers inky and good luck!

Thanks so much for stopping by! Have a wonderful weekend!
Hugs and smiles

It’s release week at Flourishes. Today’s sneak peek set is a gorgeous new flower set from Marcella Hawley. The image is so much fun to color. It’s practically screams summer and begs for fun, bright colors.

I stamped the big image in  Tuxedo Black Memento Ink on white cardstock. The image was cut with the smallest of the Grand Oval Nestabilities die and colored with Copic Markers (B60, B63, B66, YG21, YG25, YG17, C00, C3). The edges were sponged with Tumbled Glass Distress ink and the oval was adhered to a piece of black cardstock that was hand cut into a slightly bigger layer.

A sentiment from the set was stamped on white cardstock that had been cut and embossed with one of the Tailor-Made Classic Tag dies. The center had been sponged with Tumbled ink. The tag was tied to a Sheer Ribbon bow and adhered to the lower left of the image. Part of a Silver Finesse Rhinestone swirl was adhered on the tag as well as on the upper right of the image.

The layers were adhered to the card base, white cardstock, cut and embossed with the second smallest of the Grand Decorative Oval Nestabilities die.

Want to win this set? All you need to do is leave some love in the form of a comment on the blogs below! Why? You need to try to figure out…..


One of the ladies on our link list below will be picking a name from the comments on her blog post today. We don’t know which one it is… so the more blogs you leave comments on, the more chances you have to win! So what are you waiting for? Head on over and see…..

DID YOU KNOW YOU COULD WIN OUR ENTIRE JULY RELEASE? Have you checked out our IT’S SKETCHY CHALLENGE? Just click HERE to find out how to play! You can also play in our Noon Time Challenges, which kick off today and continue noon tomorrow! Our noon time challenges are fast-paced chances to win our full July release!   All challenges will close this Friday at 5 PM EST and winners will be announced Saturday in our Winner’s Circle blog post! So get those fingers inky and good luck!

Thanks so much for stopping by! Have a wonderful weekend!
Hugs and smiles

It’s my turn to share at the Spellbinders blog today. I created a picnic invitation with some of the dies that you have seen during the Summer Blog Frenzy. I hope you have time to check out the entire card and the video I have created for it.

Have a great weekend! Hugs and smiles

It’s my turn to share a card on the Spellbinders blog created with dies from the upcoming summer release. I LOVE the new dies coming out and used two different new die packs. You can find the entire card here.

Thanks so much for stopping by! Have a wonderful day.
Hugs and smiles

Today’s tutorial on Splitcoaststampers was written by Trudy Sjolander. She shows how to use dimensional adhesive as an embellishment. You can check it out HERE.

Since Trudy’s tutorial shows off Perfect Pearls, I thought I update our Poppin’ Pearls Tutorial and add it in the newsletter as Tutorials you might have missed. It’s been 6 years since I wrote it the first time around and it needed a makeover. I switched from Pearl-Ex (which need to be sealed) to Perfect Pearls.

I stamped an image from Unity’s The Artist in You in Perfect Medium ink on Neenah Solar White cardstock, cut and embossed with a Petite Oval Nestabilities die (they are unfortunately retired now) and brushed over it with Forever Green Perfect Pearls.

The oval was layered first on a piece of black cardstock cut and embossed with the next size up Petite Oval Nestabilities die, then on a piece of Celery Neenah cardstock, cut and embossed with the largest Floral Oval Nestabilities die.

A piece of My Mind’s Eye Lost &Found 2 Breeze paper was cut and embossed with a Grand Rectangle Nestabilities die. The edges were sanded, stitched and May Arts ribbon was tied around the horizontal strip. The paper was adhered to the card base, white cardstock, cut and embossed with a Grand Scallop Rectangle die. The ribbon was topped with a button, tied on with embroidery thread. Part of a black Finesse Rhinestone swirl and some Black Baby Bling Rhinestones finish off the card.

Here is a video for the visual learner:

[youtube]https://www.youtube.com/watch?v=kAeMsNFh3q0[/youtube]

Thanks so much for stopping by! Have a wonderful day.
Hugs and smiles

Today’s Timeless Tuesday Challenge hostess is Silke. She and I are posting our last post as Timeless Tuesday challenge members. Starting in July we will both be part of the Flourishes senior design team. Silke’s challenge is to use our favorite stamps, dies and embellishments for our card.

One of my favorite Flourishes image is from Year in Flowers 2 stamp set. The rose was stamped in Tuxedo Black Memento Ink on white cardstock, colored with Copic Markers ( Flowers: B0000, B91, B95, B99    Leaves: G20, G21, G24, G28) and cut out.  A piece of My Mind’s Eye Lost & Found 2 Breeze patterned paper was cut and embossed with the largest of the Classic Oval SM Nestabilities dies. The edges were sponged with Vintage Photo Distress Ink and a sentiment from the current Flip With Gratitude set was stamped in Tuxedo Black Ink.  The sentiment layer was first adhered to a piece of Kraft cardstock, cut and embossed with the largest Classic Oval LG die, then to a piece of white cardstock, cut and embossed with the largest Floral Oval Nestabilities die. The rose was adhered to the right side of the oval layers with foam adhesive.

Another piece of Breeze patterned paper was cut and embossed with the second smallest Grand Rectangle Nestabilities die. The edges were sanded and stitched before Sheer ribbon was tied around the layer and through one of the Floral Oval openings of the frame.  The bow was topped with a button, tied on with embroidery thread.

The layers were adhered to a card base, cut out of white cardstock with the second smallest Grand Scallop Rectangle Nestabilities die. Part of a Silver Finesse Rhinestone swirl over the roses and Fancy That! Border bling on the top right finish off my card.

-Favorite die: Floral Oval die
-Favorite layout: Floral Oval die on top of Scallop Rectangle
-One of my favorite images: Rose stamp
-Favorite Embellishment: Ivory sheer ribbon, Finesse Rhinestones swirl and Fancy That! Border Bling

Take a peek at what the other Timeless Tuesday designer have created for today…

I hope you have time to play. Thanks so much for stopping by! Have a wonderful day!
Hugs and smiles

Hello and welcome to Day 6 of our June Rubber & Die Release Showcase!

On Wednesday (20 June) Whimsy Stamps released this month’s new rubber designs, new Shapeology dies and new Shape EZ by TLC. From then until 26 June the Whimsy Stamps DT and Special Guests are showcasing these fabulous new goodies with a daily mini blog hop and I am part of today’s hop!

Each mini blog hop has a new release prize hidden somewhere along the way and you have 24hrs to enter each prize draw.

To be entered into today’s mini blog hop prize draw, be sure to leave a comment on ALL of the DT’s posts listed below by 12.00PM EST tomorrow. All winners will be announced on the Whimsy blog on 27 June.

My sample today was created with another new image from Elisabeth Bell. I stamped Lemon Pepper’s Laundry Day Tuxedo Black Memento Ink on Neenah Solar White cardstock,. It was cut and embossed with the largest  Classic Square Nestabilities die. The image was colored with Copic Markers (Shirt/birds: Y00, Y02, Y04, Y08   Jeans/blanket: B91, B93, B95, B97, B99   Skin: E000, E00, E01, E11   Hair: Y32, E33, E37, E29   Apron/Laundry: YG01, YG03, YG17   Apron/Sheet/Cat: N0, N1, N3    Flowers/Blanket: Y35, Y38, YR07    Ground: YG61, YG63, YG67, E31    Background: BG0000, BG000). The image was adhered to a piece of Kraft cardstock, cut and embossed with the largest swatches die.

A piece of Pink Paislee Spring Jubilee Patterned Paper was cut and embossed with a  Grand Square Nestabilities die. The edges were sanded and stitched. Another piece of Spring Jubilee paper was sanded and stitched and adhered slightly askew over the bigger layer. Aqua Sheer ribbon was tied around the layers before they were adhered to the card base, white cardstock cut and embossed with a Grand Scallop Square Nestabilities die.

The image was adhered over the card base with dimensionals. A sentiment from the new Definition Notables 4 sentiments was stamped twice in Tuxedo Black on Neenah White cardstock. The bold words were cut out and adhered to the left of the image.

I left the card without further embellishments, not wanting to distract from the very detailed image.

To take a peek at today’s fabulous new release creations, please click on the links below…

Michele RoosSpecial Guest

Remember that the entire new release is available to buy right now from the Whimsy Stamps store along with all your Whimsy favourites.

Thanks for stopping by and don’t forget to pop back to the Whimsy blog tomorrow for more new release creations!
Hugs and smiles

© 2012 fresh & fun Suffusion theme by Sayontan Sinha