Glenda Wyatt has a big challenge anniversary today and asked a few stamping friends to participate. You can find a list of all participants on her blog. The challenge today is easy. All you have to do is create a project with RED in it and post a link to the entry on Glenda’s blog. Easy, Peasy. I hope you can play along. She is offering a chance to win some blog candy.

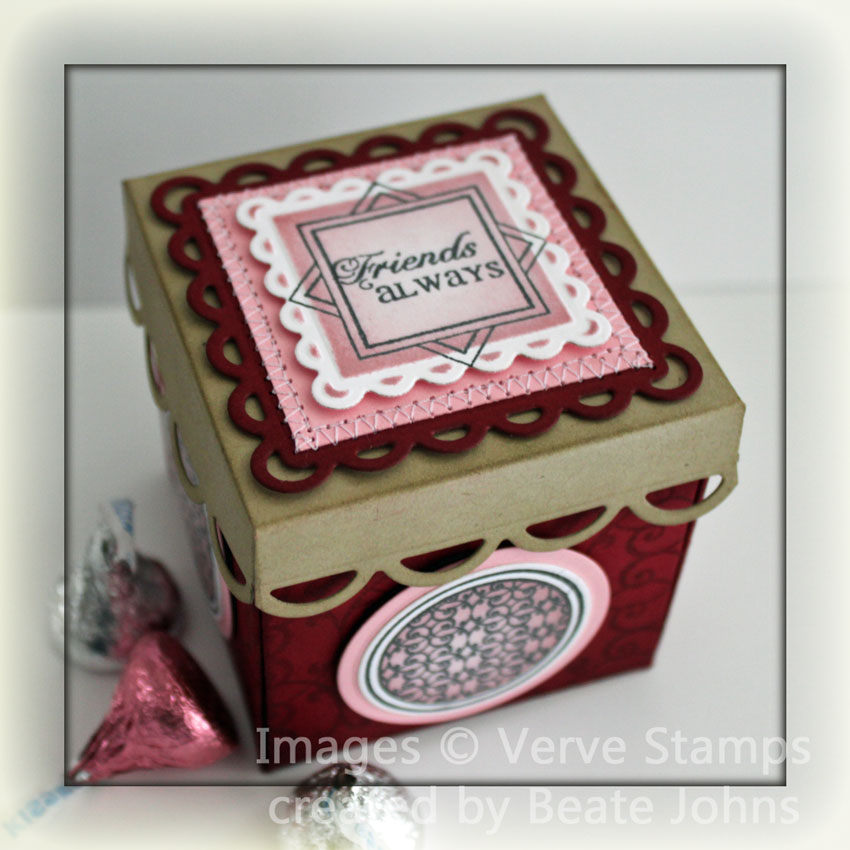
For my project I created a Explosion Box. A 7 1/2″ square of Red Riding Hood Square was stamped with the Border stamp of Verve’s Artful Elegance Stamp set in Aged Mahogany Distress ink. The cardstock was scored at 2 1/2″ and 5″ on both sides. Each outer square was scored diagonal. The edges the cardstock as well as the scored lines were sponged with Aged Mahogany ink.

The sides were decorated with a medallion stamped in Tuxedo Black Memento Ink on Neenah Solar White cardstock, cut with Circle Nestabilities and sponged with Tattered Rose Distress Ink.

For the lid Kraft cardstock was cut and embossed with the largest of the Lacey Square Nestabilities die. Next the edges of the square were scored at 3/4. The lid was first layered with a sponged piece of Red Riding Hood cut with a smaller Lacey Square Nestabilities die, then a piece of Pretty of Pink cardstock, then a white piece of cardstock cut and embossed with the smallest Lacey Square die, stamped with different stamps from Artful Elegance in Tuxedo Black Memento Ink and sponged with Victorian Velvet ink.

For the center of the inside of the box I sponged a white square of cardstock with Tattered Rose ink and stamped a sentiment from Hearts on Fire in Tuxedo black Memento Ink. It was adhered to a piece of Kraft cardstock cut and embossed with the second smallest Lacey Square Nestabilities die.

Here is a video for the visual learner:

[youtube]https://www.youtube.com/watch?v=ATG0SZyyrlw[/youtube]

On a personal note I am excited to announce that I will be on the new Inspiration Emporium Design team. I order most of my supplies from there and Ellen Hutson‘s store, so it was exciting when they asked me. This will be fun.

Have a wonderful day! Hugs and smiles

Again, sorry I have been so quiet. While I had a good start this week getting back to stamping, I was hit with another migraine in the middle of the week. I don’t know why I have those so often here in Ohio. Six more month and we will be moving….hopefully that will help.

For this treat box I started out with a 8 1/4″ square or Red Riding Hood cardstock, scored at 2 3/4″ and 5 1/2″.  The squares and triangles were layered first with Neenah Solar White cardstock, then with Fancy Pants Hot Chocolate Patterned Paper. The triangle parts of the box were decorated with White and Riding Hood Red cardstock cut and embossed with Fanciful Holiday Spellbinder dies.

May Arts Brown Organdy Ribbon was threaded through gold eyelets, tied into a bow and aged with a heat gun. A white piece of cardstock was cut and embossed with the smallest Nested Heart die and sponged with Aged Mahogany Distress ink and adhered to a bigger piece of Riding Hood Red cardstock, cut and embossed with the middle Nested Heart die. Small Snow Kaisercraft Pearls finish off the heart embellishment.

The sentiment is from JustRite Stampers Victorian Nested Frames. It was stamped in Walnut Stain Distress ink on White cardstock. The sentiment was cut and embossed with a tag die from Spellbinders. The tag was sponged with Aged Mahogany ink and tied to the bow with gold thread.

Here is a video for the visual learner:

[youtube]https://www.youtube.com/watch?v=vvMMIY3NHKc[/youtube]

Have a wonderful weekend! Hugs and smiles

For this month’s Bringing Back Beautiful Challenge, use beauty in stamping to create an accent piece for a table, a mantle, a decoration or any kind of home décor. ‘Tis the season for stamping and entertaining –so let’s see if you can create a match made in heaven by using both! Link up your Bringing Back Beautiful creation here to enter. If you upload to SCS, please use the keyword BBB05. You have until December 31st to enter! As we unveil our challenge for next month, we’ll share our True Beauties – those card makers who wowed us with this challenge! Winners will be featured on the Flourishes Blog and will receive a True Beauty blog button to display proudly on their blog!

Make sure to check out the blogs of fellow challenge team members:

Cindy Coutts
Heather Jensen
Kathy Jones
Julie Koerber
Yvonne Hagane

For my sample I used the new Alleluia Angel stamp. I stamped it on X-Press It Blending Card! with Tuxedo Black Memento Ink and cut the image down to a 1 7/8″ square. It was colored with Copic Markers (Horn: YR21, YR23, E97, Skin: E50, E51, E53, Dress: Y32, Y35, Y38, E97, Hair: E25, E27, E29, Ribbon: R08, R27, R39, Wings: BV000, BV20, BV23). I added a 1 7/8″ square of patterned paper was adhered to the back of the image. It was then sandwiched between a 2″ square Frosted Memory Glass and a regular memory glass on the back and placed in a Memory frame.

I ran some silver cord through the hanger and a Philosophy tag that I adhered to the top right of the image. I topped it with gold organdy ribbon tied into a bow and hit with a heat gun to antique it.

Sorry I have been so quiet. Besides prepping for my next class at Simply Scrapbooks in December, my internet is giving me trouble again. It just came back on after being off for 1 1/2 days. Before that it only worked for a little at a time. I hope I get this post up before it breaks again.

Today’s tutorial on Splitcoast is for a flower created out of ribbon or lace. For my sample I stamped a Label from Gina K. Lovely Labels 2 stamp set in Vintage Photo Distress Ink on Natural White Neenah cardstock. I cut and embossed the label with the matching Label 16 Nestabilities die and the center with Classic Circle Nestabilities. With both dies still on the cardstock I sponged the paper first with Antique Linen Distress Ink, then the edges with Vintage Photo Distress Ink.

In the circle I stamped the sentiment from Winter Wings in Vintage Photo Distress Ink.

The card base is a 4 1/4″ x 9 7/8″ piece of Kraft cardstock folded in half. The edges of the card front and inside were sponged with Vintage Photo Distress ink.  Two 3 3/4″ wide strips of Webster’s Pages patterned paper were sewn to a 4″ x 4 5/8″ piece of Natural White cardstock before the layers were adhered to the card base. Three dew drops from the Mint Chocolate Chip bottle were adhered to the top right side of the patterned paper layer.

The label was adhered in the center of the card with dimensionals, the circle in it’s center with a double layer of dimensionals. Three Bliss Kaisercraft Pearls were adhered to the bottom of the sentiment circle.

The flower was created out of now retired Webster’s Pages Trim. It was topped with a silk ribbon bow that was topped with a Basic Grey button.

Here is a video for the visual learner:

[youtube]https://www.youtube.com/watch?v=ACyJK-YRZRI[/youtube]

Have a wonderful Thanksgiving weekend! Hugs and smiles

Welcome to the 10th week of JustRite Stampers’  Wednesday feature, 12 Weeks of Christmas Blog Hops!  Every Wednesday up until Thanksgiving we have been showcasing JustRite’s entire Christmas Collection of stamps!  Don’t forget that JustRite has some Christmas stamps in their newly released CLING line of stamp sets, too — you can find them HERE.

For the month of November we thought we would also throw in some holiday gift ideas for any of your JustRite stamps so be watching for those, too, on November’s hops!  And in celebration of JustRite’s 10th week of Christmas Blog Hops, they have a huge surprise for you — through November 29 take 25% off all JustRite Original Christmas stamp sets, with free shipping within the U.S. on orders over $50 — Don’t forget to tell Santa!

For today’s blog hop I created a circular tag with JustRiteStampers Vintage Christmas set. I stamped the darling snowman in Tuxedo Black Memento Ink on X-Press It Blending Card and colored it with Copic Markers (snowman:  B0000, B000 Hat, nose and buttons: N3, N5, N7, N9, Cheeks: E000, E00, Scarf: BG93, BG96, BG99). The image was cut and embossed with Classic Circle Nestabilities, airbrushed with Copic Marker E40 and layered on a piece of Early Espresso Cardstock cut and embossed with Eyelet Circle Nestabilities. Glossy Accents was added over the snow on the snowman’s hat and snowflake. Fine Glitter was sprinkled over it.

The sentiment is from JustRite Stampers Christmas Nested Sentiments. It was stamped on a strip of X-Press It blending card. The cardstock was bend in shape of a waving banner and attached to the main image by adhering it to a Tim Holtz Philosophy Tag with Glossy Accents.

The box base is a 8 ¼” square of Early Espresso cardstock. It was scored at 2 ¾” and 5 ½” on each side. The corner square were scored diagonally and folded in. The folded corners were layered with white cardstock triangles that were cut by cutting  a 2 3/8” square in half. That square had been topped with a triangle cut out of a 2 1/8” square of Echo Park Wintertime. The layers were stitched together before they were adhered to the box with Scor-Tape. For the full squares,  2 ¼” pieces of Echo Park Winterland patterned paper were stitched to a 2 ½” square of white cardstock.

Organdy Ribbon was threaded through silver eyelets, was tied into a bow and topped with a navy button.

Here is a video for the visual learner:

[youtube]https://www.youtube.com/watch?v=vvMMIY3NHKc[/youtube]

Please visit these designers’ blogs to see what fabulous JustRite Christmas inspiration they have for you on the hop today!

JustRite Inspiration Blog
Sharon Harnist
Debbie Olson
Beate Johns
Kazan Clark
Stephanie Kraft
Michele Kovack
Angela Barkhouse
Sankari Wegman
Heidi Blankenship
Kathy Jones
Eva Dobilas
Thanks so much for stopping by! Have a wonderful day! Hugs and smiles

Okay…I am having a blast with these 2” x 2” Memory Glass Ornaments. They are so much fun to make. For this sample, I used the soon to be released Peace on Earth Whimsy stamp set created by Crissy Armstrong. I love this set. The images are simply beautiful! The release day for new Whimsy Stamps is this Wednesday.

I stamped the Angel image in Tuxedo Black Memento Ink on X-Press It! Blending card, cut it down to a 1 7/8” square and colored the image with Copic Markers (hair: YR21, YR23, YR24, Skin: E51, E53, E55, Dress: R27, R29, R39, Wings: B000, B01, Outline dots: YG00, G20, G21).  The image was backed with a 1 7/8” square of patterned paper with a Tim Holtz Jump Ring sandwiched between the paper. The image and backing were sandwiched between two pieces of 2” x 2” Memory Glass. ¼” wide Scor-Tape was added around the glass and Vintage Shard Glass Glitter adhered to the tape. I love the look this creates.

Seam binding was tied around the jump ring as hanger and gold organdy ribbon was tied into a bow around the binding. A button was added on top with the help of Waxed Linen.

Thanks so much for stopping by! Have a wonderful day! Hugs and smiles

My internet is out again since Saturday afternoon. It is getting really old having it break every month with no apparent reason. It’s Sunday afternoon and I am sitting in the Richmond Airport waiting for Colleen to arrive from Atlanta.I can’t wait to hang out with her the next two days.

These little ornaments are too much fun! All you need is some Microscopic Slides or like in my case, Memory Glass from Ranger. For the video I created several different samples.

Easy Santa

For this ornament I cut down a piece of Christmas Creative Scrap from Crafty Secrets. It was cut down to 1 7/8” square and backed with a 1 7/8” piece of patterned paper. The paper pieces were sandwiched between a  2” x 2” piece of Frosted Memory Glass and a 2” x 2” regular Memory Glass. All the layers were placed into a 2” x 2” Memory Frame. Red silk Ribbon was used as a hanger and to tie a bow around the hanger. The bow was topped with a Vintage Brad from Stampin’ Up!.

Sweet Girl

I cut another piece of Christmas Creative Scraps down to 1 7/8” square  and backed with another Creative Scrap square in the same size. A Tim Holtz Memo Pin was stuck between the layers before they were layered with Memory Glass. This time I wrapped ¼” wide Scor-Tape around the layers, took off the liner and pressed the tape in Vintage Shard Glass Glitter.  A bow was tied around the pin with beige silk ribbon. A mulberry flower and leaf from Recollections as well as a Tim Holtz Philosophy tag were added to the bow. Silver Cord was used to create the hanger.

Vintage Santa

For this sample I stamped my favorite Santa from Crafty Secrets Vintage Christmas in Rich Cocoa Memento Ink on X-Press It! Blending Card and colored it with Copic Markers (Background: E30, E31 Skin: R0000, R01, R20 band: E57, E59, Holly: G24, G28 R39, R59, coat: R27, R29, R39, beard/hair: W00, W1, W3). The cardstock was cut with 1 7/8” square and backed with patterned paper, sandwiched between Memory Glass and placed in another Memory Frame. May Arts Brown Crinkled Ribbon was tied in a bow on the Memory Frame and topped with a Recollections Brad. This time I used embroidery floss for a hanger.  To dress up the frame, I added May Arts Crochet Lace on the left hand side, topped it with a button that tied to the lace with waxed Linen. Three Latte Kaisercraft Pearls on the upper left hand side finish off the ornament.

Here is a video for the visual Learner:

[youtube]https://www.youtube.com/watch?v=TFegciEpnBc[/youtube]

Thanks so much for stopping by. Have a wonderful day! Hugs and smiles

I cut Brushed Silver, Shimmery Ivory cardstock as well as Cosmo Cricket’s Mitten Weather patterned paper with  Eyelet Circle Nestabilities, the Snowflake Pendant and Create-a-Flake 2 Spellbinders dies. The die-cuts were layered, sewn together and covered with Silver Kaisercraft Rhinestones to create a Snowflake Garland. You can find the photo tutorial for this project here.

Thanks so much for stopping by! Have a wonderful weekend! Mine will be  good. My oldest is turning 16 years old. That’s crazy. I remember when he was just a cute chubby toddler, not this thin, tall young man! Time flies. And I will be flying too. Sunday I am flying to Richmond, VA. Monday I will be assisting Colleen Schaan during a Copic Certification. I can’t wait.

Hugs and smiles

Yesterday we published a tutorial by Linda Duke, showing you how to create this darling felt mitten with the help of the Nested Mitten dies from Spellbinders. I created mine with Christmas Creative Scraps from Crafty Secrets, May Arts Ribbon and Tim Holtz Charm Fragments. A Prima Flower tops off my mitten. This was fun and easy to make. Rebecca and her friend started making their own.

Her is a video for the visual learner:

[youtube]https://www.youtube.com/watch?v=4KxxVw3jaL8[/youtube]

Thanks so much for stopping by! Have a wonderful day! Hugs and smiles

Today there are four new tutorials on Splitcoast! Three are for the new Holiday Dies from Spellbinders review. Let me just say that I love them. This years shapes are wonderful! A huge snowflake pendant, mittens, ornaments, trees, hearts, swords and so much more. I will be surprised if I don’t own most of them before they are discontinued.

Today I want to show you a created with the help of Julie Overby’s Heirloom Photo Ornament tutorial. I think it makes a GREAT present to grand parents. I used World Win Gold Card Stock and Bo Bunny Christmas paper (I purchased at my LSS).

The gold cardstock was first cut and embossed with the largest of Spellbinders Heirloom Ornament dies. Next the ornament was embossed with Fair Isle Borderabilities. The Bo Bunny patterned paper was cut with the second biggest die along with the Label 13 Nestabilities. Once it was cut, the paper was sponged with Vintage Photo, then the edges were sponged with Walnut Stain Distress ink.

The patterned paper piece  was adhered over the gold card stock and the window was cut through the gold paper with the same Label 13 Nestabilities die. Lace (Stampin’ Up!) was adhered to the edge of the window and photos of my kids were adhered behind it.

The steps were repeated two times for three sides. The sides were adhered together with Scor-Tape as well as Zip-Glue. Tinsel (from LSS) was adhered in the center. A bow was created with lace and silk ribbon and topped with a Basic Grey  button.

Here is a video for the visual learner:

[youtube]https://www.youtube.com/watch?v=eP3B25b2L_M[/youtube]

Thanks so much for stopping by! Have a wonderful day! Hugs and smiles

© 2012 fresh & fun Suffusion theme by Sayontan Sinha