I created this card for a recent  Inspiration Challenge on Splitcoast. Stef picked a great site to draw inspiration from. As soon as I saw this cake, I knew I wanted to use Flourishes gorgeous Orchid stamp set.

I stamped the Orchid image in  Tuxedo Black Memento Ink on Neenah Solar White cardstock and colored it with  Copic Markers (YG0000, YG01, YG03, YG17, Y13, Y17 and red spica pen). The image was cut out and adhered to a frame cut and embossed with the largest  Tear Drop Circle and a Standard Circle Nestabilities die.

With the same Standard Circle die used for the frame, a piece of MME Lime Twist Life is a Party was cut and embossed. The edges were sanded and the circle was layed inside the frame. The orchid was adhered over the frame and paper with dimensionals. A sentiment from the orchid set was stamped on the right hand side of the paper with Tuxedo Black Ink.

A 4 3/16″ square of Solar White cardstock was embossed with the Elegance M-Bossibilities folder (I do love that folder!) that had been inked with New Sprout Memento Ink. It was stitched to a 4 1/4″ square of Sour Apple Cardstock.  A piece of my new favorite May Arts ribbon was threaded through one of the Tear Drop circle holes  and tied around the layers. The frame was adhered over the squares with dimensionals.

The card base was cut and embossed with the second smallest Grand Scallop Square Nestabilities dies. Nina Brackets gorgeous new Fancy That! Border Bling and parts of a Finesse Rhinestone Swirl finish off the card.

Thanks so much for stopping by!
Hugs and smiles

This week on the Spellbinders Blog it’s all about Flower dies. Linda showcased how to roll and layer flowers and use them on an altered trinket box. Karen used layered flowers to re-purpose a frame. I thought I show you a different way to use the dies. Please check out the entire project on the Spellbinders Blog.

Hint: It’s one of my favorite things to do with Spellbinders dies. I know you know what I am talking about! 🙂

Have a wonderful day!
Hugs and smiles

Maki is today’s Timeless Tuesday challenge hostess and asked us to create an Easter project or card. As soon as I read the challenge, I knew I wanted to use those adorable bunnies from Spring is Sprung.

I started by cutting the edges of a 6 1/4″ wide piece of white cardstock with a Classic Edge 2 die as well as a die from Classic Decorative Inserts die.  I scored the strip at 3″ and 6″ before stamping the bunny image in Tuxedo Black Memento Ink on one of the 3″ panels, above the embossed edge. The image was colored with Copic Markers (Bunnies: E40, E41, E42, E43, R00, R20   Flowers: Y13, Y15, Y17, RV10, B63, B66, G43, G46   Grass: YG01, YG03, YG17   Sky: B0000, B000).

A 6 1/2″ x 7″ piece of Kraft cardstock was scored at 3″ and 6″ on the 6 1/2″ side and adhered into a tube.The bunny strip was adhered around that tube. A 1 1/2″ x 6″ piece of MME Lost & Found 2 Rosy Patterned paper was stitched to a white cardstock strip. It was adhered above the bunny image strip. A rhinestone border bling was adhered to the bottom edge of the patterned paper layer and ribbon was tied around it. It was topped with a button, tied on with embroidery thread.

A hole was punched on top and ribbon threaded through it. Next a Hershey bar was pushed down into the tube and the ribbon on top was tied with a piece of embroidery thread. A sentiment from the same set was stamped on the lower right corner of the tube. Three small rhinestones on the embossed strip finish off the pull treat holder.

Check out my fellow Timeless Tuesday Challenge Members for more inspiration:

Cindy Haffner
Heather Jensen
Maki Jones
Mona Pendleton
Silke Ledlow
Tammy Hershberger
and March Guest Designer Meredith MacRitchie

Thanks so much for stopping by! Have a wonderful day!
Hugs and smiles


This week’s hostess is Silke and she created another sketch for us. Of course I had to use one of the new sets again. First I was thinking to use one of the new bookplates instead of the star, but I couldn’t find my new die. Turned my craft room upside down…not sure where it went. So I changed my plan and used the smaller of the Magnolias images.

The image was stamped twice in Tuxedo Black Memento Ink on white cardstock. On one image I colored the leaves and colored the rose gray, on the other I colored just the rose and colored it pink and cut the rose out  (Copic Markers: RV81, RV85, G40, G82, G85, T3). The rose was adhered to the colored leaves with dimensional adhesive and Goldrush Smooch Glitz was added in to the flower center.

(FYI: I colored the bottom rose gray, so in case it shows a little, it will look like a shadow. If you look at the close up image, you can see the gray peeking through just a bit.)

A card front and the card base were cut and embossed with the largest of the Curved Rectangles dies. The card front was adhered to the card base so the curved rectangle shape looks complete.

Matching layers were cut out of Kraft cardstock as well as a piece of My Mind’s Eye Dolled Up paper. The top and bottom of each layer was cut with the edge of the Curved Rectangle die to match the shape of the card. These layers were stitched together.

White cardstock was cut and embossed with a Fancy Tag 2 die. The center was sponged with Vintage Photo distress ink and the edges of that center were stamped with the leave border of Magnolias, also in Vintage Photo ink. Another piece of white cardstock was cut and embossed with the smallest of the Petite Oval Nestabilities, sponged first with Antique Linen, then very lightly at the edges with Vintage Photo ink. A sentiment from the same set was stamped in the center of that oval with Tuxedo Black Memento ink. The oval was adhered to the Fancy Tag die cut with dimensionals.

A strip of white cardstock was cut with Classic Scallop Edgeabilities and a 1″ wide strip of Dolled Up paper was adhered above the scalloped strip.  The strips were adhered to the stitched layers.  Seam binding was threaded through one of the openings on the left hand side of the Fancy Tag die cut. The sentiment layers were adhered to the right hand side of the card base, slightly above the horizontal strips and the seam binding was tied into a bow.  Parts of a Finesse swirl and part of a Fancy Waves! Border bling finish off the card.

Check out my fellow Timeless Tuesday Challenge Members for more inspiration:

Cindy Haffner
Heather Jensen
Maki Jones
Mona Pendleton
Silke Ledlow
Tammy Hershberger
and March Guest Designer Meredith MacRitchie

Thanks so much for stopping by! Have a wonderful day!
Hugs and smiles


Hi all and welcome to the final day of Flourishes’ Release Week! And, guess what? If you like what you’ve seen on our designers’ blogs, I’m happy to report that all three of Flourishes’ new sets for March are in the Flourishes store!! Just click HERE to see for yourself!

Are you ready to see our last set being revealed today? It’s a beauty with blossoms that are just about as lovely as you can get without being the real thing!

Introducing…

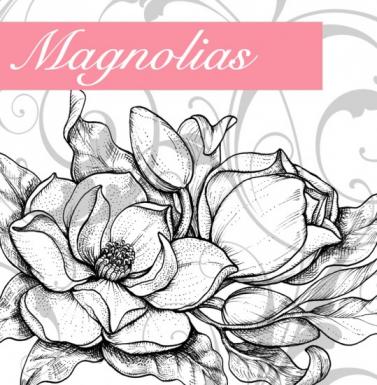
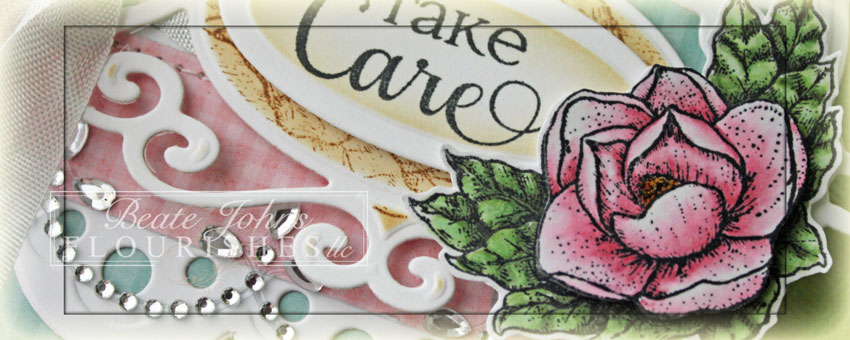
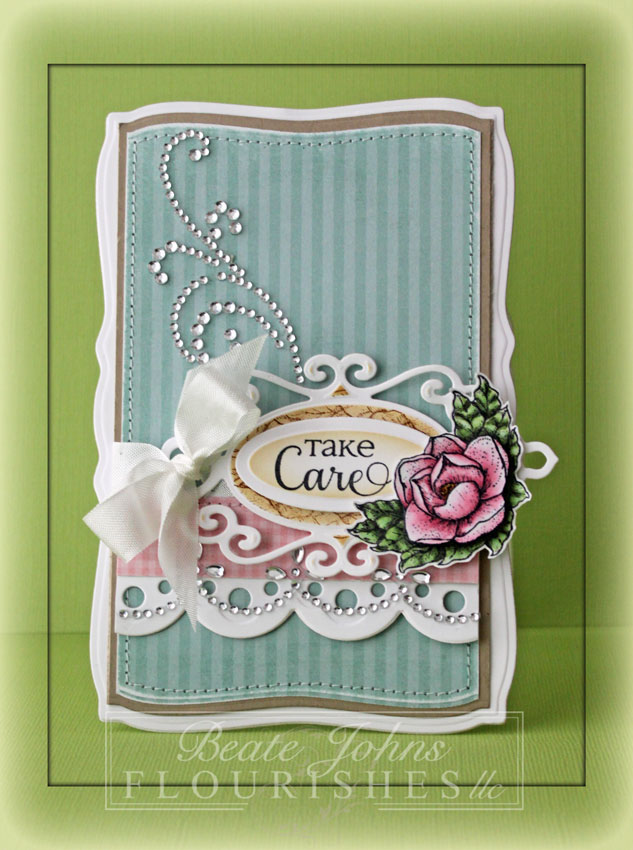
Marcella Hawley’s newest set called Magnolias features lush and sweeping flowers so sweet, you can almost smell their pure fragrance! This 4″ by 6″ set features a beautiful focal image, a corner floral piece and a border of leaves, allowing you to stamp and create accents in a whole host of ways. This set also features six touching sentiments perfect for all occasions.

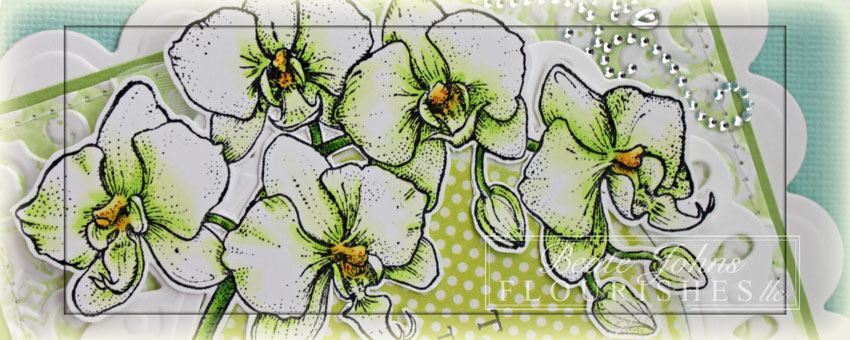
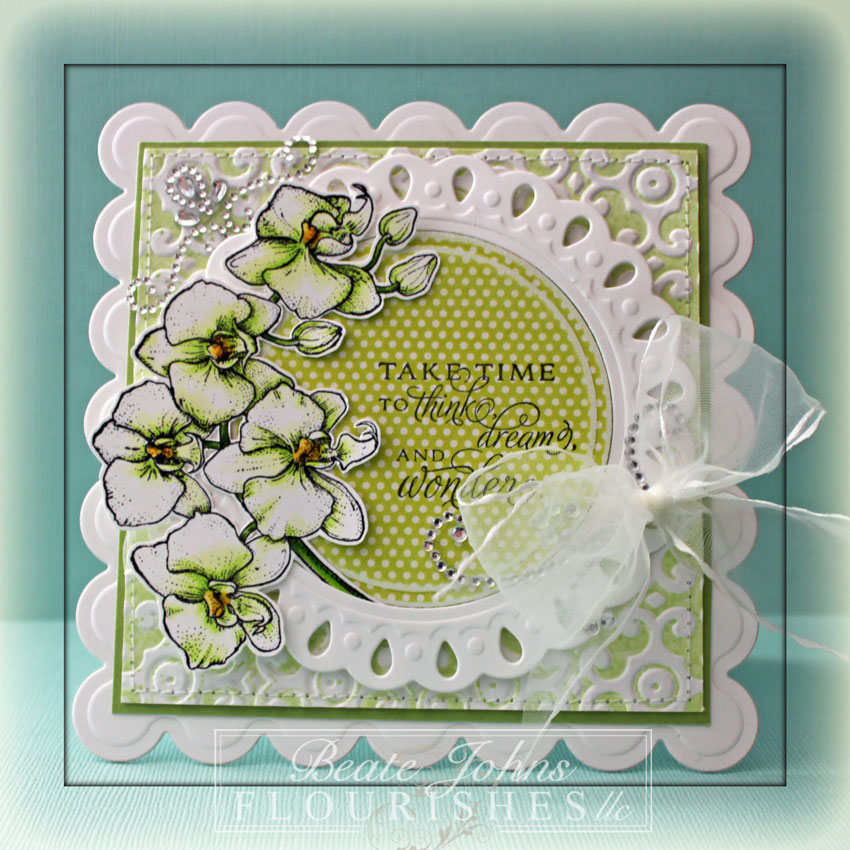
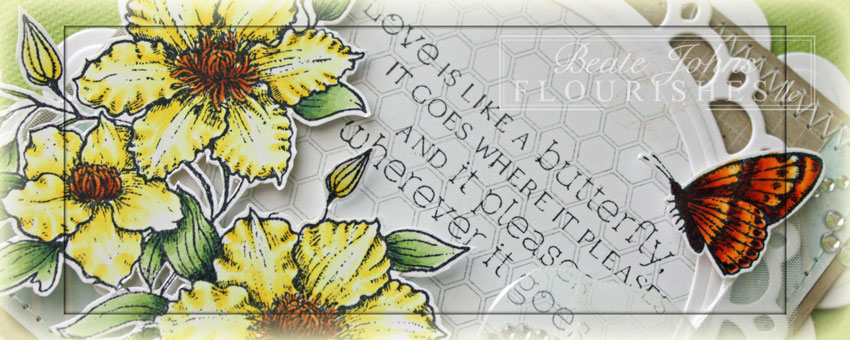
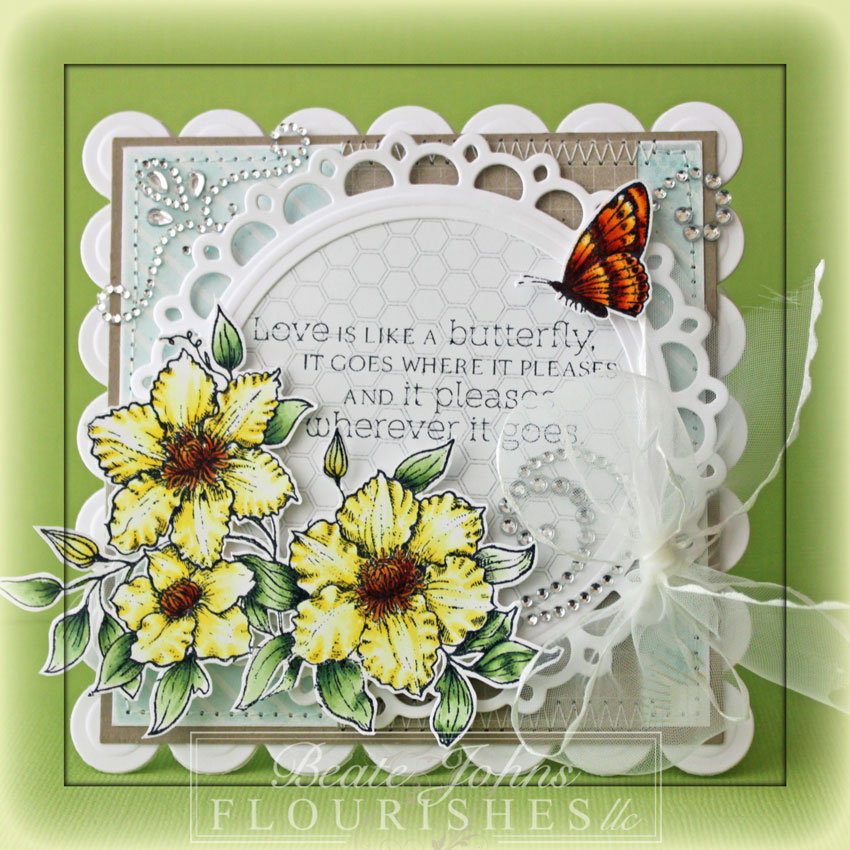
For my card I stamped the big image of Magnolias in Tuxedo Black Memento ink on white cardstock. It was cut with the largest Classic Rectangle Nestabilities die and the Out of the Box Technique and colored with Copic Markers (Petals: YR30, YR31, T1    Petal Center: YG13   Background: BG0000, BG000). The edges of the rectangle not covered with the flower were stitched.

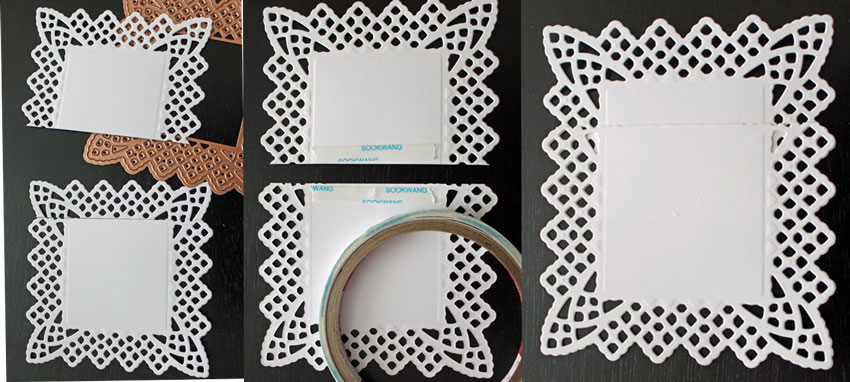
To create a lattice background for my recangle, I cut one full Lattice Doily Square and another partial square. From the full square, I cut off one side. Next I added Scor-Tape to the edge on the bottom edge of the former full square and  the cut edge of the partial square and adhered them together to create my lattice rectangle.

A 2 3/4″ x 5″ strip of My Mind’s Eye Patterned Paper was adhered to a 3 7/8″ x 5″ piece of the same paper pack. The edges were sanded and stitched. May Arts Ribbon was threaded to one of the Lattice openings before the image was adhered to the paper. The ribbon was tied into a bow and the layers were adhered to a piece of white cardstock, cut and embossed with the second smallest Grand Scallop Rectangle Nestabilities die.

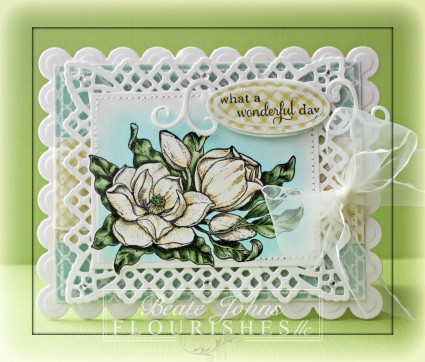
A sentiment from the set was stamped in Tuxedo black Memento Ink over a piece of MME paper, that had been cut and embossed with the smallest Petite Oval Nestabilities die. It was adhered over a piece of white cardstock, cut and embossed with a Fancy Tag die. It was adhered to the upper right of the image. A few Baby Bling Rhinestones finish off the card.

Would you like to win the Magnolias set? All you need to do is leave some love in the form of a comment on the blogs below! Why? You need to try to figure out…..

One of the ladies on our link list below will be picking a name from the comments on her blog post today. We don’t know which one it is… so the more blogs you leave comments on, the more chances you have to win!

With that bit of eye candy, you’ll surely want to see the design team’s cards and creations in full color when you take a trip over to their blogs!

DID YOU KNOW YOU COULD WIN OUR ENTIRE MARCH RELEASE? Have you checked out our Pinter-Inspiration Color Challenge? Just click HERE to find out how to play! You can also play in our Noon Time Challenges! Wednesday, we unveiled our Round and Round Challenge HERE. And, yesterday we shared the Front & Back Challenge HERE! Both are fast-paced noon time challenges that will give you yet one more chance to win our full March release! All challenges will close this Friday at 5 PM EST and winners will be announced Saturday in our Winner’s Circle blog post! So get those fingers inky and good luck!

And, don’t forget our New Release Bundle! If you buy all three sets in a bundle, you save 10% off the price. But, this offer only lasts through next Friday, March 23. So… you have to act fast! Just click HERE to see.

Thanks so much for stopping by! Have a wonderful day.
Beate

Welcome to day 2 of Flourishes Sneak Peeks for our March Release! Today we are actually unveiling not only a brand new stamp set but a coordinating die to make sure that your image is cut and embossed perfectly, each and every time. Are you ready for a peek?

Introducing….

And, it’s matching die….

Our new Botanical Bookplates Vol. 1 set might scream spring, but pair it with this matching die and you’re sure to create beautiful cards all year long with Violas and Snowdrops that are as beautiful as those in real life! This new set illustrated by Marcella Hawley features two large focal images plus two smaller bookplate versions that are perfect for tags, or adornments on cards or creations. Add in 5 beautifully scripted sentiments, and you have the makings of beautiful creativity. Botanical Bookplates Vol. 1 was designed to match our Tailor-made Classic Bookplate Die for a perfectly cut and embossed image each time!

I absolutely LOVE that Marcella designed stamps in the Botanical Bookplates Vo. 1 stamp set showcasing Schneegloeckchen. I used to love watching them popping up back home in Germany as a first sign of Spring. They were such a pretty sight after long winters, a promise that spring was just around the corner.

I cut three pieces of white cardstock with Flourishes new Tailor-Made Classic Bookplates dies. The bookplate snow bell image was stamped three times in Tuxedo Black Memento Ink and colored with Copic Markers ( Leaves: YG01, YG03, YG17   Flower heads: Y00, Y04, W1   Background: BG0000, BG000). Smooch Glitz Frost was added over the petals.

A thin strip of white cardstock was taped above a 2 3/4″ x 5 5/16″ piece of My Mind’s Eye Miss Caroline patterned paper. The edges of the paper were sanded and another piece of white cardstock, cut and embossed with a Lace Doily Accent die was adhered underneath the paper. The edges were stitched before a piece of May Arts ribbon was tied around the layers.

The strip was adhered to the card base, a 5 5/16″ x 8 1/2″ piece of Kraft cardstock, folded in half.  A sentiment from the same set was stamped on a piece of white cardstock, cut and embossed with a Fancy Tag die. The inner part was colored with Copic Marker BG0000 before the tag was adhered above the lower edge of the two bookplates on the right. Baby Bling Rhinestones on the Lattice edge finish off the card.

Would you like to win our new Botanical Bookplate Vol. 1 and Classic Bookplate Die set? All you need to do is leave some love in the form of a comment on the blogs below! Why? You need to try to figure out…..

One of the ladies on our link list below will be picking a name from the comments on her blog post today. We don’t know which one it is… so the more blogs you leave comments on, the more chances you have to win! So what are you waiting for? Hop on over and see…….


DID YOU KNOW YOU COULD WIN OUR ENTIRE MARCH RELEASE? Have you checked out our Pinter-inspiration color challenge? Just click HERE to find out how to play! You can also play in our Noon Time Challenges! Yesterday at noon, we unveiled our Round and Round Challenge at noon — click HERE for details! And, today at noon, we’ll share one more fast paced way to win our entire March release! All challenges will close this Friday at 5 PM EST and winners will be announced Saturday in our Winner’s Circle blog post! So get those fingers inky and good luck! See you back here soon!


Thanks so much for stopping by! Have a wonderful day.
Beate

Just like spring, Flourishes’ March release is blooming with goodness! If you are ready for some fresh picks, then you have definitely come to the right place! Flourishes’ tagline of having classic and timeless images couldn’t hold more true when you look at our March offerings!

This first set is Marcella Hawley at her finest. And, she’s paired beautiful peonies with one of the world’s most beloved women to bring you a touching and beautiful set to honor those special to you — including your mom!

Introducing:

Mother’s Words of Wisdom takes some of the best quotes from Mother Theresa, and brings them to life. All five sentiments in the set were designed to fit perfectly in this gorgeous frame of peonies illustrated by Marcella Hawley. It’s an image that anyone you care about, including your mother, will be sure to cherish. Set measures 4″ by 6″.

This new wreath image was so much fun to color. It was stamped in Tuxedo Black Memento Ink on Solar White cardstock and cut and embossed with the largest Standard Circle Nestabilities die. The image was colored with Copic Markers ( Peonies: RV10, RV52, RV55, Y21, YR21, YR23   Leaves: G40, G43, G46    Background: BGoooo, BGooo0) and adhered to a piece of white cardstock, cut and embossed with the largest Tear Drop Circle die.

A sentiment from the same set was stamped on a piece of white cardstock, cut and embossed with a smaller circle die. The edges were colored with Copic Marker BG0000. It was adhered into the center of the image with dimensionals.

A 4 3/16″  square of white cardstock was embossed with the new M-Bossabilities folder Elegance. It was stitched to a 4 3/8″ square of light blue cardstock. Ribbon was threaded through one of the Tear drops in the circle before the image was adhered to the center of the layers. The ribbon was then tied into a bow and everything was adhered to a card base, cut and embossed with the second smallest Grand Scallop Square Nestabilities die.

Gold Smooch Glitz was added to the center of the flowers. Parts of a Finesse Rhinestone Swirl finish off the card.

Would you like to win the Words of Wisdom set ? All you need to do is leave a comment on each of the blogs below. Why? You need to try to figure out….

.
One of the ladies on our link list below will be picking a name from the comments on her blog post today. We don’t know which one it is… so the more blogs you leave comments on, the more chances you have to win!
Happy hopping, friends!

DID YOU KNOW YOU COULD WIN OUR ENTIRE MARCH RELEASE? Have you checked out our Pinter-inspiration color challenge?  Just click HERE to find out how to play! You can also play in our Noon Time Challenges! Be sure to tune in today and tomorrow at noon for two more fast paced ways to win! All challenges will close this Friday at 5 PM EST and winners will be announced Saturday in our Winner’s Circle blog post! So get those fingers inky and good luck! See you back here soon!

Thanks so much for stopping by! Have a wonderful day.
Beate

Thank you all for the sweet comments about my news yesterday! Those meant the world to me.

Today is my first blog post on the Spellbinders Blog!  I am so excited. Please hop on over to check out the entire card, supply list and instructions. Or just to say hi and help me calm my nerves. 🙂

Have a wonderful day!
Hugs and smiles

Today’s hostess is Cindy. Her challenge is to use Scallops and Lace. How fun and easy is that? I used a set called Botanical Bookplates Vo. 1 to give you a little sneak peek (plus it’s so gorgeous, I had to use it right away). More sneak peeks of the new release sets are coming up the next three days. So make sure to check the Flourishes Blog for links of all design team members.

I stamped the image in Tuxedo Black Memento Ink on White cardstock and cut and embossed it with the largest Classic Oval Nestabilities die. The image was colored with Copic Markers (B0000, B91, B05, Y32, Y38, G20, G21, G24, G28, YR30) and  sponged with Antique Linen and Vintage Photo Distress ink. The edges of the oval were paper pierced and the oval was cut and embossed with the largest Beaded Oval Nestabilities die.

Two pieces of My Mind’s Eye  patterned paper were cut and embossed with the largest Label 21 Nestabilities die and the edges were sanded . The paper was then cut on the embossed line and adhered to a piece of  White cardstock that had been cut with the same die. Lace was adhered to the lower edge of the blue paper and the edges of the paper layers were stitched. Ivory Organdy Ribbon was threaded through one of the holes of the Beaded Oval die cut. The image layers were adhered to the card front with dimensionals and the ribbon was tied into a bow.

The card base was cut and embossed with the same Label 21 die and the card front was adhered on top. A sentiment from Botanical Bookplates Vo. 1 was stamped on a piece of Vellum cardstock, that had been cut and embossed with a Tailor-Made Classic Keyhole die. The sentiment was adhered over the lower edge of the image layer with small pieces of dimensionals. Those were covered up with Rhinestones. Part of a Finesse Rhinestone Swirl on the upper right hand corner finish off the card.

Check out my fellow Timeless Tuesday Challenge Members for more inspiration:

Cindy Haffner
Heather Jensen
Maki Jones
Mona Pendleton
Silke Ledlow
Tammy Hershberger
and March Guest Designer Meredith MacRitchie

Thanks so much for stopping by! Have a wonderful day!
Hugs and smiles


It’s time for another Timeless Tuesday Challenge. Heather is our hostess this week and she gave us a gorgeous inspiration photo to pick three colors from.

I picked the light yellow, green and orange as my colors.  I stamped the big image from Butterflies & Blossoms in Tuxedo Black Memento Ink on  Neenah Solar White cardstock. It was colored with  Copic Markers (Flowers: Y00, Y11, Y13, YR23, YR27, E37   Leaves: G40, G43, G46) and cut out. The small butterfly was stamped and colored (Y17, YR15, YR18) as well.

A frame was cut and embossed with a Picot Edge Circle and Standard Circle Nestabilities die. A piece of My Mind’s Eye Be Amazing patterned paper was cut with a slightly larger circle die and adhered behind the white frame. The cut out images were adhered over the frame with dimensionals. A 2″ x 3 7/8″ strip of Be Amazing Paper was adhered to a 3 7/8″ square of the same paper pack. The layers were stitched to a 1/4″ bigger Kraft cardstock square. May Arts Ribbon was tied around the square horizontally before the frame was adhered over the squares.

The layers were adhered to the card base, white cardstock cut and embossed with a Grand Scallop Square Nestabilities die. Part of the new Fancy That Want2Scrap Border bling and parts of a Finesse Rhinestone Swirl finish off the card.

Check out my fellow Timeless Tuesday Challenge Members for more inspiration:

Cindy Haffner
Heather Jensen
Maki Jones
Mona Pendleton
Silke Ledlow
Tammy Hershberger
and March Guest Designer Meredith MacRitchie

Thanks so much for stopping by! Have a wonderful day!
Hugs and smiles


© 2012 fresh & fun Suffusion theme by Sayontan Sinha