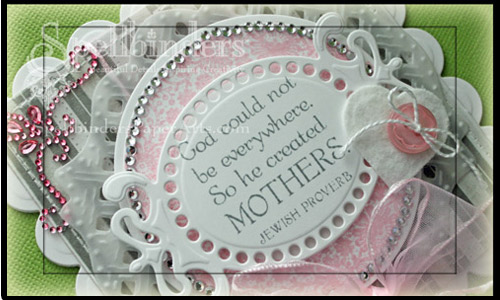
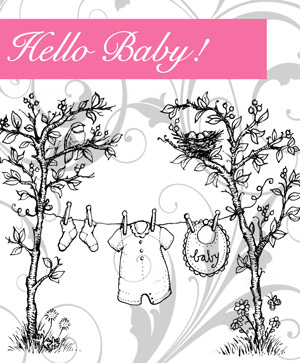
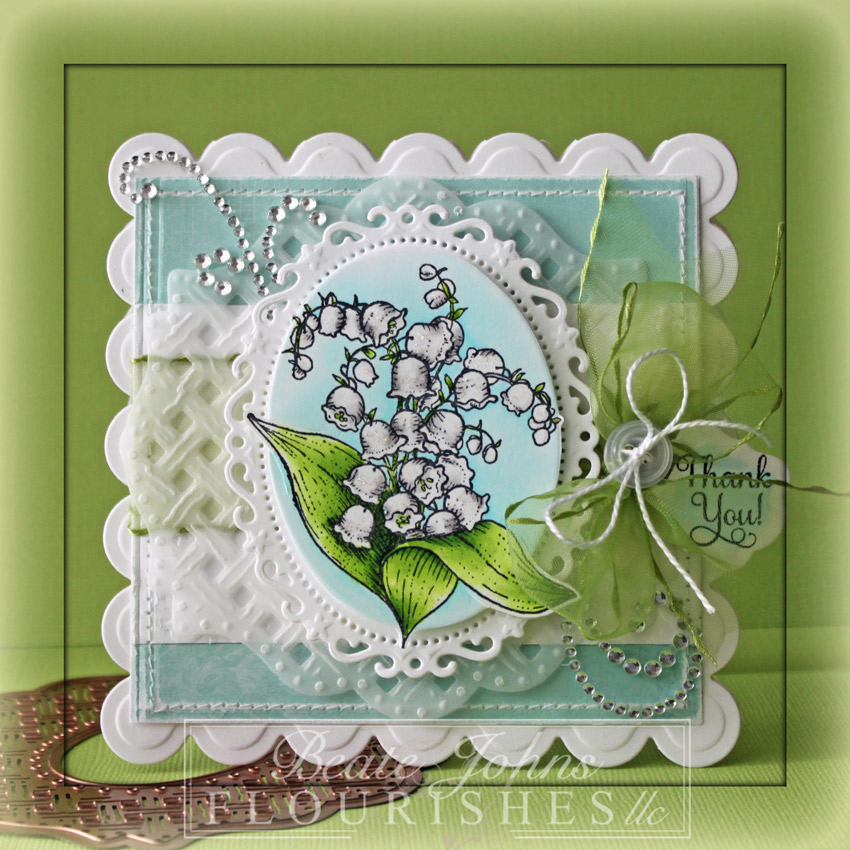
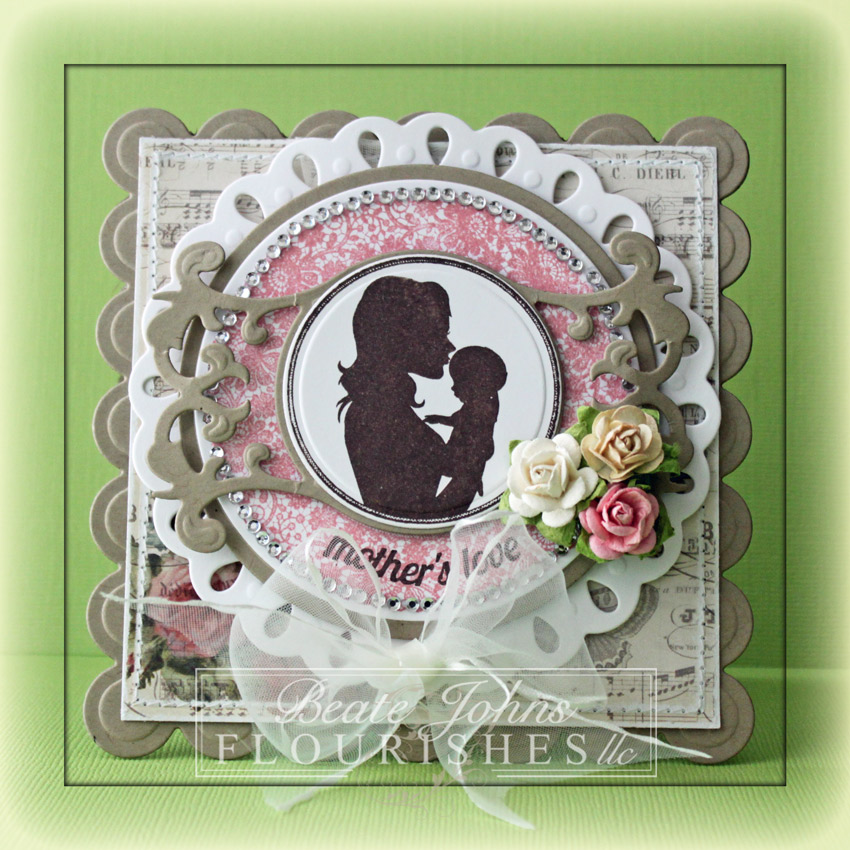
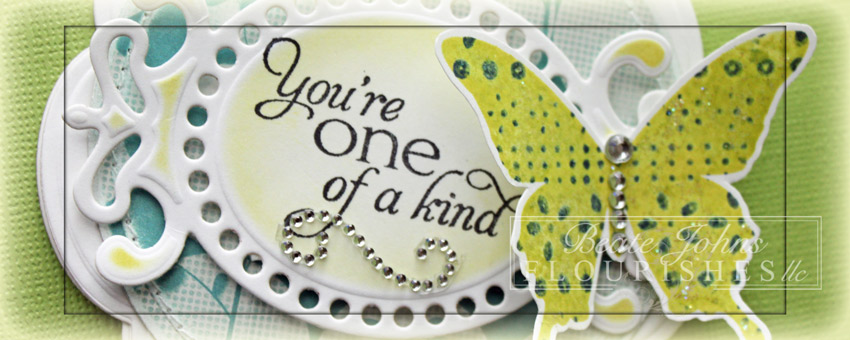
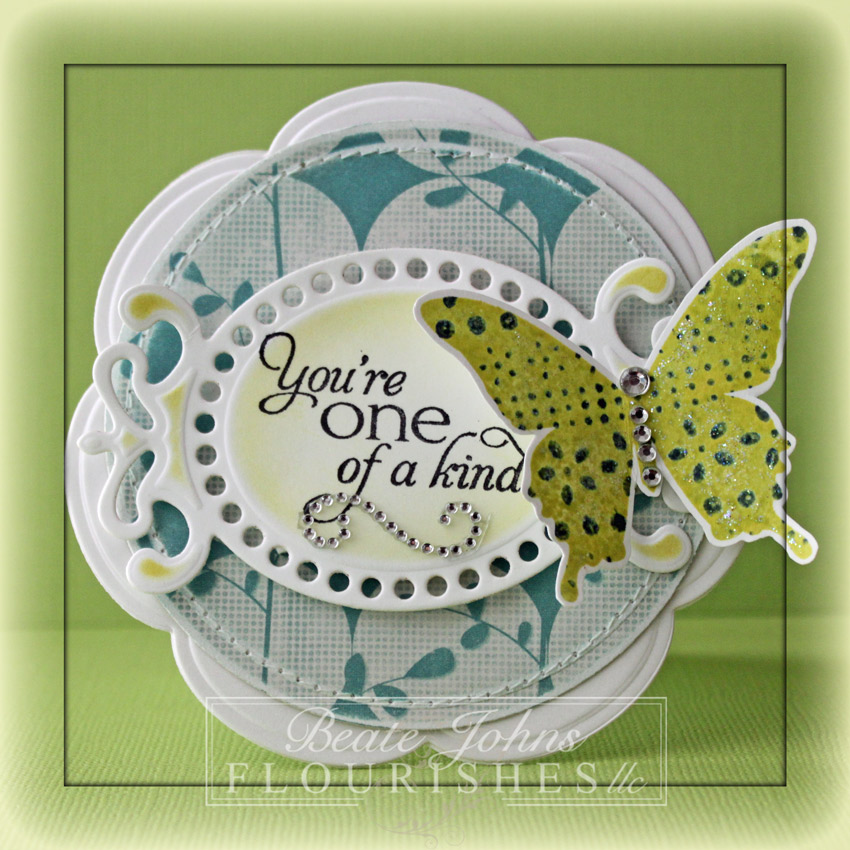
Today’s Timeless Tuesday Challenge hostess is Cindy Haffner. Her challenge to us is to create something with a butterfly. It can be a die cut, patterned paper with butterflies, embellishment or stamped image. I pulled out Butterflies & Blossoms, one of my favorite Flourishes set along with some of my favorite Spellbinders die to create my sample.

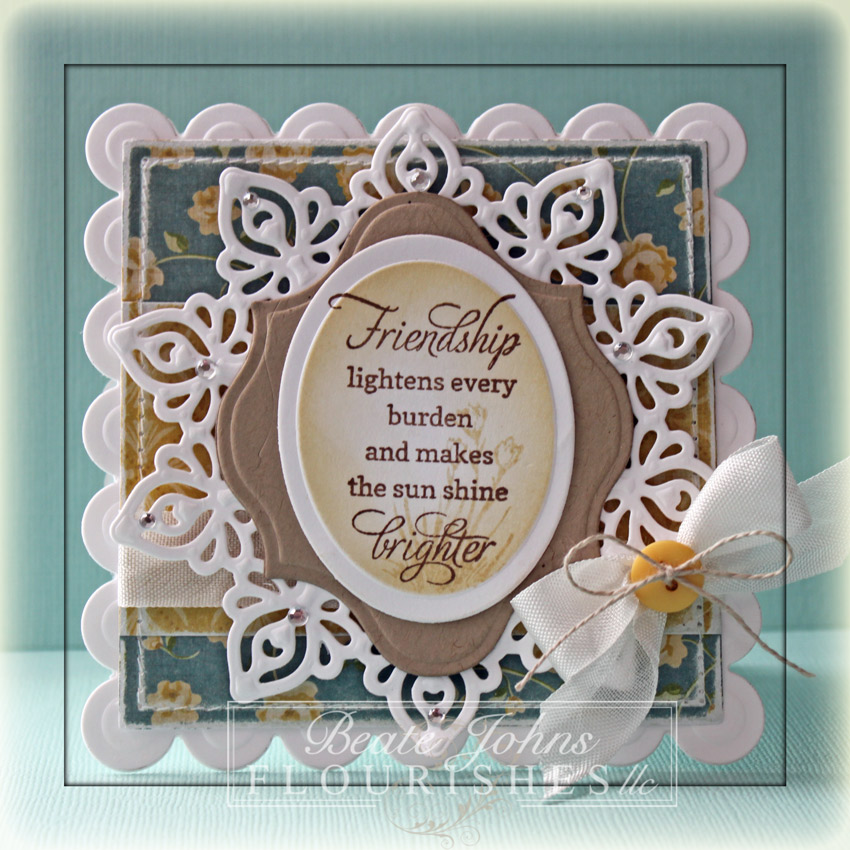
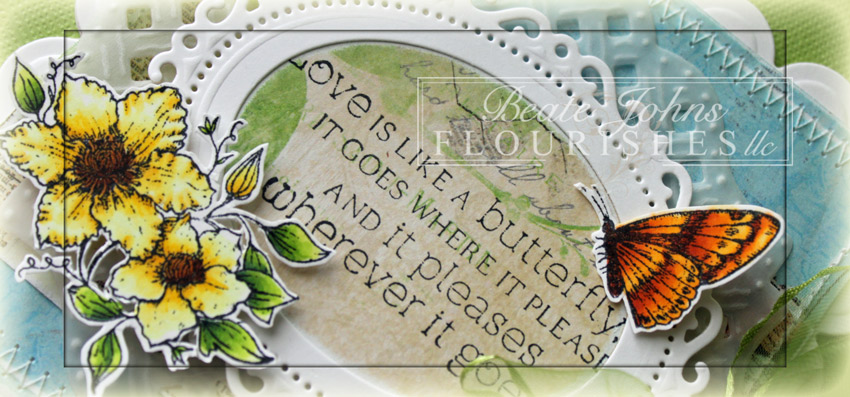
I started by cutting a frame with the second largest Floral Oval Nestabilities and a Classic Oval die out of white cardstock. A piece of Bo Bunny Country Garden paper was cut and embossed with a slightly larger  Classic Oval die. The edges were sanded and a sentiment from Butterflies & Blossoms was stamped in it’s center with Tuxedo Black Memento Ink. The oval was adhered behind the frame.

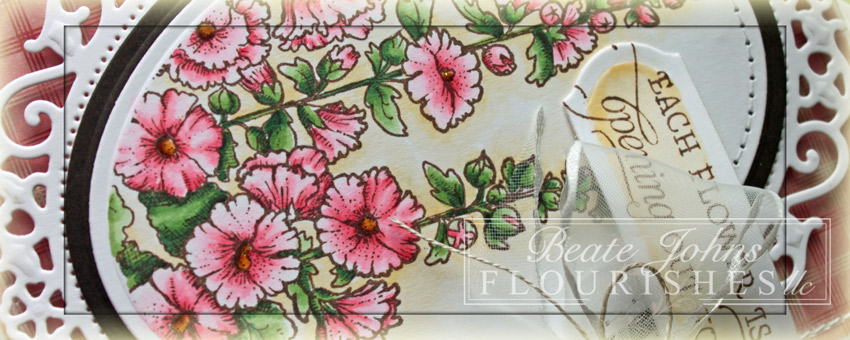
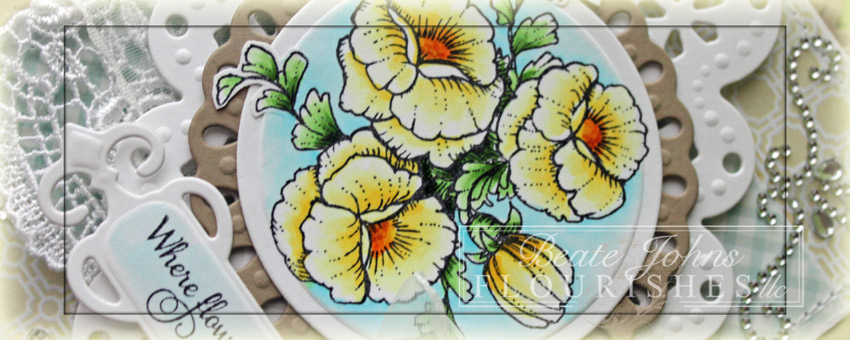
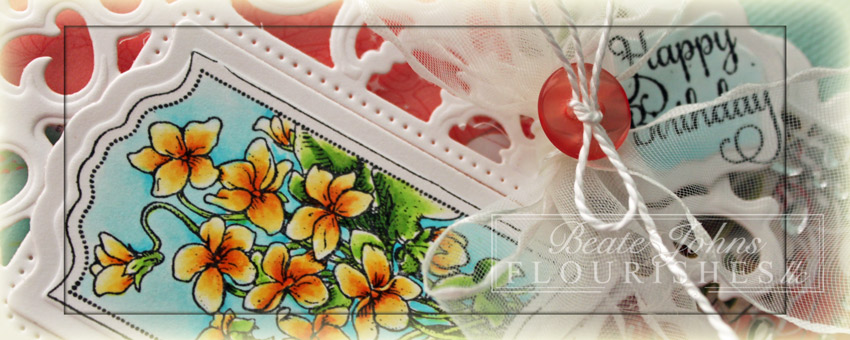
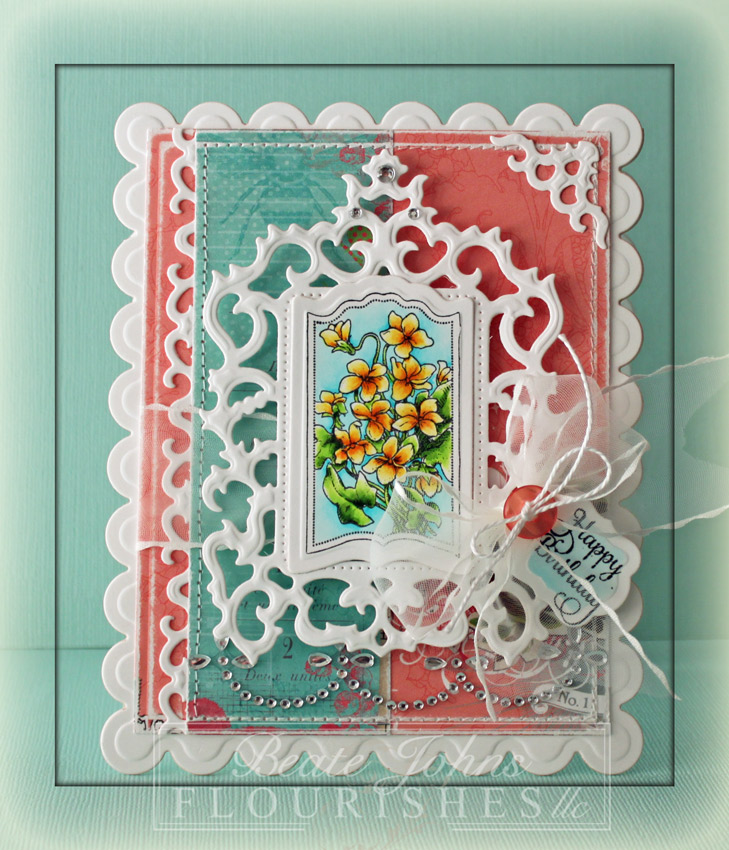
The smaller floral and butterfly image were stamped in Tuxedo Black Ink on white paper, colored with Copic Markers (Flowers: Y00, Y11, Y13, Y15, YR23, YR27, E37   Leaves: YG00, YG01, YG03, G46   Butterfly: Y17, YR15, YR18), cut out and adhered on the lower left and upper right of the frame.

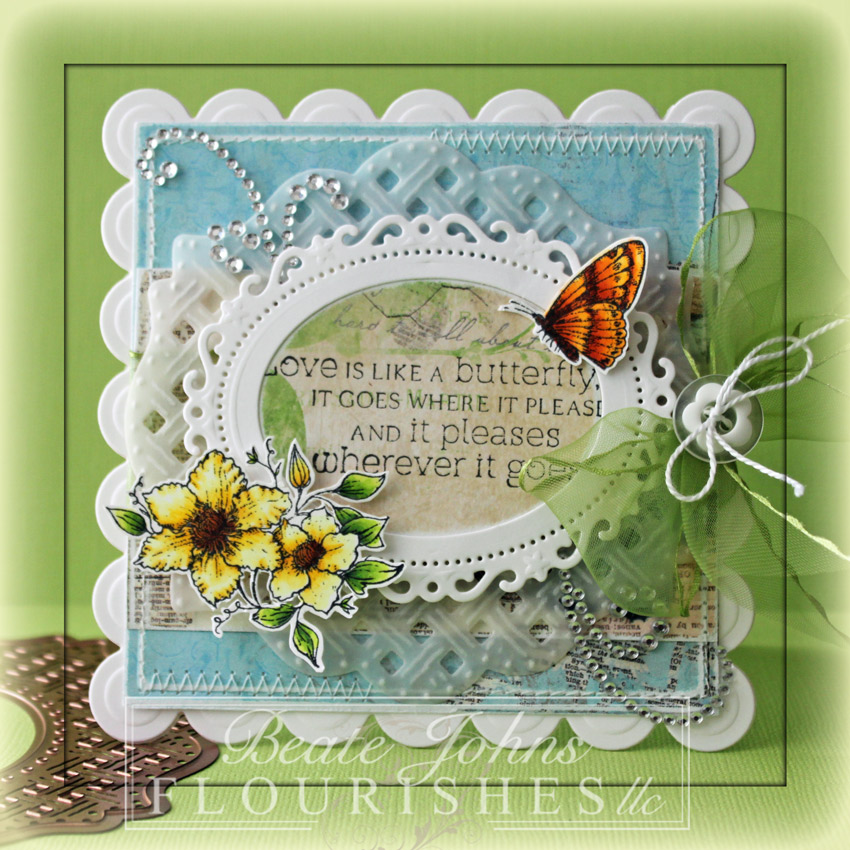
Another piece of Country Garden paper was cut and embossed with a Grand Square Nestabilities die. The edges were sanded and stitched. A piece of Vellum cardstock was cut and embossed with a Lattice Motif die. Green May Arts Ribbon was threaded through the Vellum layer before it was adhered to the patterned paper square. The ribbon was tied into a bow and topped with a button before the sentiment layers were adhered over the Vellum Lattice die cut.

The layers were adhered to the card base, white cardstock cut and embossed with a Grand Scallop Square Nestabilities die. Parts of a rhinestone swirl on the top left and lower right finish off the card.

Take a peek at what the other Timeless Tuesday designer have created for today…

I hope you have time to play. Thanks so much for stopping by! Have a wonderful day!
Hugs and smiles


I have another post on the Spellbinders blog. Check out the entire card with step by step photos here.

Have a wonderful day! Hugs and smiles

Today’s  Timeless Tuesday Challenge hostess is Heather. She created a Bingo card for us to play/stamp with. I decided to use the middle row of the bingo card (Pink – Ribbon – Die Cut).

I cut and embossed a piece of white cardstock with a Petite Oval Nestabilities die. While the die was still on the cardstock, part of the Hollyhock image was stamped in Rich Cocoa Memento Ink. The image was then colored with Copic Markers (RV000, RV10, RV13, G40, G43, G46, YR30, YR31). The oval was first layered on a piece of brown cardstock, then on a piece of white cardstock, cut and embossed with the largest Floral Oval Nestabilities die.

Patterned paper was cut and embossed with a a Grand Rectangle Nestabilities die. The edges were sanded and stitched before May Arts Ribbon was tied around the horizontal strip. The bow was topped with a button, tied on with Linen Thread. The layers were adhered to the card base, cut and embossed with a Grand Label 23 Nestabilities die.

A sentiment from the Hollyhock set was stamped in Rich Cocoa ink on a piece of white cardstock, cut and embossed with the Tailor-Made Keyhole Die. The embossed part was colored with YR30, YR31 Copic Markers. The tag was adhered to the upper right hand side of the image oval. Rhinestones finish off the card.

Take a peek at what the other Timeless Tuesday designer have created for today…

I hope you have time to play. Thanks so much for stopping by! Have a wonderful day!
Hugs and smiles

Tuesday morning means another Timeless Tuesday Challenge. Amanda is the hostess this week. She challenged us to use our favorite stamps. I don’t know about you, but usually my favorite stamps are the NEW ones. Am I bad? I just love to use new images I haven’t used before.

So for the card I stamped one of the images of the new Botanical Bookplates Vo. 2 in Tuxedo Black Memento Ink on white cardstock. It was cut and embossed with a Standard Circle Nestabilities die and the Out of the Box Technique and colored it with Copic Markers (Y00, Y11, Y13, Y17, YR15, YR24, YG11, YG13, YG17, B0000, B000). It was layered first on a piece of Kraft cardstock cut and embossed with a Tear Drop Circle die, then on a piece of white cardstock, cut and embossed with the Fair Isle Pendant die.

Patterned papers were cut and embossed with a Grand Rectangle Nestabilities die. The edges were sanded and stitched and Lace was adhered over the strip. May Arts Ribbon was tied above the lace and the bow was topped with a button.

The layers were adhered to the card base, Kraft cardstock, cut and embossed with a Grand Scallop Rectangle Nestabilities die.  A sentiment from that set was stamped on a piece of white cardstock, cut and embossed with a Fancy Tag 1 die. The embossed part was colored with Copic Marker B0000 before it was adhered under the image. Part of Rhinestones borders finish off the card.

Take a peek at what the other Timeless Tuesday designer have created for today…

I hope you have time to play. Thanks so much for stopping by! Have a wonderful day!
Hugs and smiles

Today is the final day of this month Flourishes Sneak Peeks. The set featured to day was designed by Marcella Hawley and is called Hello Baby!.

I created this card for my brother and his wife. They had a little baby boy yesterday. Well….not so little. He weight 9 lbs 8 oz and measured 22. 4 inches. I heard he has black hair just like my brother did when he was a baby. I can’t wait to see pictures. I wish I could hold the little darling. His name is Johannes, which is a family name on my Dad’s side. My uncle, my grandpa and several other male in my Dad’s family tree owned that name (German version of Johns, Hans for short).

I stamped the onesie in Tuxedo Black Memento Ink on patterned paper. It was cut out and adhered to a piece of white cardstock, cut and embossed with a Tear Drop Circle Nestabilities die that had been sponged with Antique Linen Distress Ink. The layers were adhered to a piece of white cardstock, cut and embossed with a Lattice Pendants die.

A piece of MME Lost & Found 2 Blush patterned paper was embossed with Elegance M-Bossabilities and sanded. A strip of patterned paper from the same paper pack was adhered over the embossed layer before it was stitched to a slightly bigger piece of Kraft cardstock. Ribbon was tied around the horizontal strip and topped with a button before the layers were adhered to a card base, cut and embossed with a Grand Scallop Square Nestabilities die out of white cardstock.

A sentiment from Tag Lines was stamped on a piece of white cardstock, cut and embossed with a Petite Oval Nestabilities die and sponged with Antique Linen Distress ink. It was adhered to the lower left of the Onesie. Rhinestones on the upper right and lower left finish off the card.

Want to win this set? All you need to do is leave some love in the form of a comment on the blogs below! Why? You need to try to figure out….

One of the ladies on our link list below will be picking a name from the comments on her blog post today. We don’t know which one it is… so the more blogs you leave comments on, the more chances you have to win!

Senior Design Team

DID YOU KNOW YOU COULD WIN OUR ENTIRE APRIL RELEASE? Have you checked out our Motherly Love Challenge? Just click HERE to find out how to play! You can also play in our Noon Time Challenges, which start today at noon with another one ushered in tomorrow at noon!  Both are fast-paced and fun challenges that will give you yet one more chance to win our full April release!   All challenges will close this Friday at 5 PM EST and winners will be announced Saturday in our Winner’s Circle blog post! So get those fingers inky and good luck!

And, don’t forget our New Release Bundle! If you buy all three sets in a bundle, you save 10% off the price. But, this offer only lasts through next Friday, April 20. So… you have to act fast! Just click HERE to see!

Thanks so much for stopping by! Have a wonderful day!
Hugs and smiles

Day two of the Flourishes Sneak Peeks. Today the featured set is the Botanical Bookplates Vo. 2. I loved the first one and I have to say that they second set in this series is just as gorgeous as the first.

For my sample I stamped the big Lily of the Valley image in Tuxedo Black Ink on White cardstock. It was cut and embossed with a Classic Oval Nestabilities die and the Out of the Box technique. The image was cut down even more on the embossed edge and colored with Copic Markers (T0, T1, T3, YG01, YG03, YG17, B0000, B000). The image was adhered to a piece of cardstock, cut and embossed with the second largest Floral Oval Nestabilities die.

A piece of vellum cardstock was cut and embossed with a Lattice Motif die. The image ovals were adhered over it with dimensionals. A piece of patterned paper was cut and embossed with the smallest of the Grand Square Nestabilities die. The edges were sanded and a strip of white cardstock was taped over the paper square. The edges were stitched and ribbon was threaded through the Vellum layer and tied around the paper square. The layers were adhered to the card base, white cardstock cut and embossed with the smallest Grand Scallop Square Nestabilities die.

A sentiment from the set was stamped on a piece of cardstock, cut and embossed with one of the Tailor-Made Classic Tags Template die. The tag was tied on to the bow with a button and embroidery thread.

Want to win this set? All you need to do is leave some love in the form of a comment on the blogs below! Why? You need to try to figure out….

One of the ladies on our link list below will be picking a name from the comments on her blog post today. We don’t know which one it is… so the more blogs you leave comments on, the more chances you have to win!

Senior Design Team

Friends of Flourishes Team

DID YOU KNOW YOU COULD WIN OUR ENTIRE APRIL RELEASE? Have you checked out our Motherly Love Challenge? Just click HERE to find out how to play! You can also play in our Noon Time Challenges, which start today at noon with another one ushered in tomorrow at noon!  Both are fast-paced and fun challenges that will give you yet one more chance to win our full April release!   All challenges will close this Friday at 5 PM EST and winners will be announced Saturday in our Winner’s Circle blog post! So get those fingers inky and good luck!

And, don’t forget our New Release Bundle! If you buy all three sets in a bundle, you save 10% off the price. But, this offer only lasts through next Friday, April 20. So… you have to act fast! Just click HERE to see!

Thanks so much for stopping by! Have a wonderful day!
Hugs and smiles

Mother’s Day is coming up soon and the new release of Flourishes stamps will make it easy for you to create gorgeous feminine cards. Today the first set being showcased is called Love and Lace. It was designed by Lauren Pope along with a matching background called Antique Lace.

For my sample I stamped the image circle in brown ink on white cardstock, cut and embossed it with a Standard Circle die and layered it on a piece of Kraft cardstock, cut and embossed with a Fancy Tag 3 die. The wreath image of Love and Lace was stamped in pink ink on white cardstock, cut and embossed with a Standard circle die, then adhered first on a slightly larger Kraft circle, then a piece of white cardstock, cut and embossed with the largest Tear Drop Circle Nestabilities die.

Part of a sentiment from Love and Lace was curved on the stamp block, then stamped in brown ink on the bottom of the pink wreath. Rhinestones were added on the outer edge of the pink wreath.

A piece of patterned paper was cut and embossed with the smallest of the Grand Square Nestabilities die. The edges were sanded, then stitched before Ribbon was threaded through one of the Tear Drop circle holes and tied around the patterned paper square. The layers were adhered to the card base, Kraft cardstock cut and embossed with the smallest Grand Scallop Square Nestabilities die.

Since I only used part of the sentiment on the card front,  I added the entire sentiment on the inside of the card. The background was stamped in pink on white cardstock and cut and embossed with the bigger heart die from Home Sweet Home.

Want to win this set? All you need to do is leave some love in the form of a comment on the blogs below! Why? You need to try to figure out….

One of the ladies on our link list below will be picking a name from the comments on her blog post today. We don’t know which one it is… so the more blogs you leave comments on, the more chances you have to win!

Senior Design Team

Friends of Flourishes Team

DID YOU KNOW YOU COULD WIN OUR ENTIRE APRIL RELEASE? Have you checked out our Motherly Love Challenge? Just click HERE to find out how to play! You can also play in our Noon Time Challenges, which start today at noon with another one ushered in tomorrow at noon!  Both are fast-paced and fun challenges that will give you yet one more chance to win our full April release!   All challenges will close this Friday at 5 PM EST and winners will be announced Saturday in our Winner’s Circle blog post! So get those fingers inky and good luck!

And, don’t forget our New Release Bundle! If you buy all three sets in a bundle, you save 10% off the price. But, this offer only lasts through next Friday, April 20. So… you have to act fast! Just click HERE to see!

Thanks so much for stopping by! Have a wonderful day!
Hugs and smiles

Yesterday’s tutorial on Splitcoast was written by the wonderful Susan Roberts. She created a fun tutorial on how to use embossing folders and solid shape stamps. For my sample I used the butterfly image from Fanciful Flourishes and one of my favorite M-Bossabilities folder called Flower Fun.

The butterfly was inked with Pear Tart Memento Ink, the embossing folder with Chipped Sapphire Distress Ink. The butterfly was pressed into the inked embossing folder before it was stamped on Neenah Classic White cardstock. The image was cut out and the wings were brushed with Frost Smooch Glitz.

A sentiment from Flourishes new Magnolia set was stamped in Tuxedo Black Memento Ink on a piece of white cardstock, cut and embossed with a Fancy Tag 3 die. The embossed part was sponged with Pear Tart ink.  The butterfly was adhered to the right hand side of the sentiment panel. Rhinestones from a Baby Bling and Sleek Strips Silver Rhinestones strip were used for the body of the butterfly. Part of a  Fancy That! Border Bling was added underneath the sentiment.

A piece of MME On the Bright Side Two patterned paper was cut and embossed with a Standard Circle Nestabilities die. The edges were sanded and stitched before the it was adhered to the card base, which was cut out of Solar White cardstock with the largest Blossom Nestabilities die.

Here is a video for the visual learner:

[youtube]https://www.youtube.com/watch?v=dBPQWnIi2mE[/youtube]

Thanks so much for stopping by! Have a wonderful day.
Hugs and smiles

It’s my turn to host Timeless Tuesday again. I thought I give you an easy challenge. April is my birthday month so your challenge is to make a birthday card.

I love the new Botanical Bookplates Vo. 1 and thought they would make for a great spring birthday card. One of the images was stamped with Memento Tuxedo Black and colored with Copic markers. The image was cut out with the Tailor-Made Classic Bookplate die and layered on a piece of white cardstock, cut and embossed with one of the the Antique Frame & Accent dies.

The border strip  and the small corner die of the same die package were used to cut another piece of white cardstock.  The card was designed with the designer papers. The sentiment was stamped with the same black ink on a piece of cardstock, cut and embossed with a Tailor-Made Classic Tag die. Ribbon and rhinestones finish off the card.

Take a peek at what the other Timeless Tuesday designer have created for today…

Thanks so much for stopping by! Have a wonderful day!
Hugs and smiles

Today’s Bring Back Beautiful challenge is all about friendship. Make sure you check out the Flourishes blog and the new team members! They are amazing stampers and I can’t see what they will create.

For my sample I used a sentiment from Sweet Days of Summer. It was stamped in Rich Cocoa Memento Ink on a piece of Neenah Solar White cardstock, cut and embossed with the third smallest of the Large Classic Oval Nestabilities die. The edges were first  sponged with Antique Linen, then with a  Frayed Burlap Distress Ink. The oval was layered on a piece of Kraft cardstock, cut and embossed with a Label 13 Nestabilities die, then on white cardstock, cut and embossed with a Persian Motifs Shapeabilities die (I thought it would go great with the sentiment. It almost looks like a sun die, doesn’t it?).

Cosmo Cricket Tea for Two patterned paper was cut and embossed with the largest Classic Square Nestabilities die. The edges were sanded and stitched. Seam binding was tied around the paper square before it was adhered to a piece of white cardstock, cut and embossed with the largest Lg. Scallop Square Nestabilities die. The card front was adhered to a card base, cut and embossed with the same large Scallop Square Nestabilities die.

A button was tied to the bow with  Linen Thread. Rhinestones from Baby Bling and Sleek Strips Silver Rhinestones finish off the card.

Thanks so much for stopping by! Have a wonderful day!
Hugs and smiles

© 2012 fresh & fun Suffusion theme by Sayontan Sinha