I took a few images to Chicago to color and the new My Favorite Thing Sending You a little Christmas image was one of them. I had stamped it on X-Press it Blending card with Tuxedo Black Memento Ink and colored it with Copic Markers ( Coat: B000, B02, B04  Scarf, hat: RV13, RV14, RV17  Leggings: YG21, YG03, YG25,  Boots and Mitten C1, C3, C5 Skirt: E50, E51, E53). It was cut and embossed with Classic Circle Nestabilities airbrushed with Copic Marker B01. It was then layered first on gray circle cut-out, then on a white Lacey Circle Nestabilities.

I added Polar White Flower Soft as snow on the bottom of the image and fine glitter on the hat and the top of the boots.

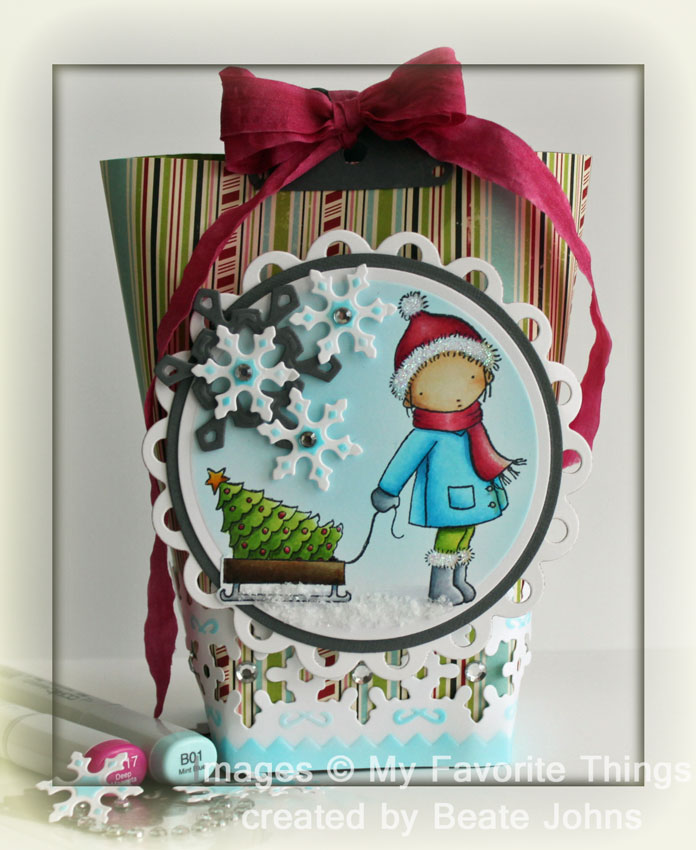
The patterned paper used for the bag is from Very Merry October Afternoon. The white cardstock strip was cut and embossed with the Snowflake Borderabilities and airbrushed with Copic Marker B01. I LOVE that border die. It’s big and the snowflakes that are cut out with it are beautiful. I used them (white ones) on the main image topped with Silver Kaisercraft Rhinestones. The gray snowflake was cut and embossed with a die from the Snowflake Pendant dies from Spellbinders.

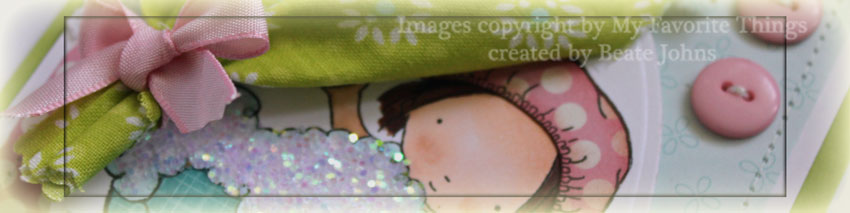
For the bag holder, I cut two small pieces of gray cardstock in half that they had been cut and embossed with Lacey Nestabilities die.  The crinkled May Arts ribbon was originally white. It had been colored with Copic Marker RV17.

Here is a video for the visual learner:

[youtube]https://www.youtube.com/watch?v=gcTL0gShpLA[/youtube]

Wednesday’s tutorial on Splitcoast was written by Julie Warner. She showed us how to create Faux Brads. I made this sample for the video tutorial .

I started out with the darling Fairy Girl from My Favorite Things. It was stamped in Tuxedo Black Memento Ink on X-Press it Blending card. It was colored with Copic Markers (hair: E31, E25, E29 skin: E51, E53 mushroom: R24, R29, R39, E50, E51, E53 shoes: E55, E57, E59 Grass: YG95, YG97, Wings & Wand: B91, B000). It was cut with Classic Circle Nestabilities, airbrushed with Copic Marker B00 and layered on a piece of Canyon Brown Neenah cardstock cut and embossed with Blossom Nestabilities.

A 4″ square of All Fall Fancy Pants paper was stitched to a 1/4″ bigger piece of white cardstock. The card base is a 4 1/2″ x 9″ piece of Red cardstock from MFT folded in half. The two slightly smaller pieces were adhered to the card base and the main image was attached to the layers with dimensionals.

The sentiment is also from the Fairy Girl set. It was stamped in Tuxedo Black Memento ink on a strip of X-Press It Blending card. I was bend into a wavy banner and attached underneath the image with dimensionals.

The Faux Brad was created out of All Fall Paper and cardboard and measures 3/4″. The edges were inked with Walnut Stain Distress ink and the top was clear embossed.  Silver Kaisercraft Rhinestones were added to the top right and bottom left of the card. May Arts Gingham ribbon topped with a Stampin’ Up! Brad was adhered to the upper left side of the image to finish off the card.

Here is a video for the visual learner:

[youtube]https://www.youtube.com/watch?v=aPaVjyIbCWQ[/youtube]

P.S.:
If you have never taken the Copic Certification class and want to check it out, you can get more info on Marianne’s blog. They are still accepting applications for the Chicago class next Thursday, the 21st. Jenn Balcer and I will be there and Lori Craig is the teacher. I can’t wait. It will be so much fun!

Thanks so much for stopping by! Have a wonderful Saturday! Hugs and smiles

For yesterday’s Product Review, I created a tutorial for the Faux Dry Embossing Technique. I thought that technique was perfect for the Xyron Create-a-Sticker.

A 4″ square of Neenah Solar White cardstock was stitched to a 3/16″ bigger piece of Early Espresso cardstock. More Neenah Solar White cardstock was cut with the smaller snowflake dies from Create-a-Flake 1 and Create-a-Flake 2. The snowflakes were run through the Xyron machine and adhered to the white cardstock square.  The layers were adhered to a 4 5/8″ x 9 1/4″ piece of Berrylicious cardstock folded in half.

The image is from My Favorite Things Flurries of Love. It was stamped in Tuxedo Black Memento Ink and colored with Copic Markers (Hat, boots and coat trimR24, R27, R29, R39, Scarf: BG11, BG13 Scarf: BG93, BG96, Skin: E51, E53, R20). It was cut with Classic Circle Nestabilities, airbrushedwith Copic Marker BG000 and layered on a piece of Berrylicious cardstock cut and embossed with Lacey Circle Nestabilities. Fine glitter was added over the falling snowflakes, Chunky Crystal Crafty Sparkles over the snow on the ground.

The sentiment is from the same set. It was stamped on Neenah Solar White Cardstock in Tuxedo Black Memento Ink, cut and embossed with Petite Oval Nestabilities and airbrushed with Copic Marker BG93. To finish off the card front a bow out of Polka Dotted grosgrain ribbon (retired Stampin’ Up! ribbon) was added to the lower right corner of the image and Silver Kaisercraft Rhinestones in the center of the big snowflakes.

Here is a video for the visual learner:

[youtube]https://www.youtube.com/watch?v=fHpFALpExW0[/youtube]

Thanks so much for stopping by! Have a wonderful day!
Hugs and smiles

For today’s product review on SCS we got to play with Xyron’s 1.5″ Create-a-Sticker. I really like using this nifty tool for adhering smaller die cut shapes.

For this sample I used the Xyron Create-a-Sticker to add adhesive to two 1/2″ circles as well as a strip of cardstock cut with My Favorite Things Jumbo Ric Rac die. I ran both the ric rac and the circles through the Xyron, took off the liner and covered them in Primrose Glass Glitter.

The image is from My Favorite Things Merry Kissmas. It was stamped in Tuxedo Black Memento Ink on Xpress it Blending card and colored with Copic Markers (hat: C1, C3, C5, RV13, RV15, RV17 Scarf: BG11, BG32, BG13 Skirt: E41, E42, E43, E44 Stockings: E40 Skin: E0000, E00, R20 Branch: E27, E29). The image was cut and embossed with Square Nestabilities and airbrushed with Copic Marker  BG000. It was layered first on a piece of Bermuda Bay cardstock cut and embossed with the next size square Nestabilities, then on a piece of black cardstock, cut and embossed with the Fair Isle Pendant die.

The card base is a 5″ x 10″ piece of Core’dination cardstock folded in half. A 4 1/4″ square of Mitten Weather paper was stitched to a 3 1/6″ bigger piece of Basic Black cardstock before that was adhered to a 1/4″ bigger piece of White cardstock.

The sentiment was stamped on Neenah Solar White cardstock in Tuxedo Black Memento Ink, cut with Petite Oval Nestabilitiesand airbrushed with Copic Marker BG11. A White Linen Ribbon bow topped with a Recollections glitter brad and a few silver Kaisercraft Rhinestones on the top left  corner finish off the card front.

Here is a video for the visual learner:

[youtube]https://www.youtube.com/watch?v=wUWa_VdBifI[/youtube]

mftflowergirlwide.jpg

I love this Pure Innocence image. I love them all, but this one seems especially cute. Maybe it’s the clothes that remind me of Rebecca’s. Maybe it’s the way she stands with the flower behind her back. Anyway…I had to use her as soon as I she came in the mail and I knew I wanted to use her in one of the video tutorials.

The Flower Girl Image was stamped in Tuxedo Black Memento Ink on Neenah Solar White Cardstock and colored with Copic Markers (YG25, YG17, R35, R37, C03, C05, C07,  E31, E25, E29, E51, E53, E55). It was cut out with Classic Circle Nestabilities and layered on a Chocolate Chip layer cut and embossed with Blossom Nestabilities.

mftflowergirlsliderfront.jpg

The card base is a 4 1/4″ x 11″ piece of Early Espresso Cardstock folded in half. The slider part was created out of Neenah Solar White cardstock. It was topped with a 3 3/4″ x 5″ piece of Report Card October Afternoon Paper. A 2″ x 3 3/4″ strip of Early Bird Cosmo Cricket was adhered to the lower half of the slider part and Gingham ribbon was tied around.  A small heart pin was added to the bow.The image was adhered to the front with dimensionals. The card front was finished off with Prima Flowers.

mftflowergirlslideropen.jpg

When you pull out the slider part, you will find a My Favorite Things Sentiment stamped on the matching Framed Greetings Die-namics die cut-out. The cut out was airbrushed with the same marker used to airbrush the main image.

mftflowergirlsliderinside.jpg

The inside was kept pretty simple. I just have a hard time leaving them completely blank.

Here is a video for the visual learner:
[youtube]https://www.youtube.com/watch?v=dgaIVVsaBc0[/youtube]

Thank you so much for stopping by. Have a wonderful day!
Hugs and smiles

mftbeautifuldaytrianglewide.jpg

Back in 2008 Carolyn King created a cute Triangle Treat Box tutorial for the Holiday Blitz week on Splitcoast. For my sample for the video I started out a 3″ x 11″ piece of Early Espresso cardstock.  After the box was assembled I layered it’s 3″ square sides with 2 1/2″ squares of Report Card October Afternoon Paper was stitched to a 2 11/16″ square of white cardstock.

mftbeautifuldaytriangletrea.jpg

The label was cut with a Framed Greeting Die-namic die and stamped with the matching stamp set. The flower was cut with the Rolled flower Die-namics die out of Cajun Craze Cardstock (Stampin’ Up!). The flower was spritzed with Smooch Spritz for a soft shimmer. The flower was layered on a Olive Silk ribbon bow. A  trinket pin finishes off the flower. Clear Kaisercraft Rhinestones were added to the label to tie in the hat pin.

Here is a video for the visual learner:

[youtube]https://www.youtube.com/watch?v=So8dD28xv98[/youtube]

mftlonelymewide.jpg

Here is another T-slide card I prepared for last weeks’ video tutorial. The card base is basically the same as the last slider card. I used a different image and different Nestabilities.

The image is from My Favorite Things Pure Innocence My Balloon. The image was stamped with Tuxedo Black Memento Ink on Neenah Solar White cardstock. It was colored in with Copic Markers (E000, E01, E11, YG25, YG17, R24, R29, Y17, YR16, BG07,  BG09). The image was cut with Label 13 Nestabilities and layered on a piece of black cardstock that had been cut with Label 3 Nestabilities. The background was airbrushed with Copic Marker B00.

mftlonelymetslideclosed.jpg

The card base is a 4 5/8″ x 9 1/4″ piece of Textured Old Olive cardstock folded in half. The edges of a  4″ square of  Thrift Store October Afternoon Paper were sanded and stitched to a 4 1/4″ black cardstock square. Red Gingham Ribbon was tied around the right side of the layers.

mftlonelymetslideopen.jpg

When pulling on a tab on the right, the image lifts up and a hidden message appears. The sentiment is from the same stamp set and stamped on Neenah Solar White cardstock in Tuxedo Black Memento Ink. It was cut with Petite Oval Nestabilities and the inside was colored with Copic B00.

Here is the video again in case you missed it:
[youtube]https://www.youtube.com/watch?v=Jdqh_Z6rR8Q[/youtube]

Thanks so much for stopping by. Have a great day!
Hugs and smiles

mftsummertslidewide.jpg

Today’s tutorial on Splitcoast is written by new tutorial writer Kim Score. She shows us a different kind of slider card. I created my sample with My Favorite Things Sunshiny Day. The image was stamped with Tuxedo Black Memento Ink on Neenah Solar White cardstock. It was colored in with Copic Markers (E000, E01, E11, YG25, YG17, R24, R29, Y17, YR16, BG07,  BG09). the image was cut with Label 13 Nestabilities. It was layered on a slightly bigger piece of Basic Black cardstock and hand cut around it. The background was airbrushed with Copic Marker B00.

mftsummertslidebeate.jpg

The card base is a 4 5/8″ x 9 1/4″ piece of Textured Old Olive cardstock folded in half. The edges of a  4″ square of  Thrift Store October Afternoon Paper were sanded and stitched to a 4 1/4″ black cardstock square. Red Gingham Ribbon was tied around the right side of the layers. Red Rhinestones were added to the top left corner.

mftsummertslideopen.jpg

When pulling on a tab on the right, the image lifts up and a hidden message appears. The sentiment is from the same stamp set and stamped on Neenah Solar White cardstock in Tuxedo Black Memento Ink. It was cut with Petite Oval Nestabilities and the inside was colored with Copic B00.

Here is a video for the visual learner:
[youtube]https://www.youtube.com/watch?v=Jdqh_Z6rR8Q[/youtube]

Thanks so much for stopping by. Have a great day! Hugs and smiles

My Favorite Things Kim‘s birthday is this weekend. To help her celebrate her big day several bloggers are featuring projects made with My Favorite Things stamps. Happy Birthday, Kim!!! I hope have a wonderful weekend and an amazing birthday! 

mftcc274owlsbluebellswid.jpg

I created this card for a color challenge on SCS  and My Favorite Things Sketch Challenge  couple of weeks back. I stamped the image from My Favorite Things Owls & Bluebells in Tuxedo Black Memento Ink on Neenah Solar White cardstock. It was cut with a square Nestabilities die and colored with Copic Markers (R32, R35, R37, G40, G94, G97, BG000, BG10, BG11, E35, E37, E39, E97, E99). The image was layered first on a black square, then on scalloped square cut out of red Core’dination cardstock.

mftcc274owlsbluebellsbeate.jpg

The card base is a 5″ x 10″ piece of Red Core’dination cardstock folded in half. A 4 1/2″ square of Hometown October Afternoon paper was stitched to a 4 11/16″ piece of Whisper White cardstock. A circle was cut with Circle Nestabilities out of another pattern of the Hometown collection and adhered to the upper left hand side. Kaisercraft Black Rhinestones were added around the edge.

A 4 3/4″ strip of Red Core’dination cardstock as well as Hometown paper were cut with the Scalloped Scallop Die-namics die and layered stitched on top of each other before they were adhered to the card White cardstock/paper layer. First thing white ric rac was taped on the lower have of the layeres, then white Organdy Ribbon was tied around them. The main image was adhered to the card front with dimensionals.

The sentiment is also from the Owls & Bluebells set. It was stamped in Tuxedo Black Memento ink on Neenah Solar White cardstock and cut out with Petite Oval Nestabilities.

mftcc274owlsbluebellsinside.jpg

For the inside of the card a piece of Red Core’dinations cardstock was cut with the Jumbo RicRac Die-namics die and stitched to a 4 11/16″ piece of Whisper white cardstock.  The main image was stamped in Tuxedo black on Hometown paper and cut with Circle Nestabilities and adhered partly under the ric rac.

Make sure you check out all the other participants of Kim’s birthday bash:

mftlatherrinsevsnwide.jpg

I had so much fun making this card last month during VSN. The challenge was to create a curtain. I cut the edge of a piece of fabric with the Scalloped Scallop Die-namic Die. The opposite side was folded over and stitched to give my a place to slide my small wooden stick through . The curtain was gathered with a small piece of Pink Taffeta Ribbon.

mftlatherrinsevsnbeate.jpg

The card base is a 4 1/4″ x 11″ piece of Sour Apple Cardstock folded in half. Two pieces of Ducks in a Row October Afternoon Paperwere cut to 3 3/4″ in width, and stitched to a 3 15/16″ x 5 3/16″ piece of Whisper White cardstock with a piece of white lace (Walmart) inbetween.

The image from Lather Rinse Repeat was stamped in Tuxedo Black Memento Ink on Neenah Solar White cardstock and cut with classic Oval Nestabilities. Part of the image was paper pieced (floor, bath cap and bath tub) with more Ducks in a Row paper, the rest was colored with Copic Markers (E00, E11, E25, E29, E31). The paper pieced parts were sponged with Tumbled Glass, Broken China and Worn Lipstick distress ink for shading. The bubbles were covered with Crafty Sparkles Chunky Crystal. I love that chunky glitter.

The sentiment is also from the Lather Rinse Repeat. It was stamped directly on my patterned paper layer with Tuxedo Black Memento ink. Two Basic Grey buttons on the top right finish off the card.

Thank you so much for stopping by! Have a wonderful day! Hugs and smiles

© 2012 fresh & fun Suffusion theme by Sayontan Sinha