Today’s tutorial is for a fun fold I called Side Spring card. Instructions were posted back in 2005 in a forum post on SCS and a recent post from Dawn reminded me of it.

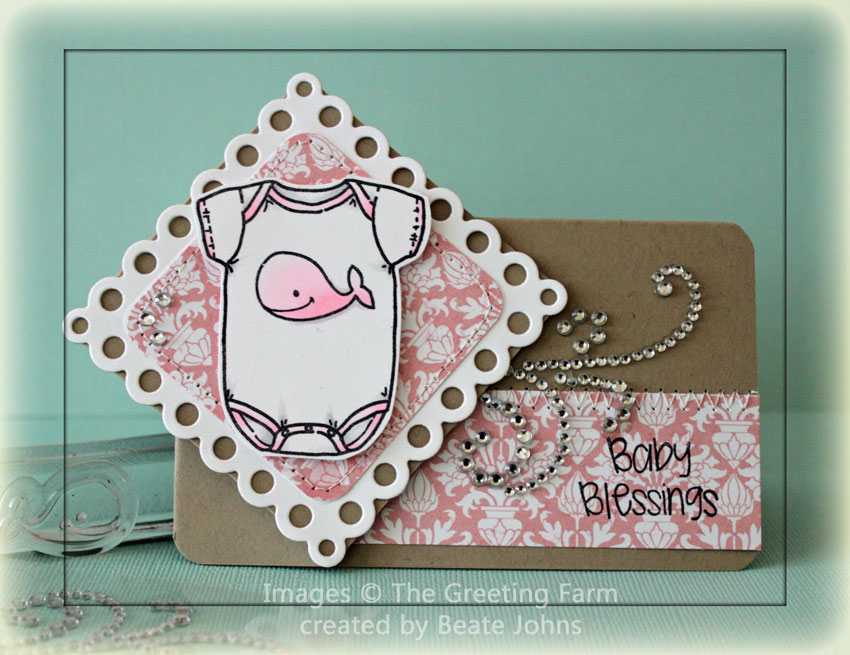
For my card I started out with a 5 1/2″ x 8 1/2″ piece of Kraft cardstock. The patterned paper is from the Echo Park Victoria Garden Paper pack. The strip on the left hand side measures 1 1/4″ x 4 1/2″. A sentiment from The Greeting Farm’s new Clear Set Build-a-Onesie Boy was stamped with Tuxedo Black Memento Ink directly on to the paper strip. Part of a Finesse Silver Rhinestone Swirl was adhered over to sentiment.

For the main image I stamped the onesie image on a piece of Neenah Solar White cardstock, colored it with Copic Markers (RV0000, RV10, N0, N1) and cut it out. A piece of white cardstock was cut and embossed with one of the Eyelet Square Nestabilities dies. A 2 3/8″ square of Victoria Garden paper was stitched to it after the corners were rounded. The image was adhered to the square with dimensionals. Three Silver Baby Bling Rhinestones on the left corner finish off the card front.

For the inside a 5/8″ x 4 5/16″ long patterned paper strip was adhered to a 2 9/16″ x 4 5/16″ piece of white cardstock. A small image from the same set was stamped to the right hand side of the strip with Tuxedo Black Memento ink.

Here is a video for the visual learner:

[youtube]https://www.youtube.com/watch?v=7nMekwqD3XE[/youtube]

Have a wonderful day! Thanks so much for stopping by!
Hugs and smiles

Silke is today’s Timeless Tuesday Challenge hostess and she asked us to create a Halloween project. I thought the Peek-a-boo Treat holder on SCS would work great for that. I used this sample in the video tutorial for the project.

The treat holder base is a 3 1/4″ x 9 1/4″ piece of Authentique Glowing paper. After scoring the paper a 3/8″ x 3 1/4″ strip of orange Echo Park Apothecary Emporium paper was adhered to the front flap. A 3 1/4″ wide Neenah Solar White cardstock strip was cut and embossed with an Ironwork Accent die and stitched underneath the flap.

Another Ironwork Accent die was used to cut a frame. It was layered first with a black cardstock circle, then with a slightly smaller white one. Both circles had been cut with Classic Circle Nestabilities dies. The white circle had been stamped with a sentiment from Flourishes Witching You a Happy Halloween in Tuxedo Black Memento ink. A swirl and bat from the same set had been stamped over the sentiment in second generation Dusty Concord Distress ink. The layers were adhered to the treat base and Rhinestone Bling from Want2scrap were added to finish it off.

For the inside I cut another Ironwork accent frame. This time though a circle die was centered inside the die to create a frame. A slightly bigger hole was cut with another circle die into the treat holder base to create the window. The frame as well as the candy were adhered with Liquid Glue.

Here is a video for the visual learner:

[youtube]https://www.youtube.com/watch?v=ZeEumGcnb4A[/youtube]

Please check out my fellow Timeless Tuesday Challenge members:

Cindy Haffner
Heather Jensen
Maki Jones
Mona Pendleton
Silke Ledlow
Tammy Hershberger
and
October Guest Designer Rosemary Dennis

Thanks so much for stopping by! I hope you have time to participate in the challenge. Have a wonderful day!
Hugs and smiles

Today’s card is another sample I created for the Hope You can Cling to Challenges on Splitcoaststampers and as one of my Sweet ‘N Sassy Guest Designer posts. The challenge at SCS was to incorporate pink in a masculine card.

The sentiment from Season of Change was stamped in the center of a 3 1/4″ x 4 3/4″ piece of Neenah Solar White cardstock with embossing ink. The sentiment was embossed with clear embossing powder before the entire piece was sponged with Tattered Rose, Wild Honey and Peeled Paint Distress ink. Leaves from Season of Change were stamped over it in the same colors.

The edges of the panel were distressed and stitched to a 1/4″ bigger piece of Canyon Brown cardstock. Three brads were added to the top left of the card.

The card base is a 4 1/4″ x 11″ piece of Kraft cardstock folded in half. The card front was embossed with the Cuttlebug Brocade Embossing Folder and the edges were sponged with Vintage Photo distress ink. The layers were adhered to the card base with dimensionals.

Leaves were cut out of white cardstock with leaf dies matching the set. Leaves were stamped over the die cuts and the edges were sponged before both leaves were tied together with a button and Linen thread. The leaves were adhered to the lower right of the sentiment panel.

I used this sample to update Splitcoaststampers Embossing Resist Tutorial and shoot a video for that technique:

[youtube]https://www.youtube.com/watch?v=qBAHRrJSuRM[/youtube]

Thanks so much for stopping by! Have a wonderful day.

Today’s tutorial on Splitcoast is for the Double Z-Fold card. It looks like a Gatefold card closed, but has another fold to it when you open it up. I think it’s a great fold for invitations.

My card base is a 5 1/4″ x 12″ piece of Textured Kraft cardstock scored at 2″, 4″, 8″ and 10″. 1 1/2″ x 4 3/4″ pieces of My Mind’s Eye Lost & Found Two Blush paper were stitched to a 1/4″ bigger piece of Neenah Solar White cardstock before they were adhered to the card base panels.A Rhinestone swirl was cut apart. Part was adhered to the upper right, the rest to the lower left of the card base.

A piece of white cardstock was cut and embossed with one of the Beaded Circle Nestabilities dies. It was sponged with Spun Sugar Distress ink before a sentiment from Verve Believe Stamp set was stamped in its center with Rich Cocoa Memento ink. A medium sized flower was stamped over the panel twice with Spun Sugar for a more textured look.

White Silk Ribbon was tied around the card before the sentiment panel was adhered with dimensionals. Baby Bling Rhinestones on the upper left hand side of the sentiment panel finish off the card front.

The inside is very simple. A 2″ x 3 3/4″ strip of Blush Paper was stitched to a 3 3/4″ x 5″ piece of white cardstock.

Here is a video for the visual learner:

[youtube]https://www.youtube.com/watch?v=f616k3NoKGU[/youtube]

Thanks so much for stopping by! Have a wonderful day!
Hugs and smiles

Last week I updated the old Shaving Cream Tutorial. For my sample I used Frayed Burlap and Spiced Marmalade Distress Re-inker on Neenah Solar White cardstock. The background was cut and embossed with a Classic Circle Nestabilities die.

The image is from TCP’s Fright Night stamp set. It was stamped in Versamagic Midnight Black in the center of the Shaving Cream circle. It was stitched on a slightly larger white cardstock circle, then on a piece of black cardstock, cut and embossed with the largest Beaded Circle Nestabilities die.

The sentiment is also from Fright Night and was stamped in Midnight Black on a piece of white cardstock cut and embossed with a small classic circle Nestabilities die. It was adhered to the left hand side of the image. Rhinestones were adhered to each of the beaded circles.

A 3 1/2″ x 4 1/2″ piece of Authentic Glowing Paper was stitched to a 4 1/2″ square of MME Lost & Found paper. White Crochet Lace and ribbon was died around the layers before they were a  4 3/4″ square of More Mustard paper. The card base is a 5″ x 10″ piece of black cardstock folded in half. A Finesse swirl was cut up and adhered to the lower left and upper right of the image.

Here is a video for the visual learner:

[youtube]https://www.youtube.com/watch?v=RCbpnGs2OJA[/youtube]

Thanks so much for stopping by! Have a wonderful day!
Hugs and smiles

I got the idea for this weeks tutorial from Ellen Hutson. She posted a similar one several years ago. I thought it was a great card idea and wanted to share it with all of you and have it in the SCS resource section. You use 4 circle die cuts to create a Petal Card.

For my sample I cut and embossed the four circles out of black cardstock with the largest of the Beaded Circle Nestabilities dies. 2 circles were cut and embossed with a smaller Classic Circle Nestabilities die out of Glowing Authentique Patterned Paper. The patterned paper circles were cut in half and sanded before one half was stitched to each of the four Beaded circles. The circles were scored in half and adhered with glue dots.

A piece of Crochet Lace was stitched to a 2″ x 10″ strip of Authentique Paper before it was adhered around the card as a belly band. Gold Organdy Ribbon was tied around the band. A Muse Token was tied around the bow with Linen Thread and topped with a button.

An image from Crafty Secrets Halloween Creative Scraps was cut with a Classic Oval Nestabilities die. The edge of the image was sanded before it was first adhered to a slightly bigger black cardstock oval, then to a Scallop Oval layer cut and embossed out of Classic Cream Neenah cardstock. A sentiment ticket from the  same Creative Scraps was cut out and attached to the image layer with a Mini Paper Clips. A small button was stitched underneath the sentiment.

For the inside of the card I cut and embossed another piece of Classic Cream cardstock with a Classic Circle Nestabilities die. A strip of Authentique paper was stitched to the layer after the edges had been sponged with Antique Linen Distress ink.

Here is a video for the visual learner:

Thanks so much for stopping by! Have a wonderful day!
Hugs and smiles

Today’s Timeless Tuesday challenge hostess is Maki. She is challenging us to use water on our card/project. Well…when I read that I thought of the Gel Card Tutorial that I needed to overhaul. While it’s not 100% according to the challenge….I think it works because it looks like water.

First I adhered two pieces of MME Lost & Found paper together along with a strip of Venice Lace to create a 4 1/4″ x 5″ layer. The bottom corners were rounded and the paper was stitched to a 3/16″ bigger piece of Neenah Solar White cardstock.

Next a window was cut into the layers with a Classic Circle Nestabilities die. A bag with hair gel was adhered behind it. Three fish from the Waterlilies set were stamped in Tuxedo Black Memento Ink on Solar White cardstock, colored with Copic Markers and cut out. The fish were adhered to a 3 1/4″ square of MME Lost & Found Paper and it was placed behind the window. The layers were adhered with dimensionals – since the gel bag made them a bit bulky – to the card base, a 4 1/2″ x 11″ piece of Kraft cardstock, folded in half.

A frame was cut and embossed with  Classic and Beaded Circle Nestabilities dies, adhered over the window and topped with Want2Scrap Pearls. A sentiment from the Waterlily set was stamped in Rich Cocoa Memento ink on a piece of Solar White cardstock that had been cut and embossed with another Classic Circle Nestabilities die. The edges were sponged with Antique Linen Distress ink and the small water lily image was partially stamped over the sentiment.

Here is a video for the visual learner:

[youtube]https://www.youtube.com/watch?v=eQcTn4z-oas[/youtube]

Please check out my fellow Timeless Tuesday Challenge Team members:

Betty Wright
Cindy Haffner
Heather Jensen
Makiko Jones
Silke Ledlow
Tammy Hershberger

I hope you have time to participate in the challenge! Have a wonderful day!
Hugs and smiles

This weeks  “From the Archives Tutorial” was Faux Leather with Masking Tape. It was a challenge at the VSN last week and I thought I better give the tutorial a make-over before that.

Masking tape was adhered to a 3 1/2″ x 4 3/4″ piece of white cardstock, sponged with Vintage Photo Distress ink and embossed with clear embossing powder. A 2″ x 4 11/16″ strip of October Afternoon Campfire paper was ahdered over it before the layers were stitched to a  3/16″ bigger piece of white cardstock. Linen thread was wrapped around the horizontal layer and was topped with an October Afternoon button. Two more OA buttons were stitched to the top left screen, along with a button from my Mom’s creation.

The sentiment is from Waltzingmouse Stamps set Back in the Saddle. It was stamped in Brilliance Coffee Bean ink on white cardstock. It was cut and embossed with a classic Circle Nestabilities die. The center was sponged with Antique Linen Distress ink. The rodeo cowboy image from the same set was stamped in the center of the circle with Antique Linen ink. The image was layered on a piece of Canyon Brown cardstock, cut and embossed with a Beaded Circle Nestabilities die.

The layers were adhered to the card base, a 4 1/4  x 11″ piece of Sno cone cardstock . A border was paper pierced around the image layers.

Here is a video for the visual learner:

Thanks so much for stopping by! Have a wonderful day.
Hugs and smiles

The new tutorial this week is written by the amazing Yvonne Hagane. She shows us how to watercolor with Distress Re-inker. She didn’t have the equipment to shoot the video so I had to do it. While I am no expert like her ( my number one choice of coloring medium are Copic Markers), I hope it will help the visual learner.

For my sample I started out with Flourishes With Gratitude set. It’s a set you can’t purchase, but get for free once you spend $100 at the Flourishes store. I stamped my image in Jet Black Archival ink on Watercolor paper and cut and embossed it with the largest of the small Classic Oval Nestabilities dies. The image was then colored with Distress inks and Reinker (petals: Mustard Seed, Wild Honey and Spiced Marmelade   Flower center: Vintage Photo, Walnut Stain   Leaves and stem: Bundled Sage Reinker, Peeled Paint   Background: Tumbled Glass Reinker).

The oval was put back over the watercolor paper and the image was first sponged with Antique Linen, then with Vintage Photo Distress inks. It was adhered to a piece of Textured Chocolate chip cardstock (Stampin’ Up!) that had been cut and embossed with the largest of the Beaded Oval Nestabilities dies. The edges of the image were paper pierced.

Four 1 7/8″ x 2 1/8″ pieces of MME Lost & Found Rosy Paper were cut, two of those pieces had one corner rounded and every piece had each edge distressed. The paper was stitched to a 4″ x 4 3/4″ piece of Neenah Solar White cardstock, which had the bottom corners rounded as well.

A 4 1/4″ wide white cardstock strip was cut and embossed with one of the Flower Doily Accent dies. It was stitched to a 2 1/4″ x 4 1/4″ piece of Rosy paper which was adhered over the center of the other layers. Blue Gingham ribbon was tied around the horizontal layer and was topped with a button. Part of a white Finesse pearl swirl was adhered to the upper left hand corner  before the image was taped down with dimensionals.

The sentiment is also from “With Gratitude”. A piece of Neenah Solar White cardstock was cut and embossed with the smallest of the small Petite Oval Nestabilities dies. It was sponged with Antique Linen Distress ink and a different sentiment was stamped over the center with Antique Linen. The main image was stamped in it’s center with Jet Black Archival ink. Three White Baby Bling Pearls finish off that sentiment panel.

The inside of the card was kept real simple. 1/2″ x 4″ strip of Rosy paper was stitched to a 1 3/4″ x 4″ strip from the same paper (opposite side) to make a 2″ wide panel. That was adhered to a 4″ x 4 3/4″ piece of white cardstock that had the bottom corners rounded. The main image was stamped over the paper petals and insert with Vintage Photo Distress Ink.

Here is a video for the visual learner (be kind….so NOT my coloring style):

[youtube]https://www.youtube.com/watch?v=mG5OjXjkDR8[/youtube]

Thanks for stopping by! Have a wonderful day!

Hugs and smiles

Yesterday Splitcoaststampers published a new Product Review. This time we got to play with Want2Scrap Products. If you have read my blog the last month you have seen me use it. I have to say I love it! It’s very affordable, gorgeous bling. I love that the Nestaboard and Nestabling are created to match Spellbinders dies. To see the entire review, click here.

In the Accordion Card Video tutorial I show the Nestaboard and Nestabling matching the Label 1 dies from Spellbinders. You can see how easy it is to use.

[youtube]https://www.youtube.com/watch?v=Cwi–V-SdVc[/youtube]

Lori Craig and Sharon Harnist are coming to town today for tomorrows Copic Certicification. Tomorrow morning Jenn Balcer arrives. I can’t wait. We will have a great weekend!

Thanks so much for stopping by! Hugs and smiles

© 2012 fresh & fun Suffusion theme by Sayontan Sinha