Search Results : round tab punch

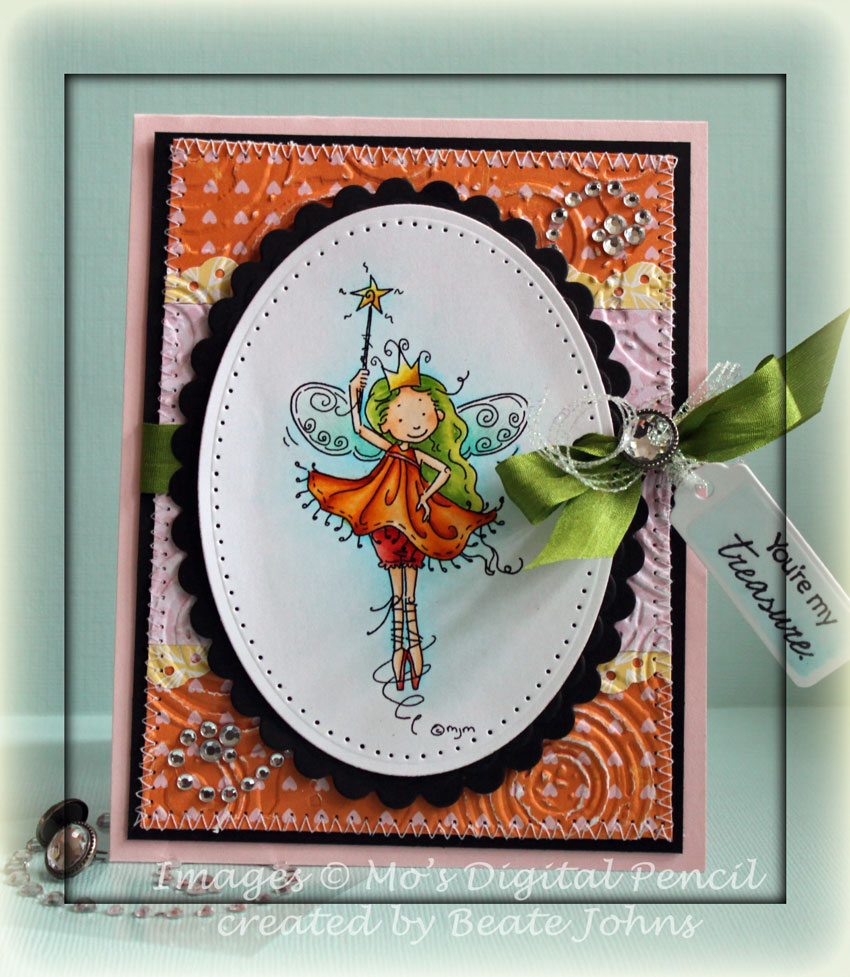
Last newsletter we ran Cami’s Trifold Card as “From the Archives” tutorial. Cambria Turnbow started using the slot punch from Stampin’ Up! years ago to hold folds from a trifold down…hence the name.

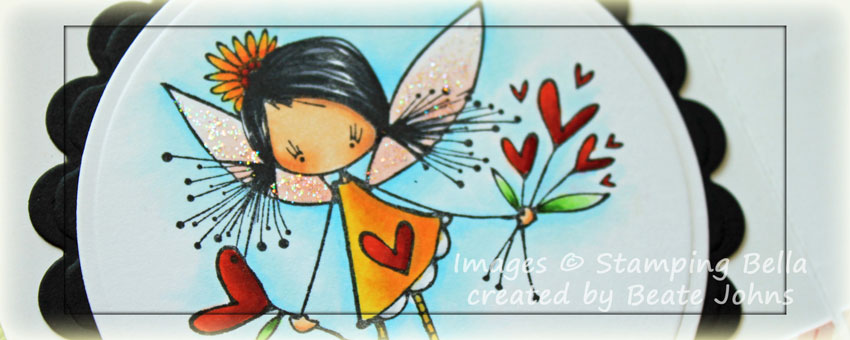
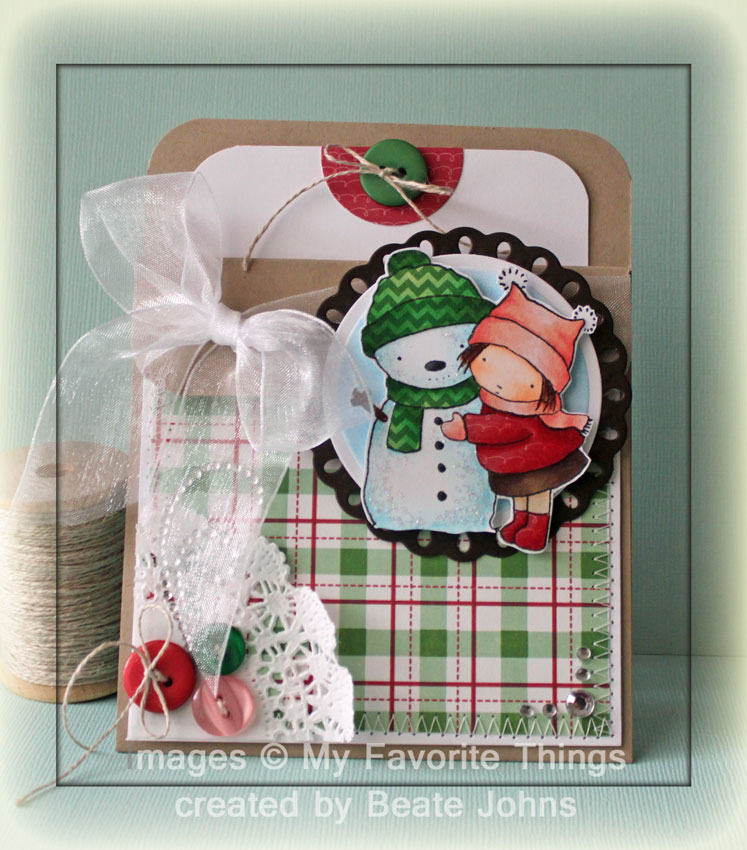
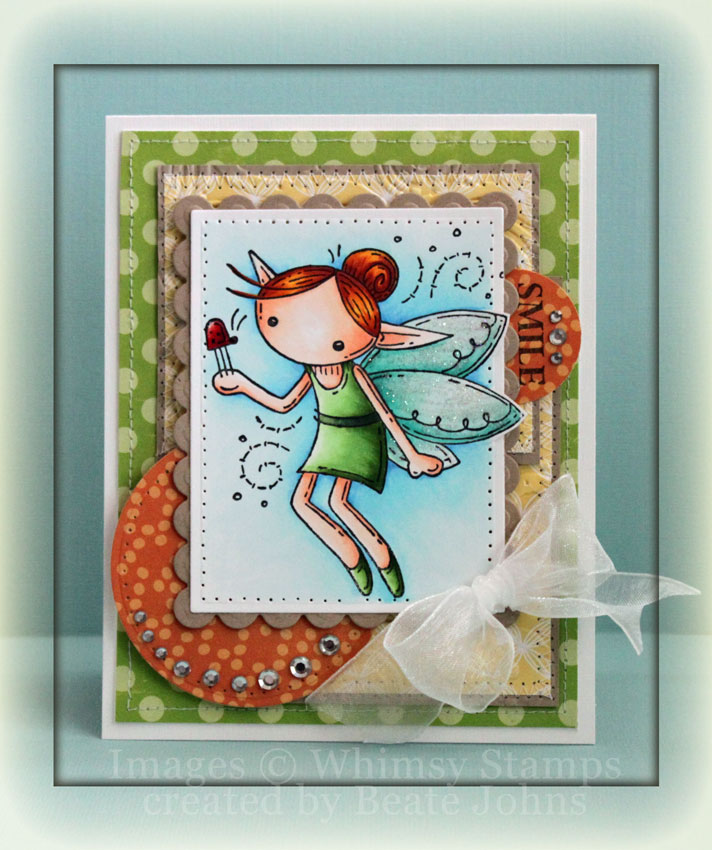
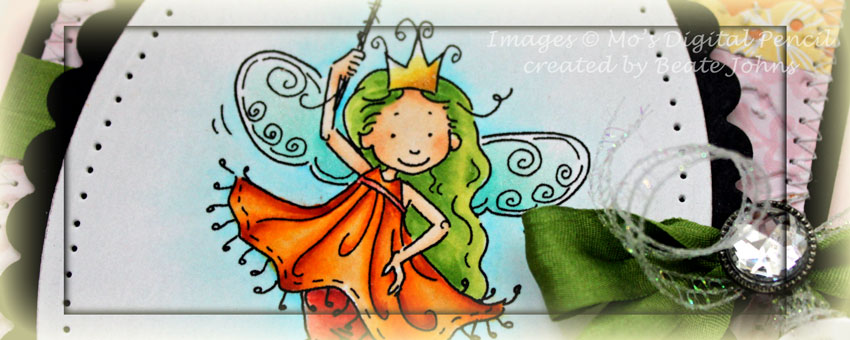
For my sample I chose Bella’s Ketto Phoebe image. My way of celebrating that Stamping Bella is back as a Member Company on Splitcoaststampers. I stamped the image in Tuxedo Black Memento Ink on Neenah Solar White cardstock, cut and embossed with a Standard Circle Nestabilities die and colored with Copic Markers (Skin: E50, E51, E53   Hair: C5, C7, C9   Wings: R000, R00   Dress: Y13, Y15, Y17    Hearts: YR07, R08, R27, R39   Leaves/grass: YG11, YG13, YG17   Background: B0000, B000). The image was adhered to a piece of back cardstock, cut and embossed with a Standard Scallop Circle Nestabilities die.

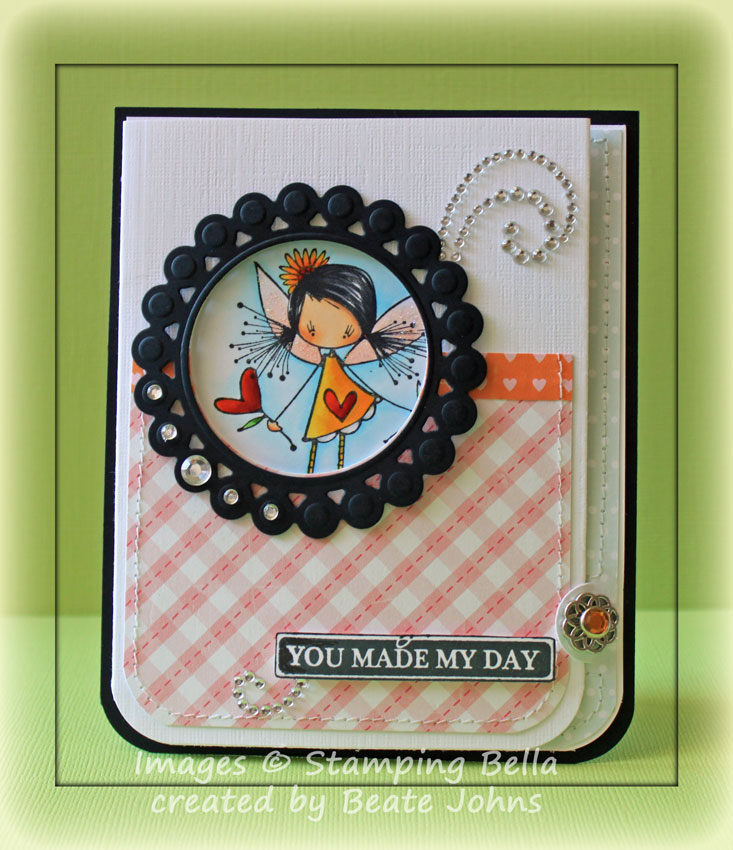
The trifold part was created out of a 5″ x 11 5/8″ piece of textured white cardstock. The strip was scored at  3 3/4″ and 7 1/2″ and the corners were rounded. A 3/8″ x 3 1/2″ piece of Echo Park Little Girl Patterned Paper was adhered to a 2 3/4″ x 3 1/2″ piece of paper from the same paper pack. The bottom corners were rounded and the edges were stitched before they were adhered to the card base.

A window was cut into the card front with a Standard Circle Nestabilities die and a frame cut with the same die and the second largest Beaded Circle Nestabilities die out of black cardstock. The frame was adhered over the window with dimensionals. Rhinestones from the 72 Count Rhinestone pack were added to the beaded circle frame and part of a Finesse Rhinestone Swirl was adhered to the upper right corner.

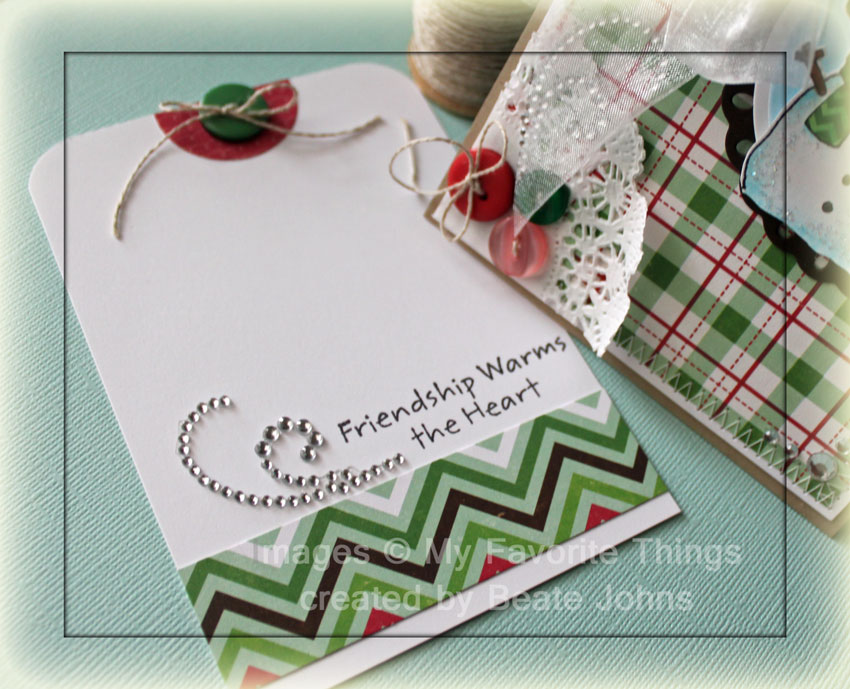
The slot punch (unfortunately retired now) was used on the lower part of the left edge and a brad from Stampin’ Up! was added over it. The layers were adhered to a 1/4″ bigger piece of black cardstock. A sentiment from the new Whimsy Stamp set Thank You Tabs was stamped in Jet Black Archival ink on Neenah Solar White cardstock, cut out and adhered to the next to the flower brad.

Here is a video for the visual learner:

[youtube]https://www.youtube.com/watch?v=Vl5MTZk2i6Y[/youtube]

Thanks so much for stopping by! Have a wonderful day.
Hugs and smiles

Hello and welcome to Day 1 of our January Rubber Die Release Showcase!

On Wednesday (18 January) Whimsy Stamps released this month’s rubber designs and new shapeology dies. From then until 25 January the Whimsy Stamps DT and Special Guests are showcasing these fabulous new stamps and dies with a daily mini blog hop.

Each mini blog hop has a new release prize hidden somewhere along the way and you have 24hrs to enter each prize draw.

To be entered into today’s mini blog hop prize draw, be sure to leave a comment on ALL of the DT’s posts listed below by 12.00PM EST tomorrow. All winners will be announced on the Whimsy Inspirations blog after 12.00PM EST on 25 January.

For my sample I chose to use the darling Wee Bunny first. The image was stamped in Tuxedo Black Memento Ink on Neenah Solar White cardstock, cut and embossed with a Standard Circle Nestabilities die and colored with Copic Markers (Bunny: E31, E41, E42, E43, E44, E47, R20, R21   Tie: B000, B21, B23, C0, C3   Leaves: YG21, YG23, YG17   Rose: R20, R21, R22, R24, YR31, W2   Ground: YG11 YG13, YG17, E30, E31, E33, W3, W5   Background: B0000, B000, B00). The image was layered to a piece of Solar White cardstock cut and embossed with the largest  Tear Drop Circle die and half a paper doily was adhered to the lower half.

Two pieces of October Afternoon Thrift Shop Paper to create a 4 3/4″ x 5 1/4″ layer. The corners were rounded and the edges were stitched. A hole was punched to the lower right of the image layers and White Organdy ribbon was threaded through.  A 4″ square of the same paper pack was taped over the stitched layers.

The image was adhered to the patterned paper square with dimensionals and the ribbon was tied around the main layers. Everything was adhered to the card base a 5″ x 11″ piece of cardstock, folded in half. A sentiment from the new Whimsy set called Thank You Tabs was stamped in Jet Black Archival ink. The solid part of the sentiment was cut out and adhered to the lower right of the card base and a layered flower was added above.  Stardust Stickles was applied over the flower as well as the flower in the image. Parts of a Finesse Pearl Swirl and addition to more pearls finish off the card.

To take a peek at today’s fabulous new release creations, please click on the links below…

Alberto Gava

Ann Vento

Deb Routledge

Debbie Eastman

Dena Concienne

Erin Bailey

Remember that the entire new release is available to buy right now from the Whimsy Stamps store along with all your Whimsy favourites.

Thanks for stopping by and don’t forget to check the Whimsy Inspirations blog tomorrow for more new release creations!
Have a great day!
Hugs and smiles

Today’s Whiff of Joy Challenge is “Love is in the Air. I hadn’t used my “Nora blowing Kisses” image yet and thought it would be perfect for this challenge. The image was stamped in Tuxedo Black Memento Ink on  a 4″ square of Neenah Solar White cardstock. The image was colored with Copic Markers (Skin: E000, E00, E01, E11, BV00    Hair: Y23, Y26, E35, E97    shoes/dress: Booo, B12, B14, B16   hearts/socks: YR07, R08, R27, R39   Ground: W4, W5, W7  background: W00, W0, W1). Stardust Stickles was added over the hearts.

The edges of the image square were distressed and Picket Fence Crackle Paint was added to the edges.  Once it was dry the edges were  sponged with Pumice Stone Distress ink and a border was stitched around the edges. The image was adhered to  a piece of Kraft cardstock, cut and embossed with the largest of the  Beaded Square Nestabilities dies.

A 2″ x 4 3/4″ piece of October Afternoon Farmhouse paper was stitched to a 4 3/4″ square of the same paper pack. A hole was punched to the lower right corner of the image layers and White Organdy ribbon was threaded through it. The image layer was adhered to the paper with dimensionals and the ribbon was tied into a bow.

The layers were adhered to the card base a 5″ x 11″ piece of Solar White cardstock folded in half. The bottom edge of the card base was cut and embossed with Classic Scallop Edgeabilities dies. A sentiment from the General Sayings sentiment set was stamped on a strip of Solar White cardstock. The edges of the strip were punched with a square punch, the strip was shaped into a banner and adhered under the ribbon bow. Rhinestones on the sentiment panel and the upper right hand corner of the image  and parts of a Finesse Rhinestone Swirl finish off the card.

Thank you so much for stopping by! I hope you have time to participate in the challenge.  Have a wonderful day!
Hugs and smiles


Every  week I try to shoot a video for one of the older tutorials. This week I picked the Pocket Card Tutorial. I am loving Echo Parks Holly Jolly Christmas patterned paper so much right now, I had to use it again (and should probably order more).

For my main image of the card I picked the image from MFT’s Merry KISSmas stamp set. It was was stamped in Tuxedo Black Memento Ink on Neenah Solar White cardstock. It was stamped again on pieces of Holly Jolly Christmas paper. Parts were cut out and adhered to the main image. The paper pieces as well as the main image were colored with Copic Markers ( hat/scarf: R00, R30, R32     Shirt/boots: R32, R35, R37     Stockings: E40, E42   Skirt: E43, E44, E47     Skin: E0000, E00, E01    Hair/branch: E23, E25, E29    Snowman: B0000, B000    Hat: G00, G02, G05, G07    Buttons: C5, C7, C9) and cut out.

The image was adhered with dimensionals on a piece of Solar White cardstock, cut and embossed with a Classic Circle Nestabilities die and airbrushed with Copic Marker B02. That circle was adhered to a piece of Canyon Brown cardstock, cut and embossed with a Tear Drop Nestabilities die.

The card base was created out of a 4 1/4″ x 11″ piece of cardstock, scored at 1 1/4″ and 5 1/2″. The four corners were rounded. A 3 3/4″ square of Holly Jolly paper was stitched to a 1/4″ bigger piece of whtie cardstock. A quarter of a paper doily was adhered to the lower left of the the stitched layers and three buttons were tied to it with Linen Thread.

Part of a Finesse Swirl was adhered over the buttons and more Rhinestones were adhered to the lower right corner. The layers were adhered to the card base. Before the flap was taped down, May Arts Organdy Ribbon was tied around it. The image were adhered over the flap with dimensionals.

The inside tag is a 3 1/2″ x 5″ piece of Solar White cardstock. The top corners were rounded and a 1 1/8″ wide strip of Holly Jolly paper was adhered to the lower half. A sentiment from the Merry KISSmas set was stamped above the strip with Tuxedo Black ink and part of Finesse swirl was adhered next to it.

I punched a half circle out of Holly Jolly paper with a 1 1/4″ circle punch, adhered it to center of the top of the tag and tied another button on with Linen thread.

Here is a video for the visual learner:

[youtube]https://www.youtube.com/watch?v=PrH-I8Op-O0[/youtube]

Thanks so much for stopping by! Have a great day.
Hugs and smiles

Today’s tutorial was created by Lisa Somerville. She shows us how to create these darling holders for Test Tubes. What a fun treat idea!!! I had to order me some test tubes right away after receiving the tutorial. Then I went shopping for more Halloween paper, found some glittery tulle and BAM…I was ready. 🙂

A label from Taylored Expressions Fright Night Favors was stamped in Jet Black Archival ink on a piece of Pink Paislee’s Phantom paper. The spider web from Toils & Trouble was stamped over the sides of the label with Shabby Shutter Distress ink. The caution/poison stamps are also from the Toils & Trouble set and were stamped in the center of the labels with Jet Black ink.

The labels were cut out, run through the Xyron machine and adhered to the test tubes. A small strip of glittery black tulle was tied above the labels to finish off the tubes.

The treat holder was created out of black cardstock. I started with a 4″ x 12″ piece of cardstock (instead of the 4 x 11″ as in the tutorial) because Taylor’s Test Tubes were a bit too long for the holder. The rest was done the same as the tutorial. I used a Classic Circle Nestabilities to cut the hole for the tube for a perfect opening (3/4″ circle punch was too small, 1″ too wide).

The mirror from Toil & Trouble was stamped in Jet Black Archival ink on Neenah Solar White cardstock, cut out and sponged with Antique Linen. Then it was stamped again on Phantom paper. The inner oval was cut out, a sentiment from Fright Night Favor was stamped in it’s center and the edges were sponged with Shabby Shuttter. The oval was adhered to the main mirror image and three Baby Bling Black Rhinestones were added to the bottom.

More tulle was tied around the holder and topped with a Halloween brad (last year Michaels). The sentiment panel was adhered next to it.

I hope you guys get to try this tutorial out. It makes the cutest treats. Thanks so much for stopping by! Have a wonderful day!
Hugs and smiles

Today is the Sneak peek day for Meljen’s new rubber stamp release with Whimsy Stamps. Melanie created some gorgeous fairies as rubber stamps. I think her fairies are darling and I am so excited to have some as actual stamps now!

The Sweet Stop sketch is one with lots of layers, including circular ones. I LOVE that!

I started by stamping the  Little Fairy Friend in Tuxedo Black Memento ink on Neenah Solar White cardstock. It was cut out with a Classic Rectangle Nestabilities die and the Out of the Box technique. The fairy was colored with Copic Markers (Dress: YG11, YG13, YG17, G24, G28, G29      Hair: Y17, YR15, E08     Skin: E000, E01, E02   Wings: BG10, BG11, BG13     Sky: B0000, B000, B12   Ladybug: R08, R24, R29)

It was adhered to a piece of Kraft cardstock that had been cut and embossed with a Scallop Rectangle Nestabilities die and the edge of the image was paper pierced.

Two pieces of yellow Echo Park Springtime paper were stitched to slightly bigger pieces of Kraft cardstock. The layers were embossed with Tim’s Retro Circles Embossing Folder.  A small circle was punched with a 1 3/8″ circle punch out of Echo Park Playground paper and stamped with a sentiment from Treasured Moment Tickets in Tuxedo Black Memento ink. The circle was adhered partially under the main image layers on the right hand side.

A bigger circle was cut and embossed out of the same paper with a circle Nestabilities die and adhered under the left corner of the image layers. All layers were adhered to a 4 1/4″ x 5 1/2″ piece of Little Boy Echo Park paper, which was adhered to the card base, a 4 1/2″ x 11 1/2″ piece of Textured white cardstock from Stampin’ Up!

Kaisercraft Silver Rhinestones were added to the circular layers. A white organdy ribbon bow as adhered to the lower right corner of the image. Glossy Accents over the ladybug and Stardust Stickles over the fairy wings finish off the card front.

Because Whisper White cardstock from Stampin’ Up! is rather thin and my card front has a lot of layers, I had to ad a layer to the inside of the card to “stiffen” it up a bit. It’s just a 4 1/4″ x 5 1/2″ piece of Kraft cardstock  layered with  a 2″ wide strip of Echo Park Springtime paper.

I hope you have time to participate in the sketch challenge. It’s a fun one! Get that patterned paper out and cut it up! Thanks so much for stopping by! Have a wonderful day!

Hugs and smiles


Last week I created a video for the Criss-Cross card tutorial. This is the sample I used for the video.

The card base was created out of Kraft cardstock. . Two 3 1/2″ x 4 3/4″ pieces of Echo Park Playground paper where cut diagonally. They were stitched to Neenah Solar White cardstock. A 3 3/4″ x 5″ piece of white cardstock had been cut diagonally as well.

The white cardstock for the belly band is 2 1/4″ wide, the orange Echo Park Playground paper 2″.  The strips were 11″ long and after stitching scored at 4 3/8″ and 9 3/4″. White May Arts Silk Ribbon was tied around the belly band.

The image is from the My Favorite Things One Sweet Chick. It was stamped on Solar White cardstock in Tuxedo Black Memento Ink and cut and embossed with a Classic Oval Nestabilities die.  The image was stamped again on the green patterned paper from Playground. The dress was cut out and adhered to the main image. It was colored with Copic Markers (Chicks: Y02, Y06, Y08, W1   Egg Shell: W00, W1, W2   Dress: YG21, W02   Shoes: E0000, E41, E42, E43, E44   Skin: E000, E01, E11   Hair: E33, E25, E29, E49   Heart in hair: YR15, YR09, R08   Grass: YG01, YG03, YG17, YG67   Sky: B0000, B000).

The image was adhered to a piece of Canyon Brown cardstock, cut and embossed with the one of a Scallop Oval Nestabilities and the edges were paper pierced. The sentiment is also from One sweet chick. It was stamped on Solar White cardstock and cut and embossed with a Petite Oval Nestabilities die. The embossed center was colored with Copic Marker B0000.

The insert of the card measures 4″ x 5″ piece of white cardstock. The top corners were rounded with my Corner Chomper.  A half circle was punched out of the orange Playground paper with a 1 3/8″ circle punch. It was layered on a half scallop circle cut out of Kraft cardstock.

A 1 3/8″ x 4″ strip of green patterned Playground paper was stitched to 1 9/16″ x 4″ piece of cardstock and adhered on
the lower end of the card insert. The single chick from the stamp set was stamped on Solar White cardstock, punched out with a 1″ circle punch and colored with Copic Markers. It was adhered to the right side of the strip to finish off the insert.

Here is a video for the visual learner:

[youtube]https://www.youtube.com/watch?v=5L0MzjqZ5sw[/youtube]

Thanks so much for stopping by! Have a wonderful day.
Hugs and smiles

For this weeks Tutorial from the Archives in the Weekly Inkling I chose Cambria‘s darling Tiny Treat Basket. I had seen Taylored Expressions Hello Spring set when it came out next week and thought that set would be perfect for the basket. The set and the beautiful new fence die. Boy did I have fun creating this sample.

To start out with the basket was created out of a 5″ square of Neenah Celery Cardstock.  I used Echo Park Little Boy Paper to decorate the sides of the basket. The fence was cut out of Neenah Solar White cardstock and adhered to the bottom of each of my patterned paper pieces. The handle was created with White Crinkled Ribbon (May Arts) and tied together with Lemon Drop Twine.

I searched everywhere to find round candy that is wrapped not in pouches, but still in a circular shape. What’s up with York for wrapping them differently now? Thank goodness Pearson is still wrapping them the good old fashioned way.

To decorate the patties I punched scallop circles (Stampin’ Up! Punch) out of Celery cardstock and another pattern from Echo Park’s Little Boy collection. I adhered the paper over the cardstock to give it more stability. A chocolate piece was adhered between two scalloped pieces. In the center of the top I adhered a 1 3/8″ black cardstock circle.

Next I inked up each image of the train stamp individually with my Tuxedo Black Memento Ink Dew Drop and punched them out with the 1 1/4″ circle punch (also Stampin’ Up!).  The images were colored with Copic Markers ( Bunny and Sheep: N0, N1, N3, R00, R20, R21,   Carrot: Y17, YR15, YR18, YG01, YG03, YG17,    Bird: Y13, Y15, Y17,    Eggs: Y17, YR15, YR18,   Boo, B01, B04,   R00, R20, R21,   YG01, YG03, Y15, Y17    Bird Wagon: Y13, Y15, Y17,    Flowers: Y17, YR15, YR18, E99, E37,  R00, R20, R21, Bo0, B01, B04, Y17, YR15,  Flower Wagon: Y15, Y15, YR15) and adhered over the black circles.

Here is a video for the visual learner:

[youtube]https://www.youtube.com/watch?v=EDahfzhs-5k[/youtube]

Thanks so much for stopping by! Have a wonderful day!
Hugs and smiles

I have some very exciting news. Not only did I order me a few Waltzingmouse stamps, but I was also invited to become a Waltzingmouse Mischief Maker. I get to play with Claire’s  sketches early. How fun is that? I love sketch challenges.

Today is my first official day as Mischief Maker. I used this sketch as my starting point to create my card for Thursday’s Way to Use it Challenge. We were to use Polka Dots on our card. A sketch and Polka Dots….through in Copic Markers and Spellbinders Dies and I am in heaven. 🙂


For my sample I picked the Stamp set Spring Baskets. I stamped first the Basket, then the Daffodils in Tuxedo Black Memento Ink on Neenah Solar White cardstock, cut and embossed the image with Classic Square Nestabilities dies and colored it with Copic Markers ((Bow: R20, R21, R22, Flowers: Y11, Y13, Y15, Leaves: YG01, YG03, YG17, Basket: E30, E31, E33, Background: BG0000, BG000, BG01, Ground: T0, T1, T3).

A piece of Kraft cardstock was cut into a frame with a Label 1 and a Classic Square Nestabilities die, sponged with Vintage Photo Distress ink and adhered over the image. The image layer was paper pierced.

A 3″ x 4″ piece of yellow polka dotted Modern Homemaker October Afternoon paper was adhered to a 4″ square of pink Ducks in a Row paper. The layers were stitched to a 4 1/4″ white square of cardstock. A 4″ long strip of white cardstock was cut and embossed with the Lattice Borderabilities die and adhered to to the upper edge of the yellow paper.

A small hole was punched in the center of left edge of the image layer. The image was adhered to the layers with dimensionals and pink silk ribbon was threaded through the hole and tied into a bow.

The sentiment is also from Spring Baskets. It was stamped in Tuxedo Black Memento Ink on a piece of Solar White cardstock that had been cut and embossed with Petite Oval Nestabilities die. The center of the oval was colored with Copic Markers BG0000 and BG000.  The sentiment was adhered to the layers with dimensionals and finished of with three tiny Recollections silver pearls. The layers were adhered to a 4 5/8″ x 9 1/4″ piece of Kraft cardstock folded in half.

After Wednesday’s tutorial was posted on Splitcaoststampers I had a lot of questions about how to cut a frame with Nestabilities. Because of that I created and posted a tutorial that day. So here is a video on creating frames with Nestabilities for the visual learner:

[youtube]https://www.youtube.com/watch?v=3G_-KNAx2jk[/youtube]

Thanks so much for stopping by! I hope you get a chance to try out the sketch! It’s an easy one. Have a great day!
Hugs and smiles

I created this card for one of the VSN challenges last weekend. For this one you should Mash two techniques together. I picked paper piercing and dry embossing.

For my image I chose one of Mo Manning’s little Fairies. She was printed on Neenah Solar White paper and cut and embossed with Petite Oval Nestabilities dies. The image was colored with Copic Markers (Dress: Y32, Y17, YR15, YR18,    underpants: R20, R21, R22,     Crown and Wand: Y11, Y13, Y15, W2,     Hair: YG21, YG23, YG25,     Skin: E50, E51, E53,    Background: BG0000, BG0000), layered on a piece of black cardstock cut with Scallop Petite Oval Nestabilities and the edges of the image were paper pierced. Clear Spica pen was used to add a subtle sparkle to her crown, wand and wings.

Two 3 3/4″ long strips of the yellow Echo Park Springtime paper were punched with a border punch from Stampin’ Up. They were adhered to a 3 3/4″ x 5″ piece of orange paper from the same paper pack with a piece of pink Springtime paper in between. The paper was dry embossed with Tim Holtz Retro Circles Embossing folder and stitched to a 3/16″ bigger piece of black cardstock.

1/2″ green silk ribbon was tied around the layers and topped with a Rhinestone Recollection brad. A sentiment from My Favorite Things Clearly Sentimental about you stamp set was stamped in Tuxedo Black Memento Ink on Neenah Solar White cardstock and cut and embossed with the small tag of the Tag Trio die set. It was tied to the brad with Iridescent May Arts Curling Ribbon.

The card base is a piece of 4 1/4″ x 11″ Pink Pirouette paper folded in half. Recollection Rhinestone swirls finish off the card.

Thanks so much for stopping by! Have a wonderful day.
Hugs and smiles

© 2012 fresh & fun Suffusion theme by Sayontan Sinha