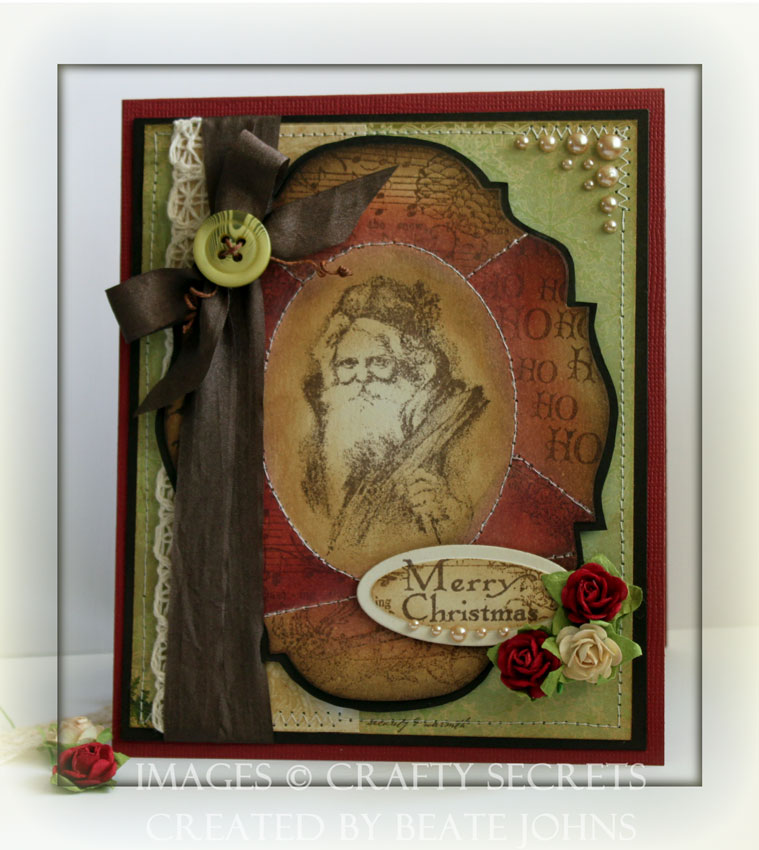
Jenn, Lori and I used the Whiff of Joy’s Henry Christmas Bauble stamp with the same Echo Park paper as a friendly challenge between friends.

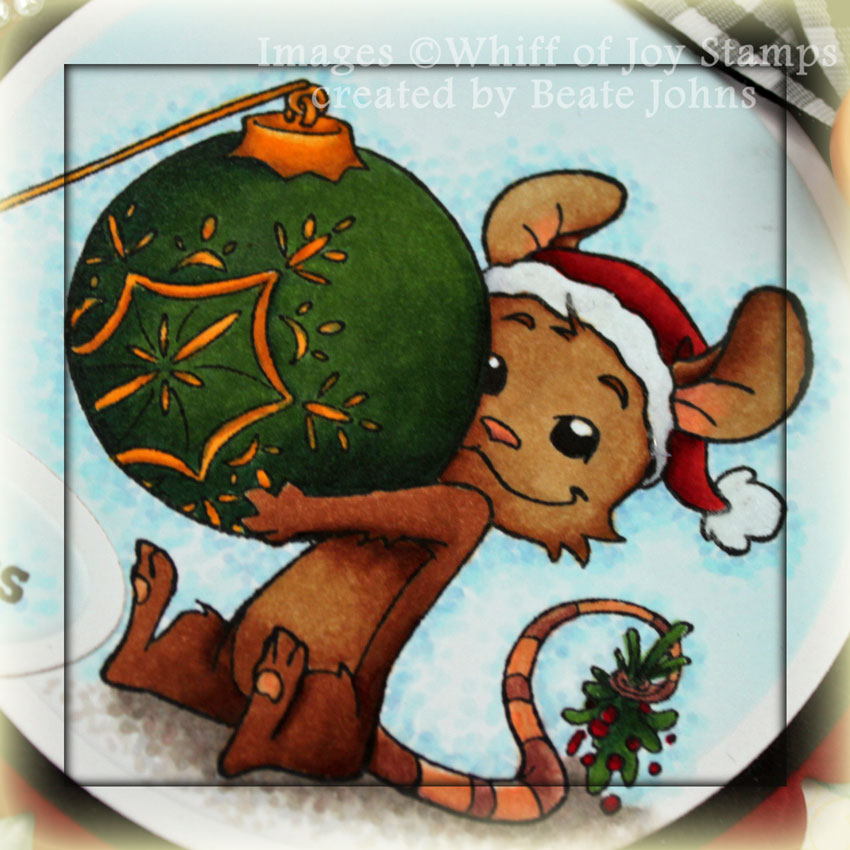
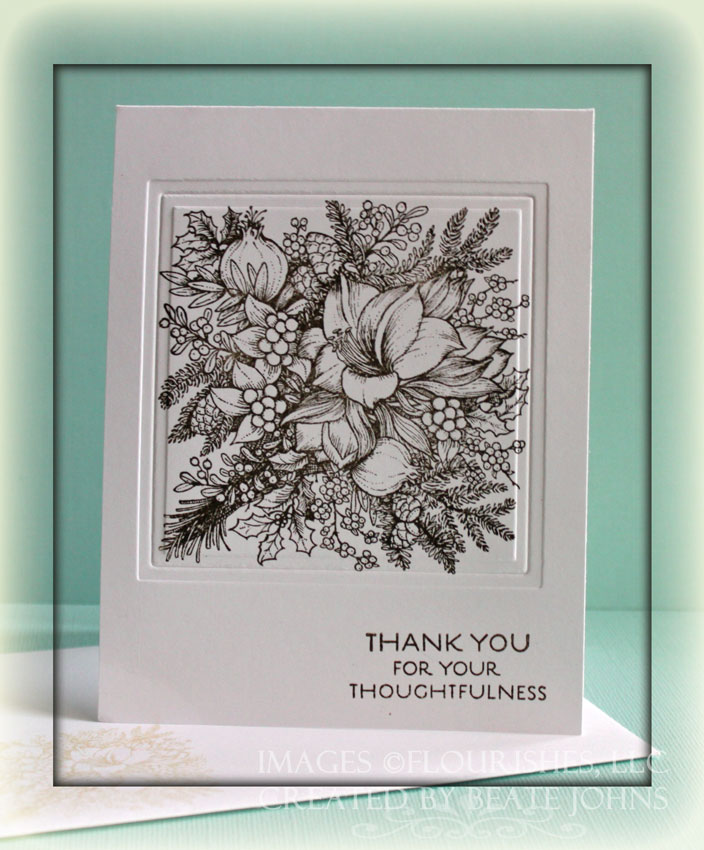
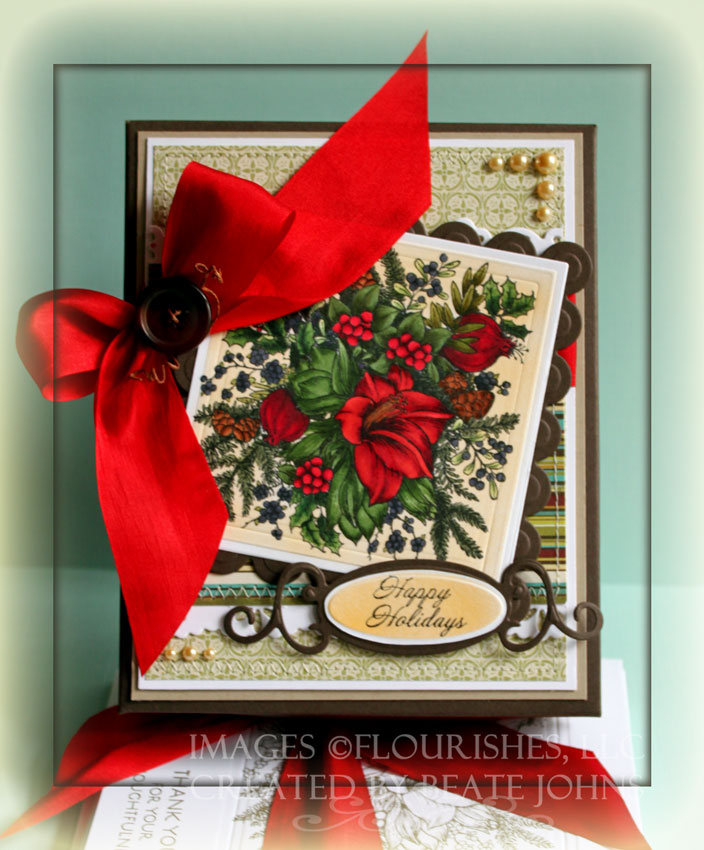
For my card I stamped the image with Tuxedo Black Memento Ink on X-Press It! Blending card and colored it with Copic Markers (Mouse: E31, E33, E35, E37, E39, E02, E04, Ornament: Y38, YR23, YR24, G24, G28, YG25, Hat: R24, R27, R29, R39, C1, C3, Floor: E70, E71, W1, W3, N1, N3, Background: B21, B000, B0000).

It was cut out and embossed with Classic Circle Nestabilities. It was layered on a slightly bigger black cardstock circle and a scallop circle cut and embossed with Scallop Circle Nestabilities out of Cherry Cobbler cardstock. The image was airbrushed with Copic Marker B000.

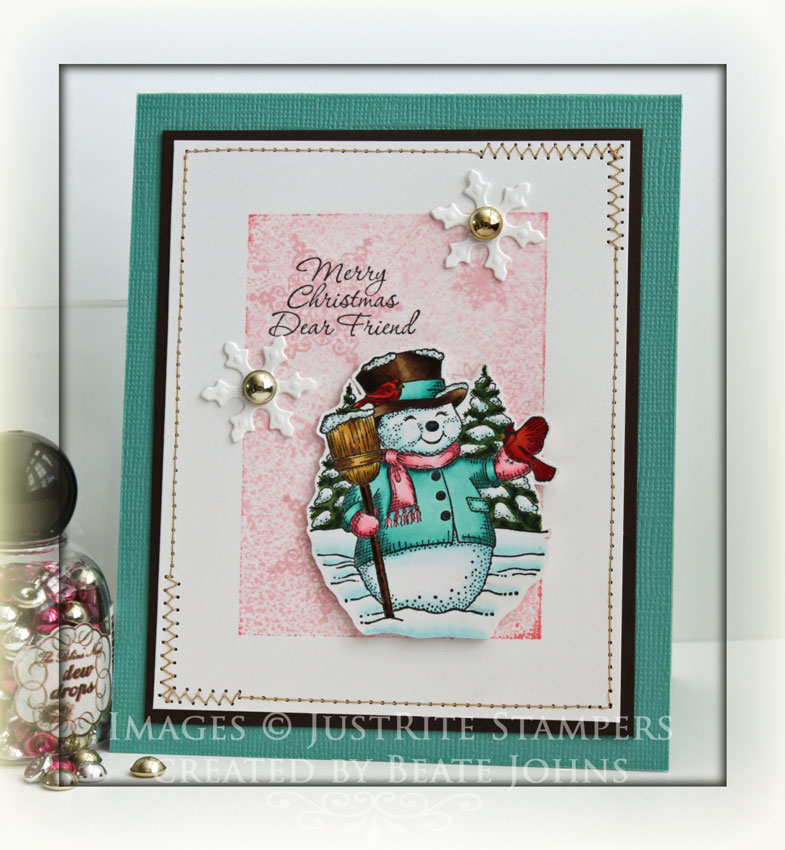
The card base is a 5″ x 10″ piece of Sour Apple cardstock folded in half. White crepe paper was folded and adhered under a 2″ x 4 1/2″ strip of Echo park paper. The strip was adhered to a 4 1/2″ square of Echo Park paper and stitched to a 4 11/16″ square of Basic Black cardstock. Ribbon from Gina K.’s newest TV stamp kit was adhered over the upper edge of the strip and a Recollection Rhinestone swirl was adhered to the top left corner before the image was adhered to the card with dimensionals.

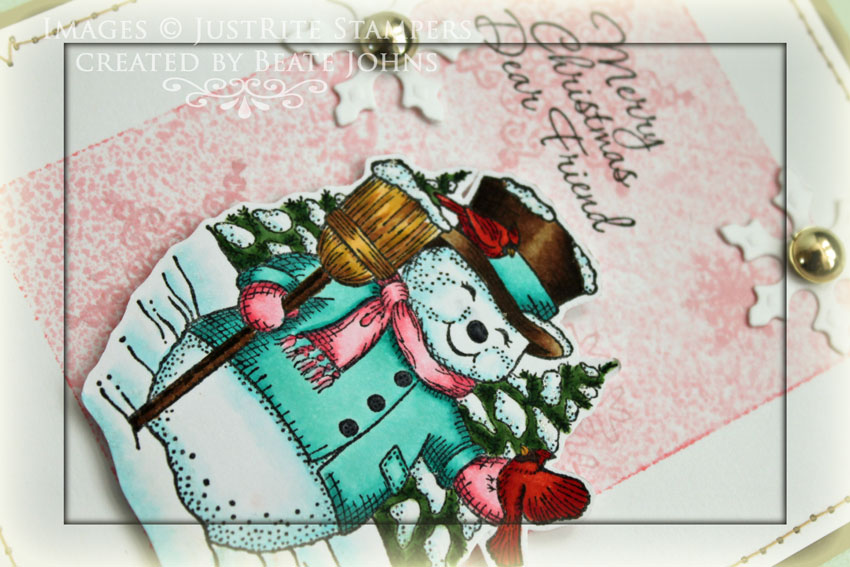
The sentiment is from Kraftin’ Kimmie’s Holiday Sentiment stamp set. It was stamped in Tuxedo Black Memento Ink and cut and embossed with the smallest of the Petite Oval Nestabilities die. Three Silver Kaisercraft Rhinestones finish off the sentiment panel.

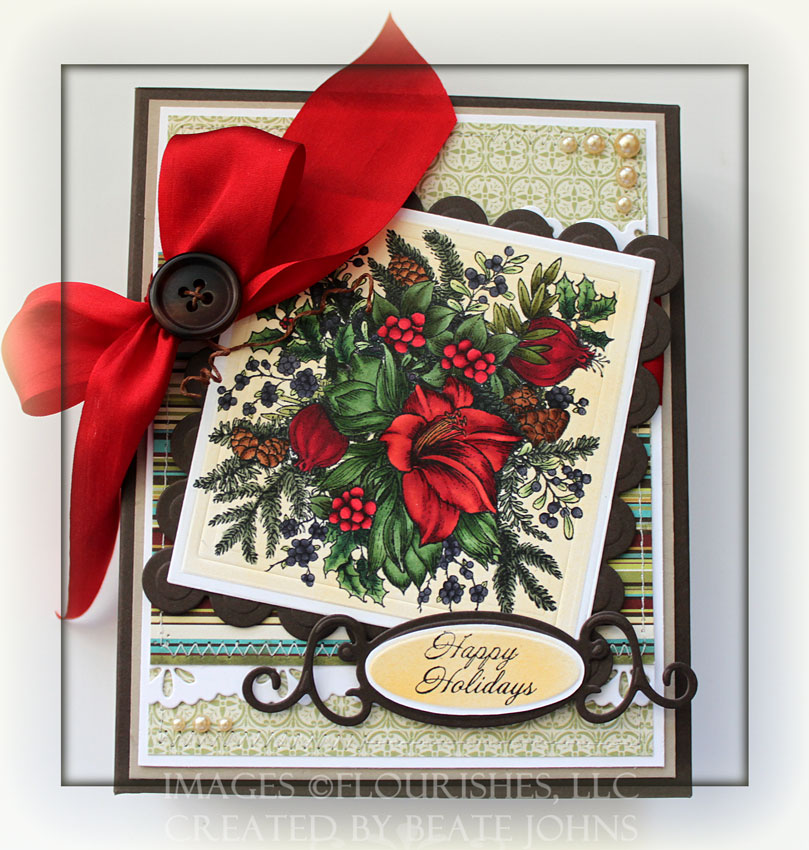
To finish off the card, I tied a bow with May Arts Gingham ribbon and topped it with a Basic Grey button. The bow was adhered to the upper left of the image.

I can’t wait to see what Jenn and Lori did with this image and paper. Thanks so much for stopping by! Have a wonderful day! Hugs and smiles

Welcome to the 11th week of JustRite Stampers’  Wednesday feature, 12 Weeks of Christmas Blog Hops!  Every Wednesday up until Thanksgiving some of your favorite designers will be joining some of the JustRite design team for a series of Christmas blog hops, showcasing JustRite’s entire Christmas Collection of stamps!  Don’t forget that JustRite has some Christmas stamps in their newly released CLING line of stamp sets, too — you can find them HERE.  This week, the designers joining the JustRite design team are the Stampers Dream design team and a few other special guests!

For the month of November, we thought we would switch gears a little and throw in some holiday gift ideas using your JustRite stamps, so be watching for those, too, on November’s hops!  And in celebration of JustRite’s Christmas Blog Hops, they have a huge surprise for you — take 25% off All JustRite Original Christmas Stamps now through November 29 — Don’t forget to tell Santa!

For my sample today I used the new Sparky the Snowman Cling stamp set. I love how the new cling stamps stamp. I stamped the snowman in Tuxedo Black Memento Ink on X-Press It! Blending card and colored it with Copic Markers (hat/broom stick: E57, E59, E49, broom top: Y23, Y26, Y28, E33, Cardinal: R08, R27, R29, R39, YR24, C7, Scarf, Mitten: Rv10, RV13, RV14, Jacket: BG11, BG13, BG15, BG18, Snow: B0000, B000, B00, Trees: YG63, YG67, G28). I colored over the snow with a clear Spica pen and cut out the snowman.

I used the largest of the three JustRite Stampers Acrylic blocks and inked it up with Spun Sugar, then the edges with Worn Lipstick Distress ink. Next I sprayed the block with water from my Mini Mister and then stamped it on a 3 3/4″ x 4 5/8″ piece of Neenah Solar White cardstock. Snowflakes from the Sparky set were stamped over the background with Spun Sugar ink.  The layer was stitched to a 3/16″ bigger piece of Neenah Canyon Brown cardstock.

The card base is a 4 1/4″ x 11″ piece of Core’dination cardstock folded in half. The sentiment is also from the Sparky set. It was stamped in Tuxedo Black Memento Ink on the left hand side of the background. Sparky was adhered over the background in dimensionals. To finish the card I added two small snowflake cut and embossed with the Snowflake Borderabilities. They were topped with Dew Drops.

This background technique has been popping up all over the internet. Lydia told me about it first after she had made a card with it during a SCS shoe box swap from Lisa Spangler. I thought it would be fun to have a tutorial for it on Splitcoast. You can check it out here.

Here is a video for the visual learner:

[youtube]https://www.youtube.com/watch?v=yJaOxVOjQt8[/youtube]

Please visit these designers’ blogs to see what fabulous JustRite Christmas inspiration they have for you on the hop today!

JustRite Inspiration Blog
Beate Johns

Debbie Olson

Sankari Wegman
Tosha Leyendekker

Kazan Clark

Lori Craig

Amy Sheffer

Stephanie Kraft

Denise Marzec

Michele Kovack

Carolyn King

Barb Schram

Jenn Balcer

Cindy Lawrence

Angela Barkhouse

Christina Fischer

Heidi Blankenship

Mariana Grigsby

Terre Fry

Teresa Kline

Thanks so much for stopping by! Have fun checking out everyone’s wonderful creations! Hugs and smiles

Today’s Tutorial was created by Jenny Gropp. She shows us how to create sturdy magnets as a gift idea. I placed my sample on a pizza box created to match.

The pizza box was created out of Chocolate chip card stock and layered with a piece of Cherry Cobbler card stock, cut and embossed with the largest Label 1 Nestabilities die. A piece of Neenah Solar White card stock was cut with a size smaller die, layered with snowflake die cuts from Create-a-Flake 2 and the Snowflake Borderabilities Petite and airbrushed with Copic Marker R89. With the die still over the card stock, I sponged it with first with Antique Linen all over, then on the edges with Vintage Photo Distress ink.  The sentiment is from Unity’s Embellished Season and was stamped in the center with Walnut Stain Distress Ink.

I airbrushed Copic Marker R89 over a  piece of Neenah Solar White card stock, stamped the ornament (also from Embellished Season) over it with Embossing inkand embossed it with Gold embossing powder. The card stock was adhered to a piece of cardboard that had been backed with Black card stock and cut out. The edges were colored with my black Copic Marker and a strong magnet was adhered to the back. Glossy Accents was added over the entire ornament.

Once the ornament was completely dry, a double bow out of red silk and gold cord was adhered to the top of the ornament. It was secured to the box with a magnet strip. Three small snowflakes were cut and embossed with the Snowflake Borderabilities Petite die out of Neenah Solar White card stock. They were topped with Red Kaisercraft Rhinestones.

Here is a video for the visual learner:

[youtube]https://www.youtube.com/watch?v=6BHSZ52UsbU[/youtube]

Thanks so much for stopping by! Have a wonderful day! Hugs and smiles

As we get closer to the season of giving, let’s take the wraps off your creativity to come up with beautiful ways to gift give. Do you have a fun template for a beautiful box? Or, do you have a beautiful presentation for gift cards? Show us what you’ve got! Link up your Bringing Back Beautiful Challenge card here to enter. If you upload to SCS, please use the keyword BBB03. You have until October 30th to enter! As we unveil our challenge for next month, we’ll share our True Beauties – those card makers who wowed us with this challenge! Winners will be featured on the Flourishes Blog and will receive a True Beauty blog button to display proudly on their blog! 

Make sure to check out the blogs of fellow challenge team members:

Becca Feeken
Cindy Coutts
Kathy Jones
Julie Koerber
Michelle Woerner
Yvonne Hagane

For my sample I used the A2 Card Box tutorial on Splitcoast to create part of Rebecca’s teacher gift for Christmas. I love working ahead. I created 6 simple thank you cards with matching envelopes. I hope the teacher will be able to use them to give to other parents as thank you for their Christmas presents.

The card base for each is a piece of 4 1/4″ x 11″ piece of Flourishes Classic White cardstock folded in half.  The big Winter Bouquet Image was stamped in Walnut Stain Distress Ink. The sentiment is from the same stamp set and was stamped with Walnut Stain into the lower right corner. A frame was embossed around the image with Classic Square Nestabilities. The envelopes were stamped with the smaller Winter Bouquet image in Antique Linen Distress ink.

For the box front I stamped the Winter Bouquet again, this time in Tuxedo Black Memento Ink on Neenah Solar White cardstock and colored it with Copic Markers (Lily: R24, R27, R29, R39, YG63, YG67, Holly: R35, R37, R39, G21, G24, G28 Pine Cones: E33, E35, E37 Pine Branches: BG93, BG96 Berries: BV25, BV29, G20, G21, G24, bigger berry leaves: G94, G97 more greens: YG93, YG97, G94, G99). The image was cut and embossed with the Classic Square Nestabilities and then airbrushed with YR21. It was then layered on an Early Espresso cardstock piece that had been cut and embossed with Classic Scallop Square Nestabilities.

The bottom of the box was created with Kraft cardstock, the top with Early Espresso cardstock.

Two 4 1/4″ long strips of Flourishes Classic White cardstock was cut and embossed with Eyelet Borderabilities. They were stitched to a 3 1/2″ x 4 1/4″ piece of Holiday Webster’s Pages paper. A 4 1/4″ x 5 1/2″ piece of a different pattern of Holiday Webster’s Pages was stitched to a 3 /16″ piece of White cardstock. The smaller piece was adhered to the bigger one and Red Silk May Arts Ribbon was tied around the horizontal strip and topped with a brown button. The layers were then adhered to a 4 5/8″ x 5 7/8″ piece of Kraft cardstock which topped the box top.

The sentiment is from Dove and Holly. It was stamped in Tuxedo Black Memento ink on Neenah Solar White cardstock. It was cut and embossed with Petite Oval Nestabilities and sprayed with YR21. It was cut down just a bit and layered on a Early Espresso cardstock cut and embossed with Spellbinders Fancy Tag dies. To finish off the box front, I added Latte Kaisercraft Pearls to the top right and bottom left corner.

Here is a video on how to create this box for the visual learner:

[youtube]https://www.youtube.com/watch?v=LKZiQhSYO5Q[/youtube]

I love the Vintage Christmas set from Crafty Secret. The santa is gorgeous and so are the coordinating stamps. So when I was looking for a set to use for creating a sample for the Retiform video tutorial, that set popped into my mind.

I cut a piece of Natural White cardstock with Tim Holtz Baroque Sizzix die and stamped the Santa in Rich Cocoa Memento Ink in it’s center. Next I created a reverse mask out of copier paper with a Classic Oval Nestabilities die and sponged an oval around the Santa first in Vintage Photo, then just the edges of the Oval in Walnut Stain Distress Ink.

I removed the reverse mask and covered the sponged oval with the copy paper oval I had cut in order to create the reverse mask.  More copy paper was used to sponge several panels. One side of the sponged lines was created with Vintage Photo, the other with Fired Brick Distress Ink.

Once the panels were sponged, I covered all up but one and stamped an image in from Vintage Christmas. After all panels were filled, the layer was adhered to a bigger piece of Early Espresso cardstock . I cut around it to create the matching layer. I sewed over the sponged lines.

The sentiment is from Season’s Greetings. It was stamped in Walnut Stain Distress Ink on Natural White Neenah cardstock, cut and embossed with Petite Oval Nestabilities. I left the die over the cardstock, stamped the musical score over it with Vintage Photo and then sponged the panel with the same ink. Latte Kaisercraft Pearls were adhered underneath the sentiment and three Prima Mini Roses were adhered to the right of it.

A 1 3/4″ x 5 1/2″ strip of Webster’s Pages Holiday Paper was adhered to the left on to a 4 1/2″ x 5 1/2″ piece of different pattern of the same paper pack. Melissa Frances lace was adhered to the left of the vertical paper strip before the layers were stitched to a 3/16″ bigger piece of Early Espresso cardstock. Brown Wrinkled May Arts Ribbon was wrapped around the layers twice before it was tied into a bow. It was topped with a green button that was attached to the ribbon with Butterscotch waxed Linen. I twisted the ends of the waxed linen around my paper piercer to curl them up.

5″ x 12″ piece of red Core’dinations cardstock was folded in half and used as card base. More Latte Kaisercraft Pearls were added to the top right corner to finish off the card front.

Here is a video for the visual learner:

[youtube]https://www.youtube.com/watch?v=UCKcRcBQTzE[/youtube]

Thanks so much for stopping by! Have a wonderful Sunday! Hugs and smiles

© 2012 fresh & fun Suffusion theme by Sayontan Sinha