Today’s tutorial is part of the Product Review for the Xyron Creatopia. Make sure to check it out. It is one cool tool. The favorite feature for most reviewers was the Fabric Adhesive Cartridge. Ashley Newell wrote the tutorial about Adhering Fabric to chipboard and created the cutest sample.

kom0909ragannfabric2.jpg

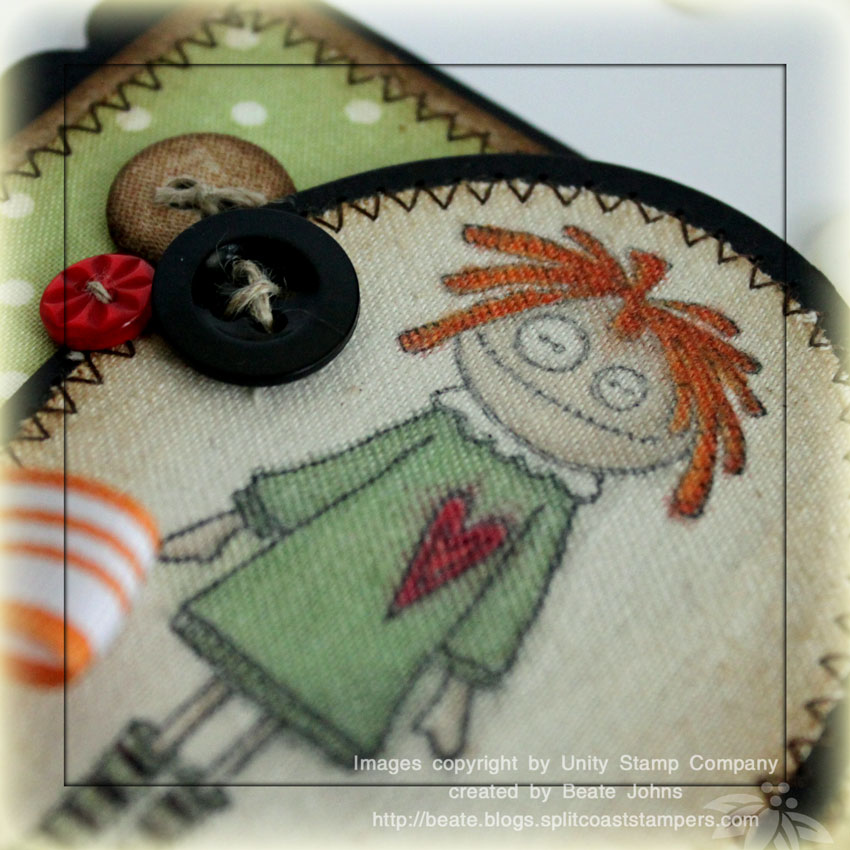
For my fabric sample I stamped this cute girl from Unity’s September Kit of the Month kit in Black Memento ink on thicker natural looking muslin. I ran it through the Creatopia, cut it out with Oval Nestabilities and sponged the edges with Vintage Photo Distress Ink. The fabric was taped on a slightly bigger oval in Basic Black ink and the edges were stitched. The little girl was colored in with Copic Markers (G82, G85, E 41, E 43, R27, R29, YR04, YR07, YR09).

kom0909ragannfabric1.jpg

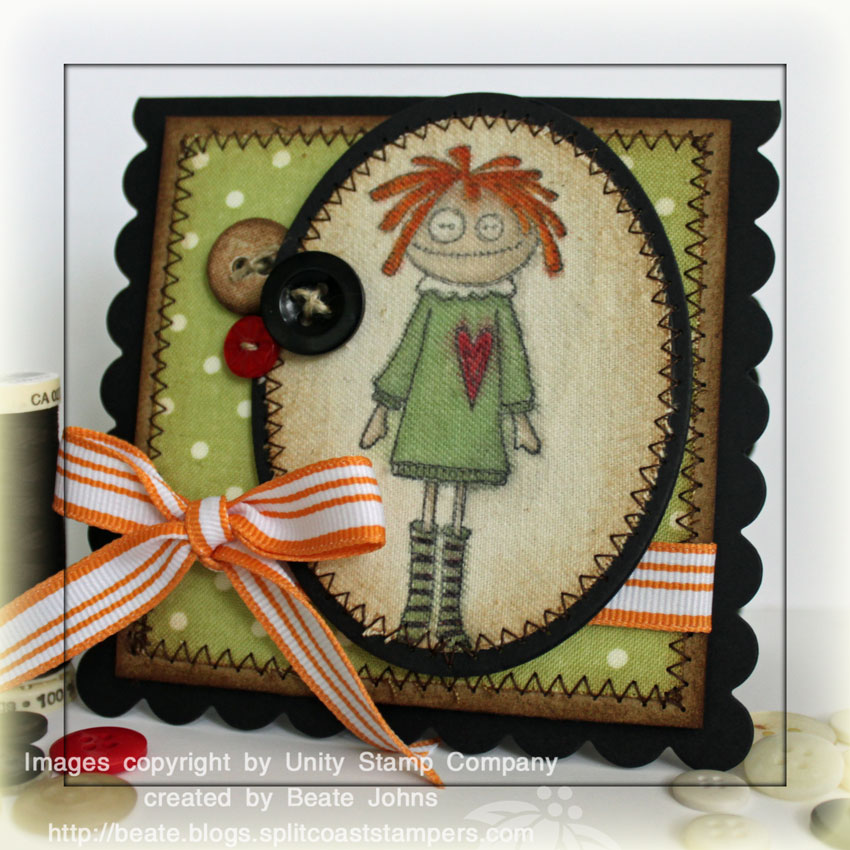
The card base was cut out of Basic Black cardstock with the Clear Scallop Die from Big Shot. The next layer is a 3 3/4″ Kraft cardstock square that had been sponged with Vintage Distress ink. The polka dotted layer is fabric. It was adhered to a piece of cardstock, cut down to 3 1/2″, sponged and then stitched to the Kraft cardstock layer. Pumpkin striped grosgrain ribbon was tied around the fabric/kraft layer and buttons were sewn on with Linen Thread.

kom0909ragannfabric3.jpg

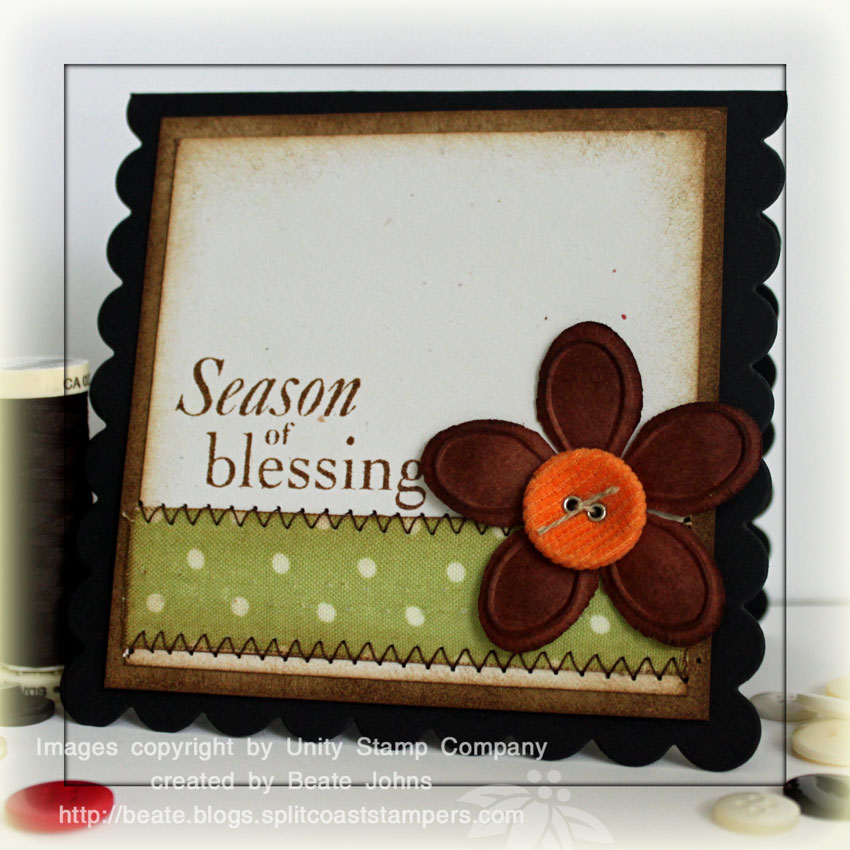
The measurements of the inside layers mirror the ones on the card front. The fabric strip measures 7/8″ x 3 1/2″. It was sponged and stitched to the main layer. The sentiment is also from Unity’s September Kit of the month stamp set. A Pumpkin Corduroy button as sewn onto a Prima Flower with Linen Thread.

Here is a video for the visual learner:

[youtube]https://www.youtube.com/watch?v=ACSO17fXUpQ[/youtube]

I really like how this card came together. Maybe it has something to do with all the brown colors on it? LOL

sc238.jpg 

I made it for the sketch challenge on SCS. I couldn’t help myself and changed the sketch a bit. But just a bit. I exchanged the squares for the shape from the Matchbox Die template. I love that shape.

floressuavessepiasc238.jpg

Because of the gorgeous shape of that die cut, I needed to find an elegant image. I thought the tulip from the stamp set Flores Suaves would be perfect for it.

My card base is a 5 1/2″ x 8 1/2″ piece of Textured Soft Suede Cardstock folded in half. The textured strip of Very Vanilla cardstock measures 2″ x 5 1/2″ and was sponged with Soft Suede. It was layered on a slightly bigger strip of sponged Chocolate Chip. The bottom of that strip had been punched with the Eyelet Border punch. The top edge of the Vanilla strip was paper pierced.

I cut out three of these shapes with the Matchbox Die Template out of Soft Suede cardstock. With help of the Stamp-a-majic I lined up the outline shape from Great friend in Soft Suede on the cut outs and sponged the edges. Next I stamped the shape three times in Chocolate Chip on Very Vanilla cardstock. I masked the shape off with a reverse mask and stamped first the tulip (then masked that one as well) and then the script from Flores Suaves in the shapes. I cut those out and sponged the edges lightly with Soft Suedes. The vanilla layers were adhered over the Soft Suede die cuts.

Next I stamped the flower again three times in Basic Brown on Very Vanilla, colored them with aqua painter and Soft Suede as well as with a hint of Crushed Curry, cut them out and mounted them on my layered die cuts.  Soft Suede dotted Ribbon was tied to the bottom of the Vanilla strip and the three die cuts were mounted over it with dimensionals.

The sentiment is from Teeny, Tiny Wishes. It was stamped in Chocolate Chip on Very Vanilla cardstock and punched out with the small oval punch. I sponged the edges with Soft Suede and stamped the tulip with second and third generation Soft Suede over it. To finish the card off I added three 5/16″ vanilla brads on the left hand side over the strip.

floressuavessepiainsidebeat.jpg

The inside was layered with a 4″ x 5 1/4″ piece of Chocolate chip cardstock layered with a 1/4″ smaller piece of Very Vanilla cardstock. The Vanilla layer was covered with a punched piece of scrap paper and sponged with Soft Suede ink. Then I added the script and Tulip from Flores Suaves over the sponged layer.

Today’s tutorial on SCS is written by Stephanie Luman and is for the Flower Pot Pocket card.

It’s easy and oh so cute! If you haven’t tried it out, what are you waiting for?

forallyoudoflowerpotbeate.jpg

My Flower Pot base is Soft Suede cardstock.

The flap edge was punched with the Eyelet Border Punch and the entire flap was sponged with Soft Suede ink.

The lower part of the Pot is covered with Thoroughly Modern Designer Paper. Polka Dot Red Ribbon was tied around the flap.

 The sentiment is from For All You Doand is stamped with Chocolate Chip on Very Vanilla cardstock. It was punched out with the small oval punch, layered first on a sponged Chocolate Chip large oval punch-out, then on a Bermuda Bay Scallop Oval. I underlined the sentiment with a paper pierced row and added three little flowers. They had been stamped in Crushed Curry and Real Red, cut out and topped with a tiny Chocolate Chip Circle I had punched out with the Double circle punch (retired).

forallyoudoflowerpotinsideb.jpg

The flowers were punched with the Embosslit Cherry Blossom, the branches with the die cut Little Leaves.

I punched two for each flower, cut the center out, sponged both of them and added 5/16″ brads in each center.  The branches were taped on with Scor-Tape, the flowers with dimensionals.

The first layer of the insert is a 2 1/2″ x 4 1/2″ piece of Textured Real Red cardstock, layered with a 1/4″ smaller piece of Very Vanilla. A 7/8″ x 2 1/4″ piece of Thoroughly Modern DP was added to the bottom of the insert to tie it in with the front.

The sentiment is also from For All You Doand is stamped in Chocolate Chip. The buttefrly from the same set was stamped in second generation Crushed Curry over it.

P.S.: If you want to see/hear my first attempt at a video tutorial for SCS, check it out here. I was very nervous and you can hear it when I talk. I hope I will get better with the following tutorials.

 [youtube]https://www.youtube.com/watch?v=ir-nDyJoGvE[/youtube].

forallyoudowsc88resist.jpg

I started out with a 3 3/4″ square of Glossy Cardstock that I had tried the Cuttlebug Wax paper resist technique on last week. See I meant to make a sample for that Wednesday tutorial, but I only got the glossy cardstock prepped and never stamped.

I sanded the cardstock with sand paper to add a bit of Faux Linen look to the background. Then I sponged all over with Soft Sueve Ink. The edges were distressed with the Cutter Kit and then I sponged the edges with Chocolate Chip. The entire piece was layered on a 3 7/8″ square of Whisper White cardstock. The edges of that layer were distressed as well.

The top 7/8″ x 3 3/4″ piece of Bermuda Bay Cardstock was stamped with the border strip from Pendant Park in Bermuda Bay. I added paper pierced holes in each of the small diamonds, then added a paper pierced row above and underneath the stamped strip. The edges of that cardstock strip were distressed.

The bottom of the lower Bermuda Bay cardstock strip was punched with the Eyelet border punch, the top was distressed. After taping the strips down, I tied White Satin Ribbon was tied around the bottom strip.

The Whisper White and Chocolate Chip rectangles were cut with Rectangle Nestabilities. The flower stem from For All You Do was stamped in second generation Soft Sueve. I inked up both the small and medium flower from the same set were inked with Bermuda Bay ink, then outlined with the Bermuda Bay marker before stamping them next to the stem. I stamped the medium flower again, cut it out and mounted it with a dimensional slightly overlapping the stamped flower. A brown brad tops this flower off. The small flower has a small clear Rhinestone brad in it’s center. The sentiment is from the same set and is stamped in Chocolate chip ink.

The card base is a 4 1/4″ x 8 1/2″ piece of Chocolate Chip cardstock. The edges of the card front were sponged to make them look darker and richer.

As you can see I couldn’t add all those flowers from the sketch on the front. So I decided to add them on the inside of my card.

forallyoudowsc88inside.jpg

Please be gentle with me when you judge the card.

I haven’t stamped in ages and feel like I have zero mojo. I hope I will find my mojo and my stamping rhythm again soon.

Have a wonderful weekend!

Hugs and smiles

Here is another card I made during VSN on Saturday. I never got a chance to upload it during VSN. I had to try out my new Oval Big Shot die as well as the new stamp set Branch Out. I love that tree. This card is a very girly version of it. I made a more manly card as well. I will share it another day.

branchoutgirlytreebeate.jpg

The card base is a 4 1/4″ x 11″ piece of Kiwi Kiss folded in half.

The designer paper on the bottom measures 2 1/2″ x 4 1/4″ and is from the Sweet Always Designer Paper pack. Over it is a 1″ strip of Whisper White cardstock that was punched with the Eyelet Border punch.

The tree trunk was stamped in Chocolate Chip on Whisper White ink. Leaves were added in Kiwi Kiss, the butterflies with Regal Rose an the tire swing with Basic Gray. All stamps are from the stamp set Branch Out. The image was cut with the Big Shot Die Oval Scallop Frame. I used that die again with Chocolate Chip cardstock to create my scallop border. The border was paper pierced around it’s smooth edge before taping it to the card base with dimensionals.

The sentiment is from the stamp set Many Happy Returns. It was stamped with Basic Gray ink on Whisper White cardstock and punched out with the Window Word punch. It was then first layered on a small oval punch-out in Chocolate Chip, then on a Curly Label punch-out in Kiwi Kiss.

To finish it off I added a small Butterfly punched with a Martha Steward punch that was topped with some Amuse bling. I also added two white brads on the top left.

 Have a wonderful day! Hugs and smiles

Remember the card I made for my A2 card box? Well….this is basically the same. I LOVE the shape of the Top Note Die. I think everyone should own one.

winterposttopnotecurlychristmasbeate.jpg

I started out by folding a 4 1/4″ x 11″ piece of Riding Hood Red cardstock in half and cutting it with the Top Note Die. The Baroque Background was stamped over it with Riding Hood Red and the edges were sponged.

Next I stamped the snowflake from Winter Post in Whisper White on a Kraft label that I had cut with my new Nestabilities. I stamped the reindeer from the same stamp set in Chocolate Chip ink on the bottom left of that label. I used classic ink for my sample, but I think I will let my customers stamp it in Chocolate Chip craft ink inkstead.The label was adhered to the next size Label cut out and sponged in Chocolate Chip.

5/8″ wide Olive Grosgrain Ribbon was tied around the card at the fold. The sentiment is from the Cute & Curly stamp set. It was stamped first in Kiwi Kiss and punched out with the Curly Label Punch. It was stamped again in Chocolate Chip and the label was cut out and adhered over the Kiwi (I think I will prestamp the chocolate labels to make it easier).

Okay…when I looked at the inspiration piece, all I could think was “What was I thinking”. Look at all that freaking orchid/purple back there. I couldn’t decide for the longest time what to do. I finally picked the blue bird with the red polka dotted wing and focused on that. And NO, my card has no purple. LOL

burstofjoybirdbic31.jpg

The card base is a 4 1/4″ x 11″ piece of Chocolate Chip cardstock. The edges of the card front were sponged to get a richer color.

Next is a 4″ x 5 1/4″ piece of Whisper White cardstock, followed by a 3 3/4″ x 5″ piece of Bella Rose Designer Paper. The 3″ x 3 3/4″ strip of green designer paper is also from the Bella Rose paper pack.  A 3 3/4″ wide Whisper White strip was punched with the Scallop Edge Punch and layered underneath the bottom of the green strip. The bottom edge was paper pierced, the top distressed. Striped Bashful Blue grosgrain ribbon was tied around the top.

The bird, the swirl and the leaves were cut with the Bird w/Leaves & Flower Sizzix die and my Big shot. The bird was cut out of Bashful Blue cardstock and sponged on the edges. I tried to add an eye like the bird on the mobile, but instead of looking cute, my bird looks like it’s snubbing you. I added a little pretty in pink with a sponge dauber on the cheek. The wing was cut from a scrap of Bella Rose Designer Paper. The dots were added with gel pen and the paper piercing matfrom the mat pack. But instead of reminding you of the bird in the mobile, the wing reminds me of a ladybug. LOL  The swirl and branches were cut out of Kiwi Kiss cardstock and their edges were sponged as well.

The big Chocolate chip circle was cut with the Sizzix Die Scallop Circle #2. This is the big circle of the two and it measures 3 3/8″ from one scallop end to the next. I still had a piece of Whisper White cardstock in my scrap pile that was dry embossed with the Cuttlebug Folder Floral Screen. I had inked up the folder first with Kiwi Kiss, then placed the cardstock in it and embossed it. The cardstock was cut with Circle Nestabilities, taped to the sponged scallop circle and the edges were paper pierced.

Last I stamped the sentiment from Bursting with Joyin Chocolate Chip classic ink on Whisper White cardstock, punched it out with the small oval punch and layered it on a sponged 1″ Chocolate Chip circle. In each of the points of the oval layer, I added a small clear Rhinestone brad from the Pretties Kit. The sentiment layers were attached to the card with dimensionals.

Today’s tutorial shows you how to make a card box for your regular sized cards.

winterposta2cardbaroque.jpg

I keep it short and sweet since you can see how it is made step by step by checking out the tutorial.

The box base is plain old Chocolate Chip cardstock.

The box top is Riding Hood Red cardstock, stamped with Baroque Background, scalloped with the Scallop Edge Punch and sponged on it’s edges.

The tag layers were cut with the new Nestablities Label Dies. The Reindeer, snowflake and sentiment is from the Stampin’ Up! set Winter Post. The Riding Hood Red part was punched with the Designer Label Punch.

The May Arts Satin ribbon measures 1″ wide and is just like the Chocolate and Pomegranate ribbon Stampin’ Up! used to carry. I just ordered several different colors by the spool from Starlitstudio. I couldn’t help myself. Now that I have a little bit of it, I NEED MORE. The  Pizza Box variation sample in the tutorial today NEEDED black satin ribbon. Of course I didn’t have any….it would look so much better with it.

brocadethanksforeverflower.jpg

I kept the matching cards really simple.

I folded two pieces of cardstock measuring 4 1/4″ x 11″ in half (Two each in Kraft, Chocolate Chip and Riding Hood Red) and cut them with the Top Note Bigz Die. I lined the folded edge up under the cutting line so I would get part of the perforated look, but it wouldn’t get cut.

I stamped each card front in the same ink color as the cardstock (I used Versamark for the Kraft cards) with the Baroque Background. Taffeta ribbon was ties around the left hand side and Nestabilities labels were added. Those labels had been stamped with the Brocade Basics swirl. I stamped different sentiments from the Sincere Salutationset in Chocolate Chip on Very Vanilla cardstock, cut it out with the large oval punch and layered it on a sponged designer label punch-out.

Last I stamped the flower from Together Forever in Chocolate Chip ink on Very Vanilla cardstock, cut it out, added a red Fire Circle Rhinestone brad in the center and attached it to the card with dimensionals.

I am still very much under the weather and will go back to bed! Have a great day!

I stamped my sample for today’s sketch last night. So don’t look too closely at my coloring. It’s not that great. I wasn’t feeling that great and messed up on the sketch as well. I turned it and put the 1/4 circle on the wrong side. Sorry!

christmascardinalwsc65topno.jpg

The card base is a 4 1/4″ x 11″ piece of Chocolate Chip cardstock folded in half. The next layer is a 4″ x 5 1/4″ piece of Ski Slope paper. The corners were punched with the ticket corner punch, the edges paper pierced and sanded with the sanding block.

I cut the 1/4″ circle out of another piece of Ski Slope Designer paper with my Coluzzle. I cut another slightly bigger 1/4 circle out of Shimmery White and taped it underneath the designer paper. I added scallops to that layer with my corner rounder.

The Cardinal from A Cardinal Christmas was stamped with Black Stazon on a 2 1/2″ x 3 1/2″ piece of Shimmery White cardstock. It was ticket corner punched, a dry embossed edge was added with scoring tool and the edges paper pierced  and distressed. The image was colored with Aqua Painter and Riding Hood Red, Kiwi Kiss, Old Olive, More Mustard, Chocolate Chip and Baja Breeze class ink.

The image was layered on a 1/4″ bigger piece of Riding Hood Red cardstock. That piece was ticket corner punched, distressed and sponged as well. It was layered on a Chocolate Chip Top Note die cut. That piece had been stamped with the branch in Chocolate Chip and it was heavily sponged. 5/8″ wide Old Olive grosgrain Ribbon was tied around the bottom of the image.

christmascardinalberriesclo.jpg

I inked up the sentiment one word at a time with Black Stazon and stamped it on top of each other on Shimmery White cardstock. I inked up the branch of the set with Baja Breeze, stamped it off once and then stamped it over the sentiment. That was punched out with the 1 1/4″ circle punch. The edges were distressed with the cutter kit, layered first on a sponged 1 3/8″ chocolate chip circle, then on a sponged Riding Hood Red scallop circle.

Once everything was done, I added Crystal effect over the berries in the main image.

Personal Note:
Thanks for all your well wishes. The cold moved from my head to my chest. I rather be coughing like I do now then feeling like I did the last two days.

Today is my oldest 14th birthday. I still remember him as a chubby little infant with dark hair and slightly elongated eyes. We thought that some Indian ancestors from Ricks past came through. Or as a chubby little toddler who had trouble jumping with both feet. He was sooo cute. He outgrew all that and is now an over 6′ sweet teenage boy. Time goes by way to fast.

I had no desire to stamp yesterday after getting done with my chores. I made this card early this morning. I have to walk Rebecca to school. I will be right back to the details. Still no mojo here, so I went back to my fall back layout! Thank goodness the BIC was easy. It was screaming for me to use the Urban Garden Paper and Pocket Silhouette stamps.

pocketsilhouettesbic20black.jpg

This time I started with my image and worked my card around it. I stamped the leaf stamp from Pocket Silhouette in Black Stazon on Whisper White, punched it out with the 1 3/4″ circle punch and added a blue shadow with my Blender Pen and Baja Breeze ink pad.

I layered it first on a slightly bigger Old Olive circle that I had cut with circle Nestabilities, then on a black scallop circle cut with the Bigz XL Pennant Die from Stampin’ Up!. I added 9 paper piercing holes on the lower left and the top right. I punched a small flower from Baja Breeze cardstock with Trio Flower Punch, sponged it’s edges with a sponge dauber, added a 1/8″ black circle, adhered it to the image with dimensionals and topped it off with a small Ice Circle Rhinestone Brad.

The card base is a 4 1/4″ x 8 1/2″ piece of Kiwi Kiss cardstock folded in half. A white gel pen dotted border was added 1/8″ in all the way around.  The next layer is a 3 3/4″ square of Basic Black cardstock. Each corner was punched with the ticket corner punch. The 3 1/2″ Whisper White square that is the next layer was first scored every 3/8″ vertically to create the look of the wall of the inspiration piece. I used my Scor-It to create those scores. It creates deep score lines and you can add those score lines anywhere you want. (Click on the image to see the image bigger and the score lines better.)The bottom part was layered with a 1 3/4″ x 3 1/2″ piece of Urban Garden Designer paper piece. Each corner was punched with the ticket corner punch and the edges were paper pierced. I tied ribbon from the retired Jersey Ribbon Originals Pack around the layers. I didn’t even realize until now that it’s the same ribbon that now comes in all six In Colors. I wish we still had a little bit wider black ribbon like that (sigh).

The sentiment was stamped in Black Stazon on white cardstock and punched out with the small oval punch. I cut the right edge off and lined it up with the edge of my designer paper, paper pierced a line underneath the sentiment and paper pierced a line under the sentiment. I punched a flower out of Kiwi Kiss paper with the Trio Flower Punch, sponged the edges and added a 1/8″ black circle before adhering it under the sentiment with a dimensional. Again the flower was topped off with a small Ice Circle Rhinestone Brad.

© 2012 fresh & fun Suffusion theme by Sayontan Sinha