It’s time for another Crafty Friends Challenge. This time Charmaine is the hostess and she gave us this photo as an inspiration:

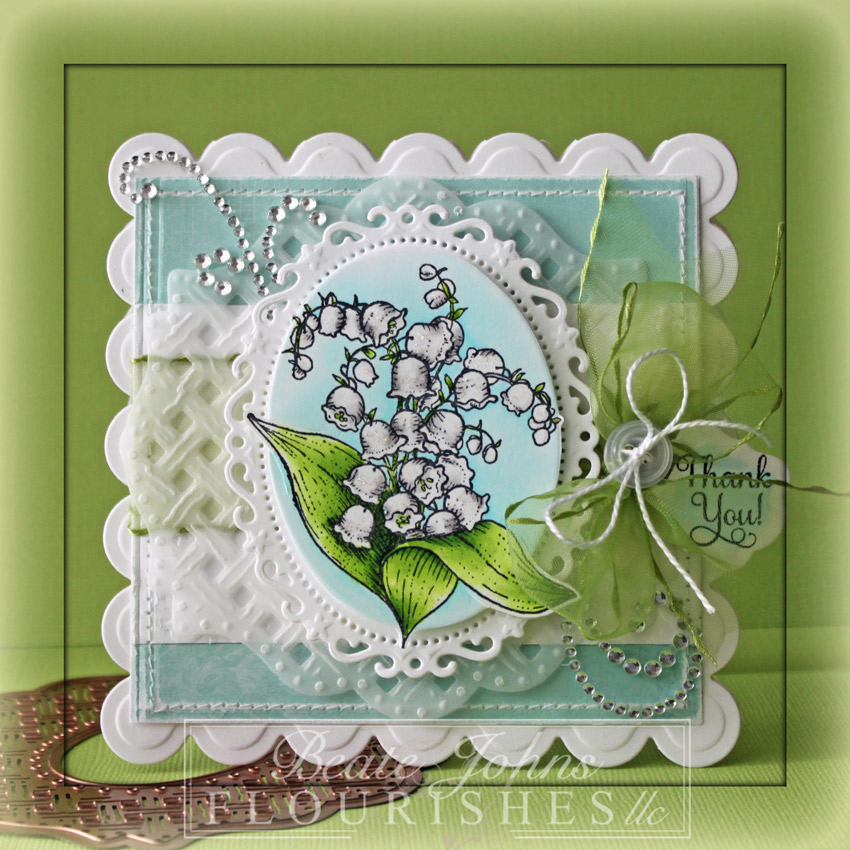
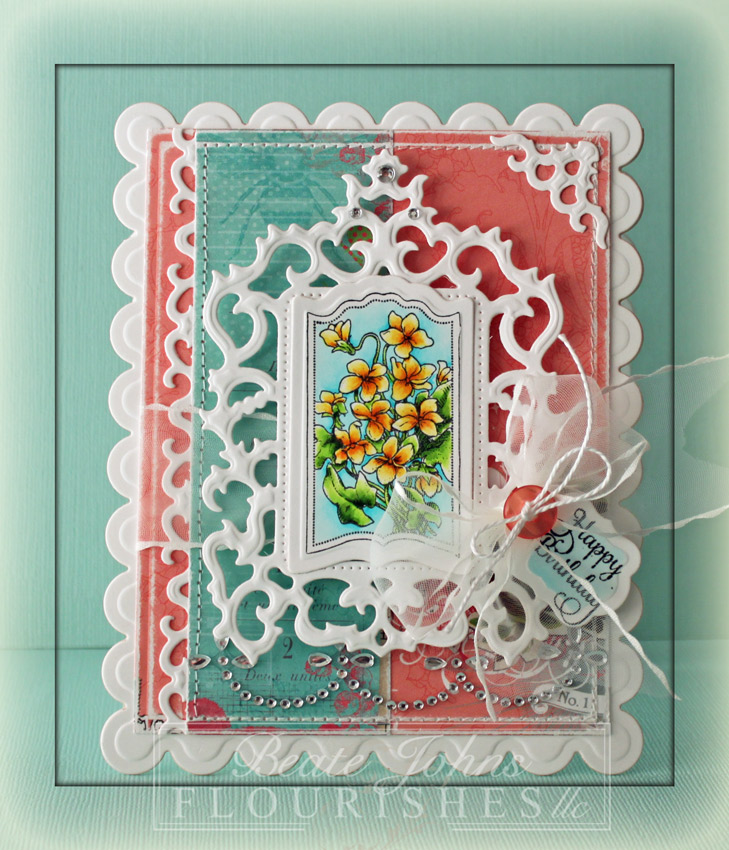
I really liked how the orange flower in the center popped out of the image and the most of rest of the image. So I started out inking up the solid flower image from The Craft’s Meow Happiness is… with Cantaloupe Memento ink. The edges of the stamp were inked with the Potter’s Clay Marker before the image was stamped on Neenah Solar White cardstock. The leaf of the same set was inked up with Pear Tart Memento Ink and the edges and lines were colored with the Bamboo Leaves Marker before it was stamped. That was repeated before both leaves and the flower were cut out.

A sentiment from that same set was stamped  Tuxedo Black Memento Ink on Neenah Solar White cardstock that had been cut and embossed with a Fancy Tag 3 die. The tag was adhered to another piece of white cardstock, cut and embossed with the Fair Isle Pennant die.

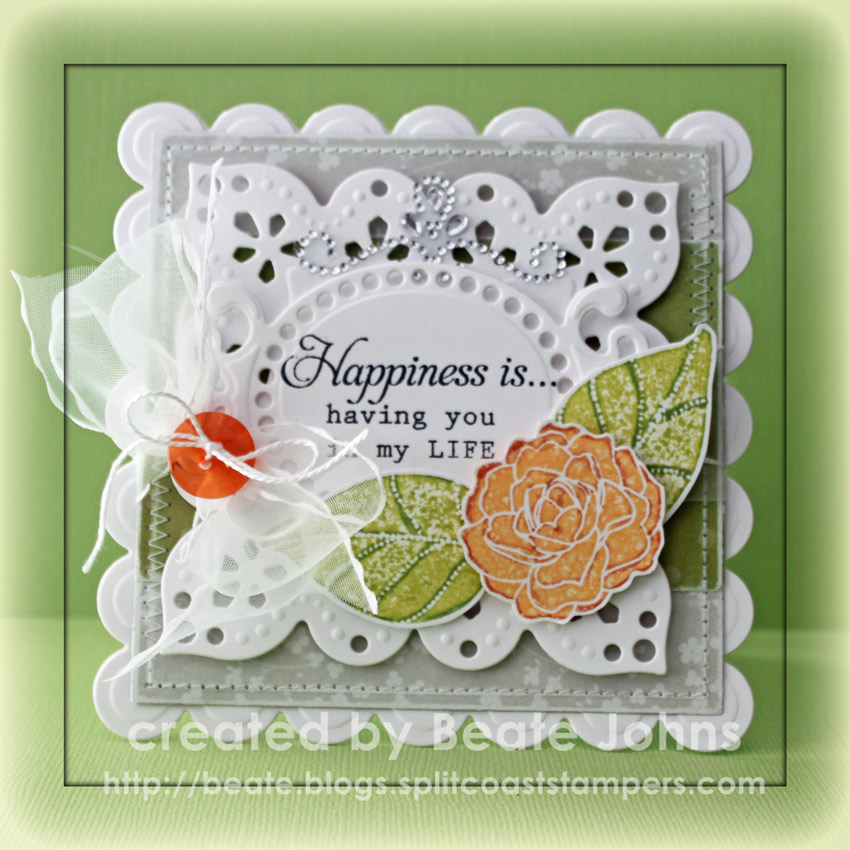
Two pieces of My Mind’s Eye On the Bright Side Two were cut and embossed with a Grand Square Nestabilities die. The edges were sanded and stitched before May Arts ribbon was tied around the layers and through an opening of the sentiment layers. The layers were adhered to the paper layer with dimensional adhesive before they were adhered to the card base, a piece of white cardstock cut and embossed a  Grand Scallop Square Nestabilities die.

The ribbon bow was topped with a button that was tied on with embroidery thread. A piece of Fancy That! Border bling finishes off my card. I hope you have time to participate in the challenge.

Thanks so much for stopping by! Have a wonderful weekend!
Hugs and smiles

I am excited to be a guest designer for Kraftin’ Kimmie Stamps this month. Today’s challenge is to create a card for Mom. I decided to use an image from Cheryl Alger’s Sugar and Spice set. It was stamped in Tuxedo Black Memento Ink on Neenah Solar White cardstock. The image was cut and embossed with a Petite Oval Nestabilities die and colored with Copic Markers (Dress, bow, balloon, grass: YG00, YG01, YG03, YG17    Socks: N0, N3   Shoes: N3, N5, N7, N9    Skin: E000, E01, E11    Hair: Y26, E33, E35, E37   Background: B0000, B000). The image was adhered to a piece of Kraft cardstock, cut and embossed with the largest Floral Oval Nestabilities die.

Two pieces of Pink Paislee She Art patterned paper were cut and embossed with a Grand Rectangle Nestabilities die. The edges were sanded, stitched and May Arts ribbon was tied around the horizontal strip. The paper was adhered to the card base, white cardstock, cut and embossed with a Grand Scallop Rectangle die.

The image layers were adhered to the card base with dimensional adhesive. Fancy That! Border Bling was added to the upper left hand side of the card. A sentiment from Kimmie’s Everyday Sentiments was stamped in Tuxedo Black ink on a piece of Solar White cardstock,  cut and embossed with a tag die from Home Sweet Home . The embossed part was colored with Copic Marker B0000. It was tied to the bow with a button and embroidery thread to finish off the card.

Thanks so much for stopping by! I hope you have time to participate in the challenge.
Have a great weekend!
Hugs and smiles

It’s my turn to post a Savvy Saturday Video for the Spellbinders blog. It features how to create a card with one of Spellbinders Cut-Fold-Tuck dies. You can find a picture of the entire card and the video in this blog post.

Have a great weekend!


I have another post on the Spellbinders blog. Check out the entire card with step by step photos here.

Have a wonderful day! Hugs and smiles

Day two of the Flourishes Sneak Peeks. Today the featured set is the Botanical Bookplates Vo. 2. I loved the first one and I have to say that they second set in this series is just as gorgeous as the first.

For my sample I stamped the big Lily of the Valley image in Tuxedo Black Ink on White cardstock. It was cut and embossed with a Classic Oval Nestabilities die and the Out of the Box technique. The image was cut down even more on the embossed edge and colored with Copic Markers (T0, T1, T3, YG01, YG03, YG17, B0000, B000). The image was adhered to a piece of cardstock, cut and embossed with the second largest Floral Oval Nestabilities die.

A piece of vellum cardstock was cut and embossed with a Lattice Motif die. The image ovals were adhered over it with dimensionals. A piece of patterned paper was cut and embossed with the smallest of the Grand Square Nestabilities die. The edges were sanded and a strip of white cardstock was taped over the paper square. The edges were stitched and ribbon was threaded through the Vellum layer and tied around the paper square. The layers were adhered to the card base, white cardstock cut and embossed with the smallest Grand Scallop Square Nestabilities die.

A sentiment from the set was stamped on a piece of cardstock, cut and embossed with one of the Tailor-Made Classic Tags Template die. The tag was tied on to the bow with a button and embroidery thread.

Want to win this set? All you need to do is leave some love in the form of a comment on the blogs below! Why? You need to try to figure out….

One of the ladies on our link list below will be picking a name from the comments on her blog post today. We don’t know which one it is… so the more blogs you leave comments on, the more chances you have to win!

Senior Design Team

Friends of Flourishes Team

DID YOU KNOW YOU COULD WIN OUR ENTIRE APRIL RELEASE? Have you checked out our Motherly Love Challenge? Just click HERE to find out how to play! You can also play in our Noon Time Challenges, which start today at noon with another one ushered in tomorrow at noon!  Both are fast-paced and fun challenges that will give you yet one more chance to win our full April release!   All challenges will close this Friday at 5 PM EST and winners will be announced Saturday in our Winner’s Circle blog post! So get those fingers inky and good luck!

And, don’t forget our New Release Bundle! If you buy all three sets in a bundle, you save 10% off the price. But, this offer only lasts through next Friday, April 20. So… you have to act fast! Just click HERE to see!

Thanks so much for stopping by! Have a wonderful day!
Hugs and smiles

It’s my turn to share on the Spellbinders blog today. And since it’s Saturday, it’s a short video explaining how I created this wall hanging. For an image of the entire project and the video, please check this blog post.

Thanks so much for stopping by! Have a wonderful weekend!
Hugs and smiles

Here is a sneak peek of the card I created for today’s post on the Spellbinders Blog.

The image is from JustRite Stampers With Sympathy set and it was colored with Copic Markers (R81, R83, R85, YG01, YG03, YG17, airbrushed BG01). And look close at the Floral Oval Nestabilities die cut. It’s not out of cardstock! I hope you go and check out the post on the Spellbinders Blog with step by step instructions for this project.

Thanks so much for stopping by! Have a wonderful day!
Hugs and smiles

It’s my turn to host Timeless Tuesday again. I thought I give you an easy challenge. April is my birthday month so your challenge is to make a birthday card.

I love the new Botanical Bookplates Vo. 1 and thought they would make for a great spring birthday card. One of the images was stamped with Memento Tuxedo Black and colored with Copic markers. The image was cut out with the Tailor-Made Classic Bookplate die and layered on a piece of white cardstock, cut and embossed with one of the the Antique Frame & Accent dies.

The border strip  and the small corner die of the same die package were used to cut another piece of white cardstock.  The card was designed with the designer papers. The sentiment was stamped with the same black ink on a piece of cardstock, cut and embossed with a Tailor-Made Classic Tag die. Ribbon and rhinestones finish off the card.

Take a peek at what the other Timeless Tuesday designer have created for today…

Thanks so much for stopping by! Have a wonderful day!
Hugs and smiles

This week on the Spellbinders Blog it’s all about Flower dies. Linda showcased how to roll and layer flowers and use them on an altered trinket box. Karen used layered flowers to re-purpose a frame. I thought I show you a different way to use the dies. Please check out the entire project on the Spellbinders Blog.

Hint: It’s one of my favorite things to do with Spellbinders dies. I know you know what I am talking about! 🙂

Have a wonderful day!
Hugs and smiles

This week’s hostess is Silke and she created another sketch for us. Of course I had to use one of the new sets again. First I was thinking to use one of the new bookplates instead of the star, but I couldn’t find my new die. Turned my craft room upside down…not sure where it went. So I changed my plan and used the smaller of the Magnolias images.

The image was stamped twice in Tuxedo Black Memento Ink on white cardstock. On one image I colored the leaves and colored the rose gray, on the other I colored just the rose and colored it pink and cut the rose out  (Copic Markers: RV81, RV85, G40, G82, G85, T3). The rose was adhered to the colored leaves with dimensional adhesive and Goldrush Smooch Glitz was added in to the flower center.

(FYI: I colored the bottom rose gray, so in case it shows a little, it will look like a shadow. If you look at the close up image, you can see the gray peeking through just a bit.)

A card front and the card base were cut and embossed with the largest of the Curved Rectangles dies. The card front was adhered to the card base so the curved rectangle shape looks complete.

Matching layers were cut out of Kraft cardstock as well as a piece of My Mind’s Eye Dolled Up paper. The top and bottom of each layer was cut with the edge of the Curved Rectangle die to match the shape of the card. These layers were stitched together.

White cardstock was cut and embossed with a Fancy Tag 2 die. The center was sponged with Vintage Photo distress ink and the edges of that center were stamped with the leave border of Magnolias, also in Vintage Photo ink. Another piece of white cardstock was cut and embossed with the smallest of the Petite Oval Nestabilities, sponged first with Antique Linen, then very lightly at the edges with Vintage Photo ink. A sentiment from the same set was stamped in the center of that oval with Tuxedo Black Memento ink. The oval was adhered to the Fancy Tag die cut with dimensionals.

A strip of white cardstock was cut with Classic Scallop Edgeabilities and a 1″ wide strip of Dolled Up paper was adhered above the scalloped strip.  The strips were adhered to the stitched layers.  Seam binding was threaded through one of the openings on the left hand side of the Fancy Tag die cut. The sentiment layers were adhered to the right hand side of the card base, slightly above the horizontal strips and the seam binding was tied into a bow.  Parts of a Finesse swirl and part of a Fancy Waves! Border bling finish off the card.

Check out my fellow Timeless Tuesday Challenge Members for more inspiration:

Cindy Haffner
Heather Jensen
Maki Jones
Mona Pendleton
Silke Ledlow
Tammy Hershberger
and March Guest Designer Meredith MacRitchie

Thanks so much for stopping by! Have a wonderful day!
Hugs and smiles


© 2012 fresh & fun Suffusion theme by Sayontan Sinha