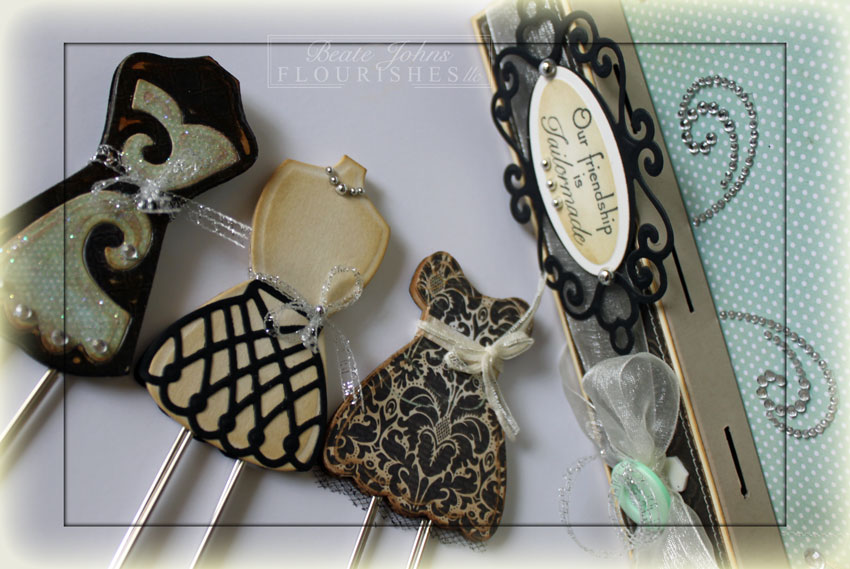
Today’s hostess is Mona. She challenged us to create a corner bookmark. I hadn’t made one of those since I wrote the tutorial. With me buying all my books on Kindle now, I don’t usually have books laying around. But…. I do have magazines I can use them for. And since it’s for a magazine, I don’t have to worry about making it not bulky so it doesn’t hurt the book pages. 🙂

I couldn’t help myself. I had to use the Rose from A Year in Flowers 2 again. I LOVE that image. I stamped it several timed in Rich Cocoa Memento Ink on Neenah Solar White cardstock. They were colored with Copic Markers (Roses: R00, R01, R02, R05   Leaves: G40, G43, G46), cut out and layered.  A piece of white cardstock was cut with a Standard Circle Nestabilities die and embossed with the new Elegance M-Bossibilities folder. The circle was stitched to a piece of Kraft cardstock, cut and embossed with a Beaded Circle Nestabilities die. The rose layers were adhered slightly to the lower right of the circles.

My bookmark base was created out of a 4″ square of Neenah Solar White cardstock. It was scored and the bottom edge was cut and embossed with the Eyelet Borderabilities die. The edges of a 1 1/4″ x 4″ piece of My Mind’s Eye Follow Your Heart Be Happy paper patterned paper were sanded, stitched and adhered over the lower part. Seam binding was tied around it. The bow was topped with an  October Afternoon button tied on with Linen Thread.

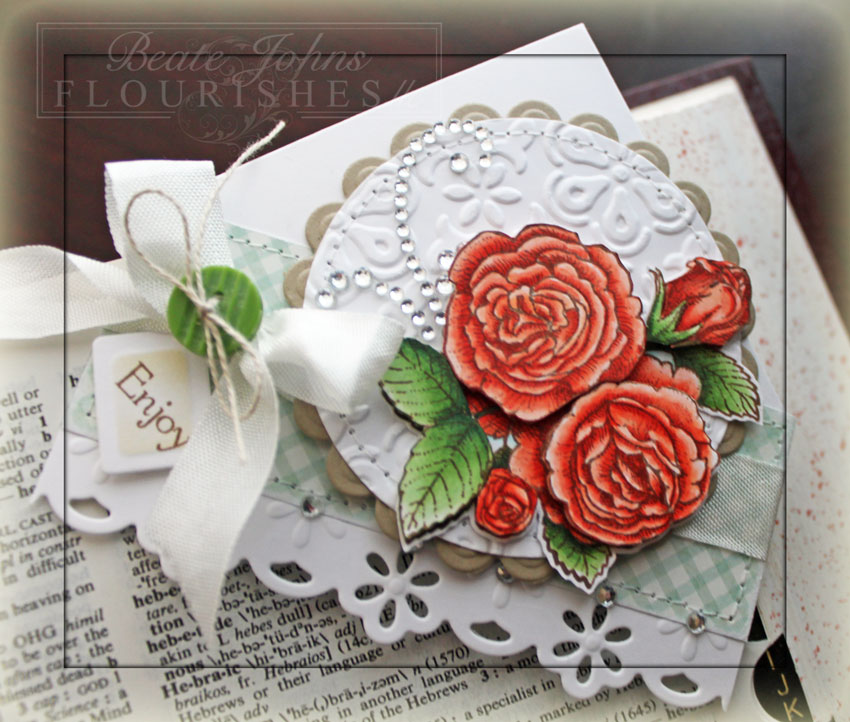
With the same Linen thread I tied on a small tag, cut and embossed with one of the new Tailor-Made Classic Tag Template die.  The center was lightly sponged with Antique Linen Distress ink before a sentiment from Tiny Flowers and Tags. I didn’t want the seam binding in the back of the bookmark to get in the way of the magazine pages, so I taped another 1 1/4″ x 4″ strip of the same patterned paper over it on the back.

The image layers were adhered to the right of the bookmark. Baby Bling Rhinestones on the embossed part and parts of a Finesse Rhinestone Swirl finish off the bookmark.

Check out my fellow Timeless Tuesday Challenge Members for more inspiration:

Cindy Haffner
Heather Jensen
Maki Jones
Mona Pendleton
Tammy Hershberger
and February Guest Designer Tera Fujan

Thanks so much for stopping by! Have a wonderful day!
Hugs and smiles

Here is another project I created with the Faber-Castell products.

I started by painting a chipboard circle with gesso to prime it. Next the grit background from Moments in Bloom was inked with Nougat Big Brush Pen and stamped over the chipboard. Once it dried, blue metallic and pistachio gelato were rubbed over the circle and smoothed out with a finger tip.

Flowers from Moments in Bloom were inked with the Cobalt Turquoise and Chrome Green Big Brush Pen and stamped over the grid. Once that dried, the same pens were used to add more detail. Small black lines were added with the Fine Artist Pen and highlights with more gesso (I used my paper piercer to apply it). The sentiment, also from the same set, was inked up with the Black PITT Big Brush Pen and stamped over the flowers.  More gesso was used to soften the edges of the circle.

Ribbon was run through the hole in the chipboard, topped with a button and tied on with Honeydew Twine. Thanks so much for stopping by! Have a wonderful day! Hugs and smiles

Here is another project created with the fabulous Faber-Castell products we were lucky enough to have to review. 🙂

The new Butterfly Flourish image from Sweet n’ Sassy was inked with Black PITT Big Brush Pen and stamped on a Frayed Canvas Triangle from Maya Roads. The butterfly were colored with PITT Aquarelle Pencils (105, 111, 117, 125, 153, 166), the background with Cotton Candy Gelato.

The word stamps are from the Sweet n’ Sassy stamp set You. They were inked with the black Big Brush Pen and stamped over the triangle. A tiny flower was stitched to the banner with a small button and Linen thread.

Altered art and Mixed Media are usually not my thing. I am grateful that tutorials and product reviews push me out of my comfort zone. It was fun creating samples with the Faber-Castell pens, gelatos and pencils.

Thanks so much for stopping by! Have a wonderful day!
Hugs and smiles

Here is my last guest designer sneak peek for JustRite Stampers.  This one is a box like the one I created back in December. I used of the new JustRite Stampers set Just Keep CalmMy Mind’s Eye Lost &Found 2 Breeze paper and various Spellbinders dies.

I hope you go and check out the entire box over at the JustRite Stampers Blog.

Have a wonderful day!
Hugs and smiles

I thought it would be nice to have a video for the Acetate Box Tutorial. It’s a great project to dress up Valentine’s treats.

The finished box measures 2″ wide, 2″ deep and 3 1/2″ wide. Because it’s so little, there isn’t much room to decorate. The patterned paper strip are from  Echo Park Little Girl Patterned Paper. One edge was cut with the Stampin’ Up! Scallloped Edge Punch.

A tiny tag was cut with MFT’s Notched Tag die out of Neenah Solar White cardstock. Two small hearts were cut with dies from the same stamp set/die combo out of Little Girl paper as well as red cardstock. The hearts were adhered to the tag and a sentiment was stamped on it with Tuxedo Black Memento ink. Silver curling ribbon was tied into a double bow and adhered on top of the tag.

Here is a video for the visual learner:
[youtube]https://www.youtube.com/watch?v=HCfWNFyfkRU[/youtube]

Thanks so much for stopping by! Have a wonderful day.
Hugs and smiles

Remember this box from last week?

I wrote a tutorial for Splitcoast for that box and it came out today. Check here for step by step instructions on how the box was created.

Here is a video for the visual learner:

[youtube]https://www.youtube.com/watch?v=ShIz7gS_-jk[/youtube]

Thanks so much for stopping by! Have a wonderful day
Hugs and smiles

The current JustRite Stampers Challenge is easy. Make a Christmas Card or Tag.  The winner of the challenge will receive two sets of die sets from the JustRite store, three honorable mentions will oone die set! SWEET!!!

For my creation I started out stamping the biggest stamp from Musical Notes in Rich Cocoa Memento Ink on Classic White cardstock. One was cut out and embossed with the  second largest Label 20 Nestabilities die, the other with the third largest die. The ribbon and ornate embellishments of the image were colored with Copic Markers (R24, R27, R29, YR21, YR23, YR24) before both labels were sponged with Vintage Photo Distress ink. A sentiment from the Christmas Nested Frames was stamped in Rich Memento Ink in the center of the smaller label before that layer was adhered to the larger label with dimensionals.

A piece of MME Lost & Found Christmas was cut and embossed with a Label 21 Nestabilities die. The edges were sanded and then cut at the embossed line. A piece of Kraft cardstock was cut and embossed with the same die. The edges of both the cardstock and paper layers were sponged with Vintage Photo Distress ink before the layers were stitched on top of each other.Red Seam Binding (Stampin’ Up!) was tied around the layers. The bow was topped with a button, tied on with Linen Thread.

Another piece of Lost & Found Christmas paper was cut and embossed with the second smallest Grand Label 23 Nestabilities die. The edges were sanded and cut off at the embossed line. A piece of Kraft cardstock was cut and embossed with the same die. The edges of both the cardstock and paper layer were sponged with Vintage Photo before the layers were stitched together. The sentiment layers were adhered to this layer with dimensionals. Cream Baby Bling Pearls finish off this section.

Now I had to decide if I should make it into a card and just cut a base for it, of into something else. I thought it would look great as a box. I took pictures while making the box for step by step instructions. If you are interested how I made this, click on more.

Thanks so much for stopping by!
Have a wonderful day!
Hugs and smiles

Continue reading »

This week I picked the Paper Clip Bookmark for the Tutorials from the Archives for the Newsletter.

I started with cutting thin coasters with Spellbinders gorgeous new Dress Form dies. (You can purchase them at now at Crafters Home stores or starting in February everywhere.) I LOVE these new dies and had to use them as soon as I got them.

Two of the dress forms were layered with MME Lost & Found  2 Sunshine Paper, one with part of the fourth dress form die, cut and embossed from black cardstock. The patterned paper layers were first sanded, then sponged with Vintage Photo Distress ink.

Jumbo Paperclips were adhered on the back of one of the dress form with Glossy Accents, before a second one cut and layered the same was adhered over it with dimensionals. I had purchased the Paper clips a couple of years ago at Walmart.

The pieces had been dressed up with Silver half Pearls (Recollections, Michaels), May Arts Silver Curling ribbon and thin beige ribbon, Stardust Stickles as well as Baby Bling Rhinestones.


I decided to create a box with a backdrop to show off the bookmarks. I started with a 5″ x 8 1/2″ piece of Kraft cardstock piece. The 5″ side was scored at 3/4″, 2 1/4″, 3″ and 4 1/2″. The 8 1/2″ side was scored at 3/4″ and 7 3/4″.  Before the box was put together, I cut three 3/4″ slids about 1/16″ wide in the top of the box.

A 1 1/2″ x 7″ piece of Natural White cardstock was sponged with Vintage Photo Distress ink. The edges of a 1 3/8″ x 6 7/8″ piece of Sunshine paper were sanded, then sponged with Vintage Photo ink. The patterned paper was stitched to the sponged white cardstock before those were adhered to the box front.

May Arts Ivory Organdy Ribbon was tied around the box. The bow was topped with a button tied on with more silver curling ribbon. A sentiment from Flourishes Feminine Charms was stamped in Tuxedo Black Memento Ink on a piece of Natural White cardstock, cut and embossed with a Petite Oval Nestabilities die. The oval was sponged with Vintage Photo before it was adhered in the center of a piece of black cardstock that had been cut and embossed with a Fancy Tag 2 die.

For the backdrop I cut a piece of Sunshine paper with a Grand Label 23 Nestabilities die. It was stitched to a piece of Natural white cardstock, cut with the same die for more stability.  The edges were first sanded, then lightly sponged with Vintage Photo. The Label was adhered behind the box and decorated with Rhinestones and Finesse Rhinestone swirls.

Here is a video for the bookmarks for the visual learner:

[youtube]https://www.youtube.com/watch?v=cnzBBDIVvIU[/youtube]

Thank you so much for stopping by! Have a wonderful weekend!
Hugs and smiles


Today’s Flourishes sneak peek is for the set called Joy is in the Air. I used one of the images for a tin ornament, which was the Holiday Blitz tutorial on Splitcoaststampers on Tuesday this week.

I stamped the house image in Tuxedo Black Memento Ink on a piece of Neenah Solar White cardstock, that had been cut and embossed with a Classic Circle Nestabilities die. The image was colored with Copic Markers (House: E21, E23, E25, E27, E29    Trees: YG61, YG63, YG67    Door/Beams: E40, E41, E42   Reds: R08, R27, R39   Yellow: Y13, Y15, Y17   Sky: B0000, B000, B00). Stardust Stickles was added over the snowy parts, Glossy Accents over the Christmas lights in the tree and gumdrops next to the door.


The image was adhered in a Tart Tin with dimensionals. SnowTex was adhered on the bottom of the tart tin and glitter was added over it while it was still wet.

A hole was punched in the top of the in and Linen Thread was tied through the hole. A ribbon was tied with May Arts gingham ribbon, topped with a button and tied to the Linen thread.

Make sure to check the Flourishes blog to find links to all the other projects made with this set by other Design Team Members and find out how to win the new release sets.

Thanks so much for stopping by! Have a great day!
Hugs and smiles

Taylored Expressions is hosting a Holiday Hoopla today and I’m excited to be a part of it. You should have arrived here from Sankari‘s blog.  If you didn’t (or if you get lost along the way) you can head back to the beginning at Taylor’s blog for the full list of participants. There are 22 designers showcasing Christmas/Winter/Holiday stamps sets from TE with samples that include all sorts of projects from cards to gifts and beyond!  We want to inspire you to get your holiday crafting and card making into high gear!  Be sure to stick with me all the way to the end of the post to get a coupon code for 25% off holiday stamp sets at Taylored Expressions!


The set I’m showcasing is Tag You’re It. It’s great to create fast Christmas gift tags.

For my sample I wanted to show a quick and easy gift idea with Taylor’s Tag You’re Are It! stamp set. I stamped the Penguin tag in Tuxedo Black Memento Ink on Neenah Solar White cardstock. The image was cut out and colored with Copic Markers (YG61, YG63, R08, R27, R29, YR15).

A sour cream container was created with a 4 1/2″ x 5″ piece of Bo Bunny Blitzen paper. A bow was tied with gingham ribbon with the help of the Bow-Easy. Curling Ribbon was used to tie the tag to the bow and the bow to the container.

Here is a video on how to create a sour cream container for the visual learner:

[youtube]https://www.youtube.com/watch?v=QsgcPQCTe8M[/youtube]

Creating for this hop caused to me to go back and look at some of my previous creations and I wanted to share one of those with you today too.  You can find it here.

Are you getting in the mood to stamp?  Be sure to check out Taylor’s 12 Days of A Handmade Christmas Video Series for lots of easy gift ideas.

Now, who loves a SALE? Use Coupon Code HOOPLA2011 to get 25% off the following holiday stamp sets (released in 2009 and 2010) at Taylored Expressions now through November 2:


Christmas Blessings, Enjoy!, From the Heart, Hangin’ Out –  At the North Pole, Holiday Wonder, Home Sweet Home, Keeping Tabs, Merry Little Cocktail, Penguin Pals, Season’s Sweetings, Sparkle & Cheer, Tag Treats , Tag You’re It, Take Note – Holidays , Wings of Joy, Winter Wonderland.

The coupon code is case sensitive. Follow these instructions to apply the discount to your order:


1. Add the desired stamp sets from the above list to your shopping cart.

2. Insert the coupon code into the Promotional Code box.

3. Click the Update Cart button.  Your discount should now be applied.

4. Proceed to checkout to finalize and submit your order.

Now hop on over to Danielle Lounds for the next sample. Thanks so much for stopping by! Have a wonderful day.
Hugs and smiles

© 2012 fresh & fun Suffusion theme by Sayontan Sinha