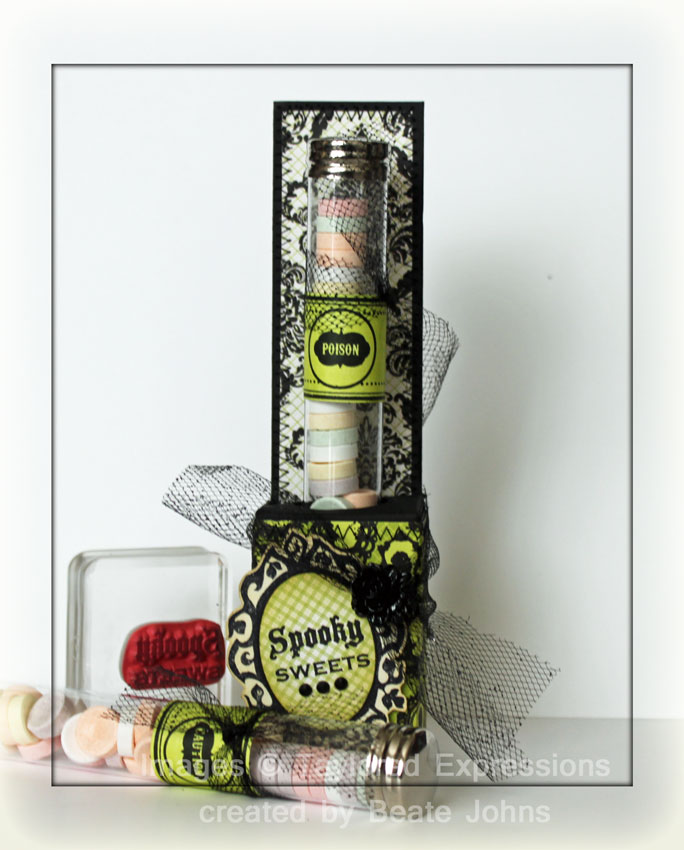
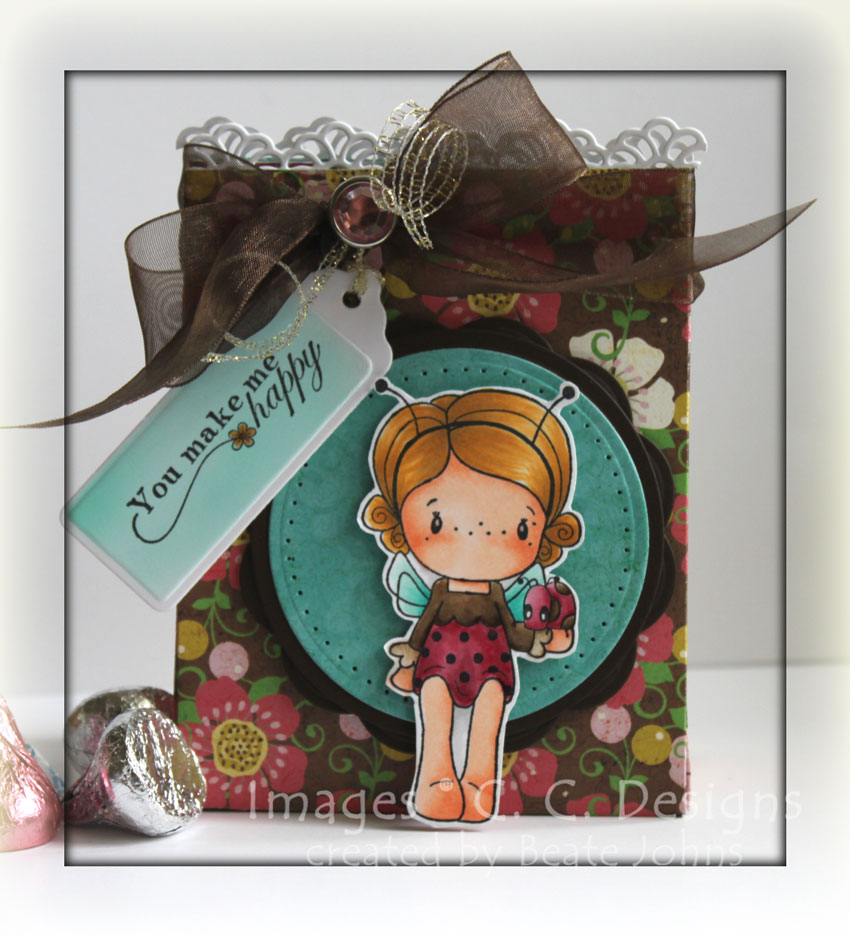
Silke is today’s Timeless Tuesday Challenge hostess and she asked us to create a Halloween project. I thought the Peek-a-boo Treat holder on SCS would work great for that. I used this sample in the video tutorial for the project.

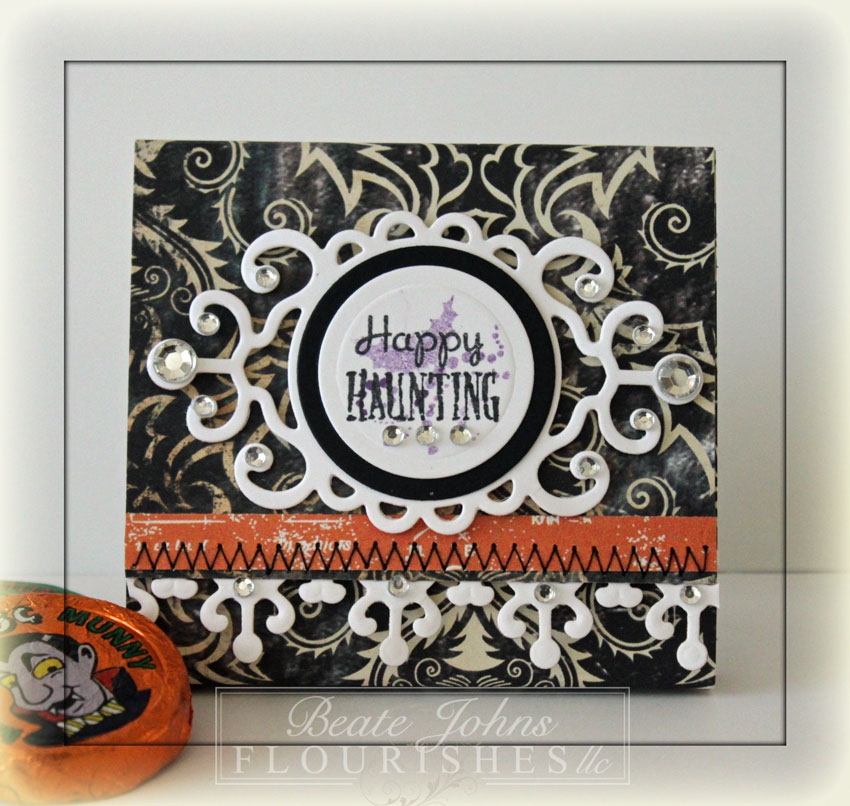
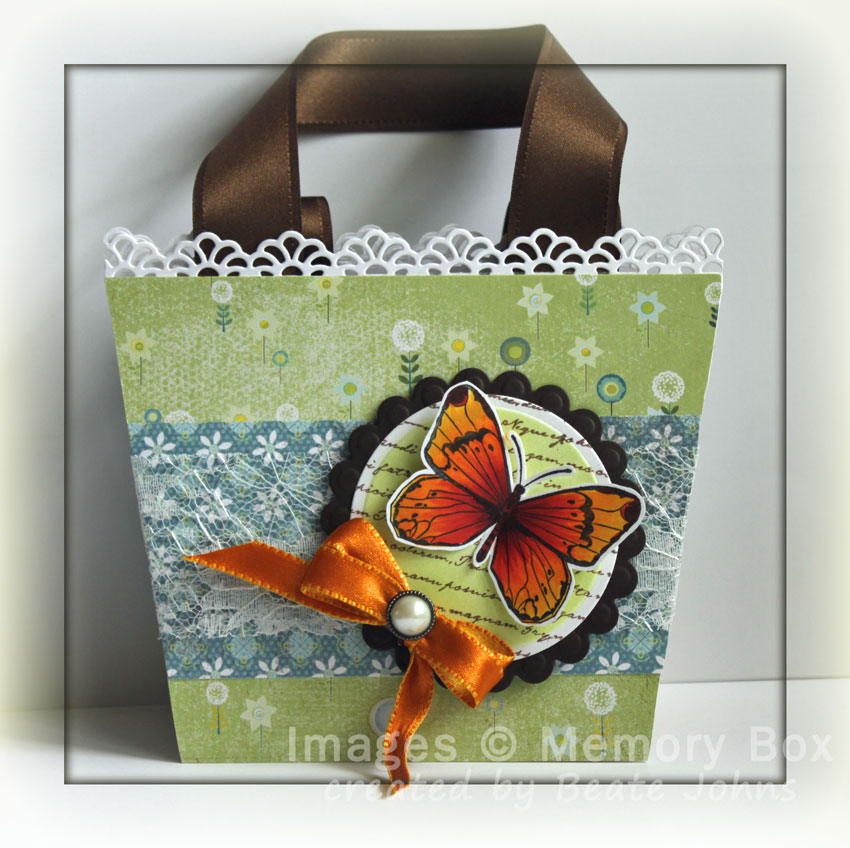
The treat holder base is a 3 1/4″ x 9 1/4″ piece of Authentique Glowing paper. After scoring the paper a 3/8″ x 3 1/4″ strip of orange Echo Park Apothecary Emporium paper was adhered to the front flap. A 3 1/4″ wide Neenah Solar White cardstock strip was cut and embossed with an Ironwork Accent die and stitched underneath the flap.

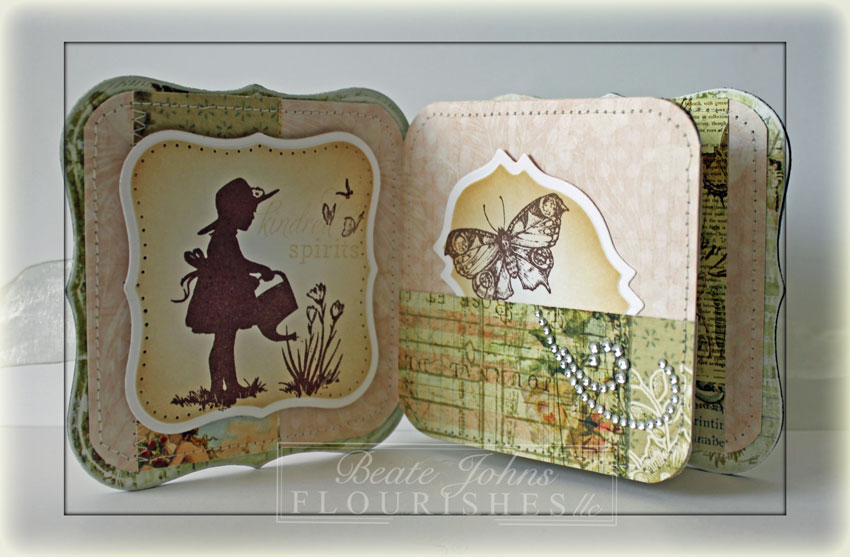
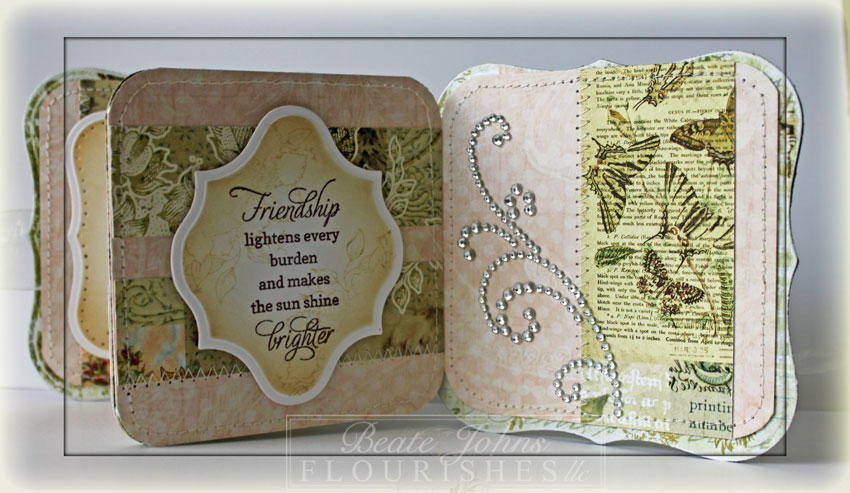
Another Ironwork Accent die was used to cut a frame. It was layered first with a black cardstock circle, then with a slightly smaller white one. Both circles had been cut with Classic Circle Nestabilities dies. The white circle had been stamped with a sentiment from Flourishes Witching You a Happy Halloween in Tuxedo Black Memento ink. A swirl and bat from the same set had been stamped over the sentiment in second generation Dusty Concord Distress ink. The layers were adhered to the treat base and Rhinestone Bling from Want2scrap were added to finish it off.

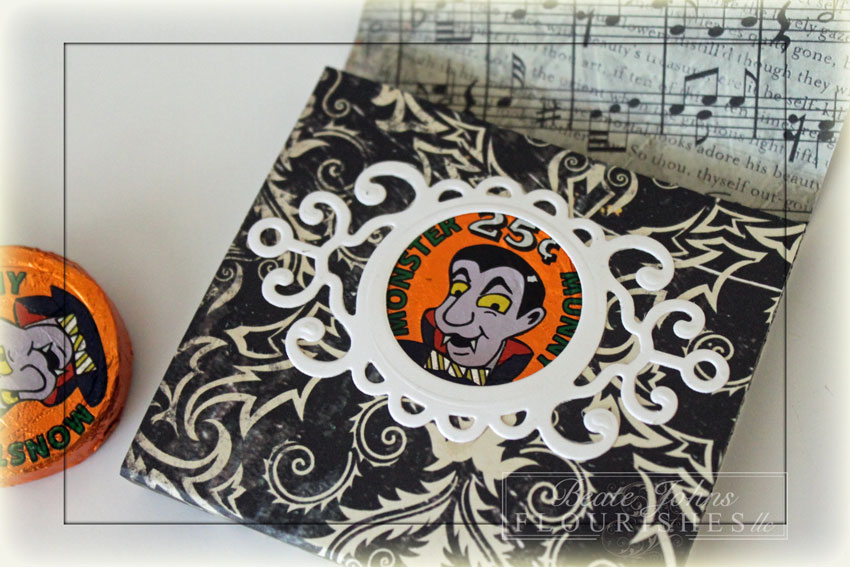
For the inside I cut another Ironwork accent frame. This time though a circle die was centered inside the die to create a frame. A slightly bigger hole was cut with another circle die into the treat holder base to create the window. The frame as well as the candy were adhered with Liquid Glue.

Here is a video for the visual learner:

[youtube]https://www.youtube.com/watch?v=ZeEumGcnb4A[/youtube]

Please check out my fellow Timeless Tuesday Challenge members:

Cindy Haffner
Heather Jensen
Maki Jones
Mona Pendleton
Silke Ledlow
Tammy Hershberger
and
October Guest Designer Rosemary Dennis

Thanks so much for stopping by! I hope you have time to participate in the challenge. Have a wonderful day!
Hugs and smiles

Today’s challenge hostess is Tammy. Her challenge is called Set the Table. Create anything you would use for a dinner table. Center piece, place cards, napkin rings…..

I created a paper cone with little coin envelopes inside. Each envelope has the name of a family member. I figure we give out little pieces of paper and everyone writes something nice, or something they love about each family member. Then we get to read it after dinner.


All the patterned paper used for the cone and envelopes are from the Lost & Found Merry Christmas paper pack.

The paper cone has a trim that had been cut and embossed with one of my new dies from the Lace Doily Accent pack.  The coin envelopes started out as 5″ x 5 1/2″ pieces of paper. The 5″ side was scored at 1 1/2″ and 3 1/2″. The 5 1/2″ side at 1 1/8″ and 4 3/4″. The corner pieces were cut off. The bigger flap was rounded completely, the smaller flap only had the edges rounded.

A Label from the Country Charm Label set was stamped in Rich Cocoa Memento Ink on Classic Cream Neenah cardstock. It was cut out by hand (I like it better then cutting it with the matching die so I can have a little trim of the cardstock showing), sponged first with Antique Linen, then just a touch of Tea Dye Distress ink. A small swirl from the same set was stamped in the lower right and upper left corner in Antique Linen.

For the inside I chose titles from What A Catch and Spring Bouquet. Before the panel was adhered to the envelope with dimensionals, gold organdy ribbon was taped around that envelope. Baby Bling Pearls under the title finish off the envelopes.

I created very simple place cards to match the envelopes. The base was cut and embossed out of Classic Cream cardstock and Label 10 Nestabilities. A second single layer was cut out of the same cardstock and adhered over the base. Patterned paper was cut with one of the Petite Oval Nestabilities, sanded and lightly sponged with Antique Linen. Then a duplicate of the label for the envelope was adhered to the place card to finish it off.

This was a tough challenge for me. I am so NOT good with “Setting the table challenges” and actually had a couple restless nights over it. I hope you have an easier time with this. Check out what the other challenge designers created.

Cindy Haffner
Heather Jensen
Makiko Jones
Silke Ledlow
Tammy Hershberger
Theresa Winslow – September guest Designer

I hope you have time to participate in the challenge! Have a wonderful day!
Hugs and smiles

Today’s tutorial was created by Lisa Somerville. She shows us how to create these darling holders for Test Tubes. What a fun treat idea!!! I had to order me some test tubes right away after receiving the tutorial. Then I went shopping for more Halloween paper, found some glittery tulle and BAM…I was ready. 🙂

A label from Taylored Expressions Fright Night Favors was stamped in Jet Black Archival ink on a piece of Pink Paislee’s Phantom paper. The spider web from Toils & Trouble was stamped over the sides of the label with Shabby Shutter Distress ink. The caution/poison stamps are also from the Toils & Trouble set and were stamped in the center of the labels with Jet Black ink.

The labels were cut out, run through the Xyron machine and adhered to the test tubes. A small strip of glittery black tulle was tied above the labels to finish off the tubes.

The treat holder was created out of black cardstock. I started with a 4″ x 12″ piece of cardstock (instead of the 4 x 11″ as in the tutorial) because Taylor’s Test Tubes were a bit too long for the holder. The rest was done the same as the tutorial. I used a Classic Circle Nestabilities to cut the hole for the tube for a perfect opening (3/4″ circle punch was too small, 1″ too wide).

The mirror from Toil & Trouble was stamped in Jet Black Archival ink on Neenah Solar White cardstock, cut out and sponged with Antique Linen. Then it was stamped again on Phantom paper. The inner oval was cut out, a sentiment from Fright Night Favor was stamped in it’s center and the edges were sponged with Shabby Shuttter. The oval was adhered to the main mirror image and three Baby Bling Black Rhinestones were added to the bottom.

More tulle was tied around the holder and topped with a Halloween brad (last year Michaels). The sentiment panel was adhered next to it.

I hope you guys get to try this tutorial out. It makes the cutest treats. Thanks so much for stopping by! Have a wonderful day!
Hugs and smiles

Today’s Timeless Tuesday Challenge is to create a card with a sentiment as a focal point. I hadn’t made an Accordion Card in AGES, so I combined this challenge with a remake of the old Accordion Card tutorial.

For my covers I used the largest of the Nestaboard Label 1 pieces. Pink Paislee Butterfly Garden paper was cut with the largest Label 1 Nestabilities die. I ran the patterned paper pieces were run through my Xyron and adhered to the Nestaboard pieces. Next the paper was slightly sanded for a softer look.

The largest of silver Rhinestones Label 1 Nestabling was adhered to the front cover. The card was tied shut with May Arts ivory Organdy Ribbon.

A piece of Neenah Solar White cardstock was cut and embossed with Nestabilities Label 18. A sentiment from Butterflies & Blossoms was stamped in it’s center with Rich Cocoa Memento ink. Flowers from the same set were stamped in Antique Linen partly over the label. The inside was sponged first with Antique Linen and then with Vintage Photo Distress ink. The label was adhered over the ribbon with dimensionals.

I didn’t have the right color green Rhinestones to match the green on the paper so I colored silver Rhinestones and a partial Silver Rhinestone swirl with Copic Marker YG96. On top of the rhinestone swirl I added a tissue flower cut with the smallest of the Eyelet Circle Nestabilities die. The flower was stained with a mix of water, Tattered Rose and Fired Brick Distress Reinker plus a tiny big of Perfect Pearls. Once it tried I added an orange Rhinestone to finish it off.

The inside pages were also created out of Pink Paislee Butterfly Garden paper. The corners of the papers were rounded with my Corner Chomper. The first page was decorated with a piece of Neenah Solar White paper cut and embossed with the 3rd biggest Label 1 Nestabilities die. The image is from Flourishes newly released Sweet Days of Summer stamp set. It was stamped in Rich Cocoa Memento ink.

The label was sponged with Antique Linen and Vintage Photo distress ink and the edges were paper pierced. Kindred Spirits, a sentiment from the same set, was stamped in Antique Linen ink behind the image. The layer was adhered to the page with dimennsionals.

The second page includes a pocket on the bottom. A small tag was cut with a Label 18 Nestabilities die out of white cardstock. A butterfly from Butterfly and Blossoms was stamped in Rich Cocoa Memento Ink . The label was sponged with Antique Linen and Vintage Photo ink before it was slipped in the pocket. Part of a Silver Finesse Swirl (want2scrap) as adhered to the pocket.

The third page holds a label cut and embossed with a Label 13 Nestabilities die. A sentiment from Sweet Days of Summer was stamped in it’s center. Like the other pieces it was sponged. Flowers from Butterflies & Blossoms set were stamped over the label with Antique Linen. The label was adhered to the page with dimensionals.

The last page was decorated with the other half of the swirl from the pocket page.

Please check out my fellow Timeless Tuesday Challenge Team members:
Betty Wright
Cindy Haffner
Heather Jensen
Makiko Jones
Silke Ledlow
Tammy Hershberger
Allison Cope – August Guest Designer

I hope you have time to participate in this challenge! Thanks so much for stopping by! Have a wonderful day!
Hugs and smiles

Copic Certification coming to town!
Lori Craig and Jennifer Balcer will be teaching a Copic Certification class here in Oklahoma City on the 26th of August. I will be there as well. It will be fun! I hope to see some of you there!!!

I created this Genie bag back in February for a class at my local Scrapbook store.  I used Memory Box papers to cover a 4 1/4″ x 5 1/2″ cardstock piece. The cardstock was cut 3/4″ from one end to create the slanted look. May Arts lace was adhered over the horizontal strip.

Memory Box Circle Word Background was stamped in Rich Cocoa Memento Ink on Neenah Solar White cardstock and cut embossed with Circle Nestabilities die. The inner part of the circle was airbrushed with Copic Marker YG01. It was adhered to a scallop circle cut out of Neenah Canyon Brown cardstock.

Memory Box Coco Bean Butterfly was stamped in Tuxedo Black Memento Ink on Solar White cardstock and colored with Copic Markers (Y15, Y17, Y38, R05, R08, E09), cut out and adhered with Scor-Tape and dimensionals to the center of the circular layers. A bow created out of May Arts ribbon was topped with a Recollection brad and adhered to the lower left to the circle.

Two 5 1/2″ long strips of white cardstock were cut with Faux Crochet Die-namics die and adhered to the top of the cardstock/paper layers.  May Arts Brown Satin ribbon was adhered about 1″ in on each end of the paper layers to form a handle.

The cardstock pieces were adhered to a small lunch bag that had been cut down to a 4″ square to create a purse treat bag.

Thanks so much for stopping by! Have a wonderful day!
Hugs and smiles


I used Sweet Ladybug Nora image for a One Sheet Box that I created for a class at my LSS back in March. The image was stamped with Tuxedo Black Memento Ink on Neenah Solar White cardstock . It was colored with Copic Markers and cut out.

The box base was created out of Echo Park Life is Good paper. Two strips of white paper were cut with Faux Crochet Die-namics border. The pieces were adhered to the top of the front and back of the bag. It was tied shut with brown Organdy Ribbon. Gold Curling Ribbon was tied around the bow and topped with a Pink Rhinestone brad from Recollections.

The sentiment is also from C. C. Designs and it was stamped in Tuxedo Black Memento Ink on Neenah Solar White cardstock and cut and embossed with the retired Five Tag die from Spellbinders. The tag was airbrushed with Copic Marker BG11.

Thanks so much for stopping by! Have a wonderful day!
Hugs and smiles

Today’s tutorial on Splitcoaststampers is written by the sweet and talented Tosh Leyendekker. She shows us how to create loopy flowers out of felt strips.

The finished flower is around 3″ big. I cut and embossed leaves out of MFT’s Sour Apple Cardstock with on of Spellbinders new Foliage dies.  The leaves were sponged with Shabby Shutter Distress ink before I adhered them under my Loopy Flower. I placed a retired Pink Paislee brad in the center of the flower.

The flower was placed on a pizza box I had sitting on my shelf unfinished. Not sure why I never finished it. The pizza box base is was created out of Kraft cardstock, the patterned paper used is from October Afternoon’s Ducks in a Row line.

Here is a video for the visual learner:

[youtube]https://www.youtube.com/watch?v=EKdtXNYeKOA[/youtube]

Thanks so much for stopping by! I hope you have a wonderful week!
Hugs and smiles


Remember the card I made for the Inspiration Emporium challenge last month? I created a tutorial for the Diamond fold card for Splitcoast and it’s being published today. My sample is the same as the Fragment card, except for without the fragments. Instead of  those, I paper pierced the edges of the square.

I chose another image from Flourishes Spring is Sprung set. I just LOVE that set. I stamped the bird nest in Tuxedo Black Memento Ink on Neenah Solar White cardstock and colored it with Copic Markers (Nest: E41, E42, E43, E44   Eggs: BG000, BG01, BG02   Leaves: YG01, YG03, YG17   Branch: E23, E25, E27, E29   Sky: B12, B000, B0000).

he image layers were adhered to a Diamond Fold card base created out of a 4″ x 12″ piece of October Afternoon Weathervane paper. I created a tutorial for it, but that won’t be published until the end of May. It’s pretty easy though. Score your strip at 2″ and 10″. Mark the center of the strip on each side and fold the paper down and back up.

The 2″ x 4″ panels were stitched to a 2 1/8″ x 4 1/4″ piece of black cardstock, then adhered to a piece of Kraft cardstock, cut and embossed with a Curved Rectangle Nestabilities dies. A doily was cut and half and a half was adhered on each panel.

A sentiment from the Spring is Sprung was stamped in Tuxedo Black Memento Ink on Solar White cardstock that had been cut and embossed with the retired Five in one Tag die from Spellbinders. The center of the tag was colored with Copic Marker BG000. The tag attached to the card with the White May Arts Organdy Ribbon that was used to tie the card shut.

Here is a video for the visual learner:

[youtube]https://www.youtube.com/watch?v=QzPyoUja4DI[/youtube]

Thanks so much for stopping by! Have a wonderful day.
Hugs and smiles

Here is the design cube that I altered for the Daily Window review. I really like the black texture on the cube. It makes black and white photos look even better and really showcases your favorite cards well.  The cube comes with four super strong magnets (I am not kidding. I have never owned stronger magnets). I used one to secure my photo on the cube wall.

I added some lime green pebbles and artificial flowers I bought at Michaels to dress it up and two glitter swirls ( I don’t remember what company they are from, sorry!). I used Glossy Accents to adhere the pebbles, swirls and flowers to the cube.

That’s it! A short and sweet post today without Copics, stamping or Nestabilities. Just a picture of my sweet man and my little girl inside a cool cube!

Have a wonderful day! Hugs and smiles

Today’s tutorial on Splitcoast is for the Side Step card. It’s a variation of the Stair Step fold card.

My card base was created out of Canyon Brown Neenah cardstock. The grass was cut with the Grass Die-namic die out of Pebbles patterned paper.  The rain pattern paper is from Echo Park’s Springtime patterned paper.

The images are all from Flourishes new set April Showers. The images were stamped on Solar White cardstock in Tuxedo Black Memento Ink and colored with Copic Markers (Sun: Y11, Y13, Y15    Cloud: N1, B0000, Bo00    Bucket: N0, N1, N3, N4, N5     Tulips: YR12, YR15, Y09, Y21, Y23, YR12, YG01, YG03, YG17    Umbrella: YG00, YG01, YG03, R08, R29, E23, E25, YR12, YR15, Y11, Y13, Y15, B000).

The boots were stamped on Echo Park Playground paper, colored with Copic Markers (YR00, YR12, YR15, Rim: YR09, R08, R29).

Here is a video for the visual learner:

[youtube]https://www.youtube.com/watch?v=PCvVJD4kg9U[/youtube]

Thanks so much for stopping by! Have a wonderful day.
Hugs and smiles

© 2012 fresh & fun Suffusion theme by Sayontan Sinha