I didn’t stamp much this weekend. I am trying to learn the Adobe Premiere Elements program so that I can edit my video tutorials better. Working with videos sure takes a LOT of time. At least right now for me it does. I am sure it will be better once I know the program better.  I do have something to share though. Remember when I said I visited Mary Brown?

Here is the other card she prepped for me and her downline/sideline to do! I tell you, she is one of the sweetest people.

kindandcaringraspberrymaryb.jpg

I think it’s beautiful and it shows of this new Level 3 hostess set perfectly.

I really like how this card came together. Maybe it has something to do with all the brown colors on it? LOL

sc238.jpg 

I made it for the sketch challenge on SCS. I couldn’t help myself and changed the sketch a bit. But just a bit. I exchanged the squares for the shape from the Matchbox Die template. I love that shape.

floressuavessepiasc238.jpg

Because of the gorgeous shape of that die cut, I needed to find an elegant image. I thought the tulip from the stamp set Flores Suaves would be perfect for it.

My card base is a 5 1/2″ x 8 1/2″ piece of Textured Soft Suede Cardstock folded in half. The textured strip of Very Vanilla cardstock measures 2″ x 5 1/2″ and was sponged with Soft Suede. It was layered on a slightly bigger strip of sponged Chocolate Chip. The bottom of that strip had been punched with the Eyelet Border punch. The top edge of the Vanilla strip was paper pierced.

I cut out three of these shapes with the Matchbox Die Template out of Soft Suede cardstock. With help of the Stamp-a-majic I lined up the outline shape from Great friend in Soft Suede on the cut outs and sponged the edges. Next I stamped the shape three times in Chocolate Chip on Very Vanilla cardstock. I masked the shape off with a reverse mask and stamped first the tulip (then masked that one as well) and then the script from Flores Suaves in the shapes. I cut those out and sponged the edges lightly with Soft Suedes. The vanilla layers were adhered over the Soft Suede die cuts.

Next I stamped the flower again three times in Basic Brown on Very Vanilla, colored them with aqua painter and Soft Suede as well as with a hint of Crushed Curry, cut them out and mounted them on my layered die cuts.  Soft Suede dotted Ribbon was tied to the bottom of the Vanilla strip and the three die cuts were mounted over it with dimensionals.

The sentiment is from Teeny, Tiny Wishes. It was stamped in Chocolate Chip on Very Vanilla cardstock and punched out with the small oval punch. I sponged the edges with Soft Suede and stamped the tulip with second and third generation Soft Suede over it. To finish the card off I added three 5/16″ vanilla brads on the left hand side over the strip.

floressuavessepiainsidebeat.jpg

The inside was layered with a 4″ x 5 1/4″ piece of Chocolate chip cardstock layered with a 1/4″ smaller piece of Very Vanilla cardstock. The Vanilla layer was covered with a punched piece of scrap paper and sponged with Soft Suede ink. Then I added the script and Tulip from Flores Suaves over the sponged layer.

I made this card for a while back for a challenge during VSN. I didn’t even know there was a fruit called Dragon fruit. It looks like Stracciatella Icecream (I think that’s a German flavor…not sure).

These colors are so bright together….so I thought while I am already out of my comfort zone, while not go a bit more outside and use messy stuff. Glitter and beads. So here is what came out of that ….

partyheartyaugvsnbeate.jpg

The card base is a 4 1/4″ x 8 1/2″ piece of Old Olive cardstock, followed by a 4″ square in Basic Black.

Next is a 3 3/4″ square of Whisper White that was dry embossed with the Swiss Dot Cuttlebug Folder.

I added a 1 3/4″ wide strip of Melon Mambo Pattern Designer Paper to the white layer and tied Old Olive 5/8″ wide ribbon around the top edge of it.

I inked the cupcake from Party Hearty with Old Olive, Pretty in Pink and Melon Mambo markers, stamped it twice on Whisper White cardstock and cut them out. Both were adhered to a white square with dimensionals. Glitter and Microbeads were added to the cupcake top.

Both the Melon Mambo and the Black scallop squares were cut with Square Nestabilities. I added more glitter over the Mambo frame. The sentiment was stamped in Black Stazon, punched out with the Window word punch and first layered on a small oval punchout, then on a black large oval.

partyheartyaugvsninside.jpg

The card inside is layered with a 4″ Basic Black square followed by a 1/4″ smaller piece of Whisper White.

That was layered by a 1 1/4″ x 3 3/4″ piece of Melon Mambo Pattern Designer paper. A small strip of Basic Black was punched with the Eyelet Border punch and adhered under the designer paper layer.

The present stamp is also from Party Hearty. It was stamped in Old Olive on Whisper White and punched out with the 3/4″ circle punch. It was adhered over a 1″ black circle on the bottom left.

I am loving Laurie’s sketch. Right now I am stuck on Soft Suede. I grab for it for every card I make. I am sure I will get a different favorite soon (maybe). LOL

lejardinbotaniquewsc90beat.jpg

The card base is a 4 1/4″ x 8 1/2″  piece of Chocolate chip cardstock folded in half.

It was topped with a 4″ square of Kraft cardstock.

Next is a 3 3/4″ square of Thoroughly Modern Designer Paper (I already ordered my second pack! It’s definite my favorite new DP so far).

The textured Chocolate chip cardstock pieces on the left measure 1 5/8″ x 1 7/8″. They were topped with 1 1/2″ x 1 3/4″ piece of Thoroughly Modern Designer paper that had been stamped with the Background Medallion in Melon Mambo. The left hand side of the Mambo layer was paper pierced. White Organza Ribbon was tied around it.

The sentiment was is from Fifth Avenue Floral and was stamped in Chocolate Chip on Shimmery White cardstock. it was cut out with Oval Nestabilities. The flower from Le Jardin Botanique was stamped in second and third generation Soft Suede over the sentiment on the left. The oval was layered on a slightly bigger scallop oval, cut with Nestabilities out of Chocolate chip.

I punched a large oval out of a leftover piece of the Medallion stamped designer paper, cut it in half, layered it on textured chocolate chip cardstock and taped it to the lower right of the card front. To finish it off, I added one of those gorgeous 5/8″ white bradsover the punchout.

lejardinbotaniquewsc90insid.jpg

For the inside I used a 4″ Kraft cardstock square.

The flower from Le Jardin Botanique was again stamped in second and third generation Soft Suede ink on the left hand side.

For the strip I cut a 7/8″ x 4″ piece of Thoroughly Modern Designer paper, stamped the Medallion again in Melon Mambo and layered that on a 1/4″ wider strip of Textured Chocolate Chip cardstock. The top border was paper pierced.

To add a splash of white, I added a small strip of Shimmery White cardstock that was punched with the Eyelet Border punch (I can’t help myself. I love the look of that punch!) and another 5/8″ white brad.

 I  hope you have time to participate in the challenge this weekend. I want to see what you do with this sketch!

Have a great weekend. Hugs and smiles

I changed my blog template. What do you think?  I had the other one since I started the blog and I was getting a bit tired of it.

I think eventually I have to look into letting someone create one for me. I am thinking Chocolate with vanilla swirls or some kind of medallion…something like most of my cards.

I had a busy day. After going to check out a private school for my 5th and 8th grader (we checked out the public school they would have to go to and decided to send them to a private school. First time ever for us. We usually move to where the best rated schools are. That wasn’t possible this time since it was mandatory that we live on base.) , I went home, worked for about an hour. Then headed out to the orthodontist. Poor Reba got spacers in today. Then the fun part.

Amy Saucer came over and we stamped a bit together. My first SCS visitor in Ohio! I was excited and had a blast.

amysaucerme.jpg

In the back you can see the cabinets that hold all my stamping supplies.

I added Manhattan Flowers Decor Elements to them. I really like the look of them.

tracyporterpitcheric189.jpg

Last Saturday’s inspiration Challenge was to pick an item from Tracy Porter’swebsite as inspiration.

I picked this pitcher, used the colors and even the striped border on the top.

But then I covered most of it up later on…oh well.

pendantparkic189hellobeate.jpg

I like the color combo, but I am not sure about the card.

The base is a 4 1/4″ x 8 1/2″ piece of Old Olive cardstock folded in half.

Next is a 1/4″ smaller piece of sponged and distressed Soft Suede cardstock, followed by a 3 3/4″ x 5″ piece of Dusty Durango cardstock.

I created a striped strip with different colored cardstock strips from Real Red, Crushed Cardstock, Soft Suede, Dusty Durango and Old Olive strips, taped it across my Durango layer and tied ,my new favorite ribbon ,Red Polka Dot Ribbon around the strip.

I stamped the beautiful tree/bus stamp from Pendant Parkin Old Olive on Very Vanilla Cardstock, cut it out with Nestabilities Labels and sponged the edges in Crushed Curry. Next is a layer of the next size up Label from Nestabilities in Soft Suede with sponged edges.

Hello is the sentiment from the same set. It’s stamped in Soft Suede and was punched out with the small oval punch. Next I stamped the bench in second generation Crushed Curry over the sentiment, making sure the two squirrels would be on the oval. I sponged the edges with Crushed Curry and taped it on a large oval punchout out of textured Real Red cardstock. I added a clear sticker from the Build-a-Brad over the squirrels.

On the top left, I added two sponged 1/2″ circles out of Crushed Curry and placed 5/16″ chocolate brads over them.

pendantparkic189helloinside.jpg

The inside is pretty simple.

A sponged and distressed 4″ square of Soft Suede cardstock was adhered to inside.

Topping that is a 3 3/4″ piece of distressed Dusty Durango cardstock. The bush/tree image was stamped in the same color on the top left.

Today’s tutorial on SCS is written by Stephanie Luman and is for the Flower Pot Pocket card.

It’s easy and oh so cute! If you haven’t tried it out, what are you waiting for?

forallyoudoflowerpotbeate.jpg

My Flower Pot base is Soft Suede cardstock.

The flap edge was punched with the Eyelet Border Punch and the entire flap was sponged with Soft Suede ink.

The lower part of the Pot is covered with Thoroughly Modern Designer Paper. Polka Dot Red Ribbon was tied around the flap.

 The sentiment is from For All You Doand is stamped with Chocolate Chip on Very Vanilla cardstock. It was punched out with the small oval punch, layered first on a sponged Chocolate Chip large oval punch-out, then on a Bermuda Bay Scallop Oval. I underlined the sentiment with a paper pierced row and added three little flowers. They had been stamped in Crushed Curry and Real Red, cut out and topped with a tiny Chocolate Chip Circle I had punched out with the Double circle punch (retired).

forallyoudoflowerpotinsideb.jpg

The flowers were punched with the Embosslit Cherry Blossom, the branches with the die cut Little Leaves.

I punched two for each flower, cut the center out, sponged both of them and added 5/16″ brads in each center.  The branches were taped on with Scor-Tape, the flowers with dimensionals.

The first layer of the insert is a 2 1/2″ x 4 1/2″ piece of Textured Real Red cardstock, layered with a 1/4″ smaller piece of Very Vanilla. A 7/8″ x 2 1/4″ piece of Thoroughly Modern DP was added to the bottom of the insert to tie it in with the front.

The sentiment is also from For All You Doand is stamped in Chocolate Chip. The buttefrly from the same set was stamped in second generation Crushed Curry over it.

P.S.: If you want to see/hear my first attempt at a video tutorial for SCS, check it out here. I was very nervous and you can hear it when I talk. I hope I will get better with the following tutorials.

 [youtube]https://www.youtube.com/watch?v=ir-nDyJoGvE[/youtube].

Remember this card?punchesthreekiwiboybeate.jpg

I don’t know why, but I still really like this card (insert a big sigh…because I miss Kiwi Kiss BAD!).

I needed a few thank you cards and decided to case this card with the new In colors.

The hardest part was to decide what stamp set to use.

forallyoudooldcasebeate.jpg

I love the new set For All You Do and decided the reverse square image would work great for my wide oval.

The Bermuda Bay card base measures 3 3/4″ x 6 3/4″.

It was scored at 3 3/4″. The side edge of the front was punched with the scallop border punch.

forallyoudooldcasemessagebe.jpg

I stamped the floral square twice in Melon Mambo on Shimmery White cardstock and punched it out with the Wide Oval Punch. The sentiment was stamped in Soft Suede on Shimmery White and was punched out with the small oval punch. I taped the small on the wide oval and paper pierced a line underneath the sentiment.

The small flower from For All You Do was inked with Bermuda Bay (with my marker, since my ink pad has a really washed out look. I can’t wait to get my new pad!!!), cut out and taped above the sentiment. A small clear rhinestone brad finished the sentiment panel off.

I punched a hole with my Crop-A-Dile on the spine of the card as well as further inside the card front. Through both holes I tied White Taffeta Ribbon. The sentiment oval was taped over the ribbon hole with dimensionals.

I added two 1/4″ Melon Mambo circles on the top left of the card and placed small clear Rhinestone brads over each circle.

forallyoudooldcaseinsidebeate.jpg

Here is a look inside the card.

The Melon Mambo piece measures 2 1/2″ x 3 3/4″.  I stamped the small flower as a row on the bottom of that piece.

Next is a 1″ x 3 3/4″ strip of Shimmery White cardstock. I taped it behind the Melon Mambo cardstock and let about 1/4″ of the strip show.

The Thoroughly Modern Designer Paper ( I love this new paper pack!) strip measures 1″ x 3 3/4″. I taped that down first. Then taped the Melon/Shimmery piece over it.

Have a wonderful day! Hugs and smiles

Here is another card I made for the VSN challenge. This was my entry for the Swiss Cheese Challenge. You were to use your hole punch in a creative way. I have to say mine wasn’t THAT creative. I punched out circles with the Crop-a-dile to add in the center of one of my brads.

medallionfriendwsc89beate.jpg

I used the sketch from this weekend again and the same colors that I had used in my Friday card. In fact, I had started this card along with my sketch challenge sample, simply hadn’t finished it until I saw the VSN challenge.

This time though my card base is a 6″ square of textured Chocolate Chip cardstock folded in half.

Next is a 2 3/4″ x 5 3/4″ piece of Very Vanilla. All four corners were punched with the ticket corner. It was followed by a 3/16″ smaller piece of textured Melon Mambo.

The Melon Mambo layer had been stamped with the Medallion background in the same color. Again the corners were punched with the ticket corner punch. The bottom half of that layer was covered with Soft Suede Pattern Designer Paper. Where both layers met, I added a slim strip of Very Vanilla. The bottom edge of that strip was punched with the Eyelet Border Punch. 5/8″ wide Chocolate Chip Grosgrain Ribbon was tied around it.

The Chocolate Chip rectangular layer measures 2 1/2″ x 3″. It is followed by a 1/4″ smaller piece of Soft Suede. All four corners were punched again with the ticket corner punch and the Medallion was stamped over the Suede piece with Soft Suede ink.

The bird image is from Friends 24-7, another favorite set of mine. It was stamped in Chocolate Chip on Very Vanilla, cut out with Oval Nestabilities and layered on a Melon Mambo scallop oval, cut with Nestabilities as well.

The brads are from the Vanilla Hodgepodge kit. The centers were punched out of Chocolate Chip cardstock with my Crop-a-dile and adhered to the brad with Crystal Effect.

 medallionfriendinsidewsc89.jpg

The inside of this card is even more simple then my usual cards.

It WAS VSN and I was in a hurry.

I cut a 2 3/4″ x 5 3/4″ piece of Very Vanilla cardstock, punched all four corners with the ticket corner punch and stamped the Medallion in second generation Soft Suede over the left hand side.

Next I stamped the bird in Chocolate Chip over the Medallion and paper pierced a row on the bottom or that layer.

Yesterday was VSN over on SCS. I actually participated in three of the four challenges. It felt great to create so much in one day. On one sample I even went above and beyond and used glitter and microbeads. I usually don’t use it much…..I don’t like messes. Then my hubby came by and commented on me being sparkly …..so I rubbed my hands all over his stubbly face. He is still sparkly this morning. What a great start of a weekend!!! 🙂

It’s cold and cloudy here. I was laying in bed reading the new Nora Roberts book until noon. I love reading in bed! That’s why my blog entry is a bit late. I love lazy Saturday mornings!

greatfriendaugvsnpot3beate.jpg

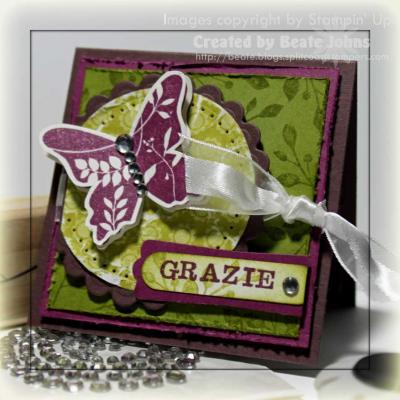
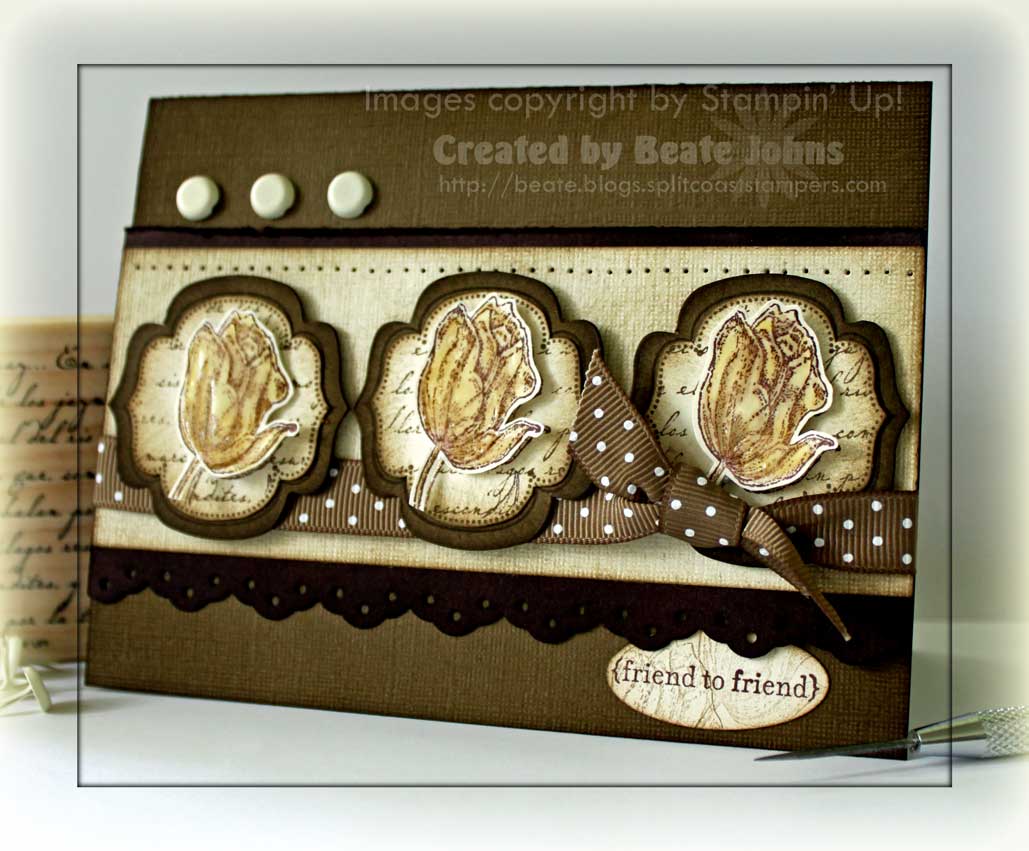
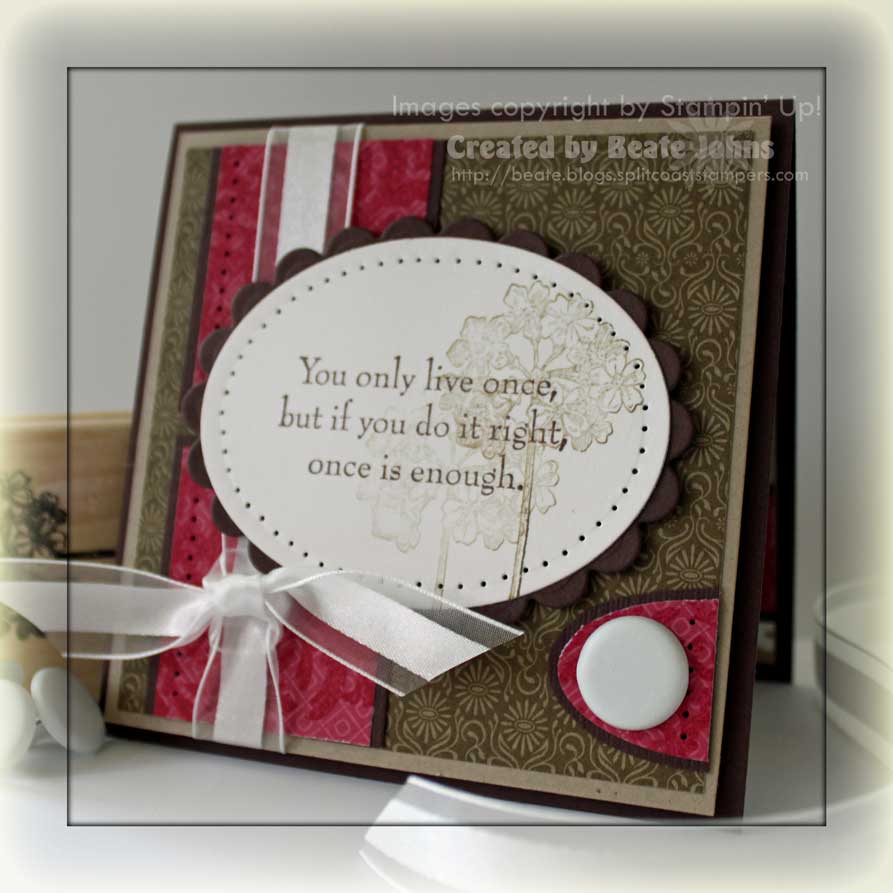
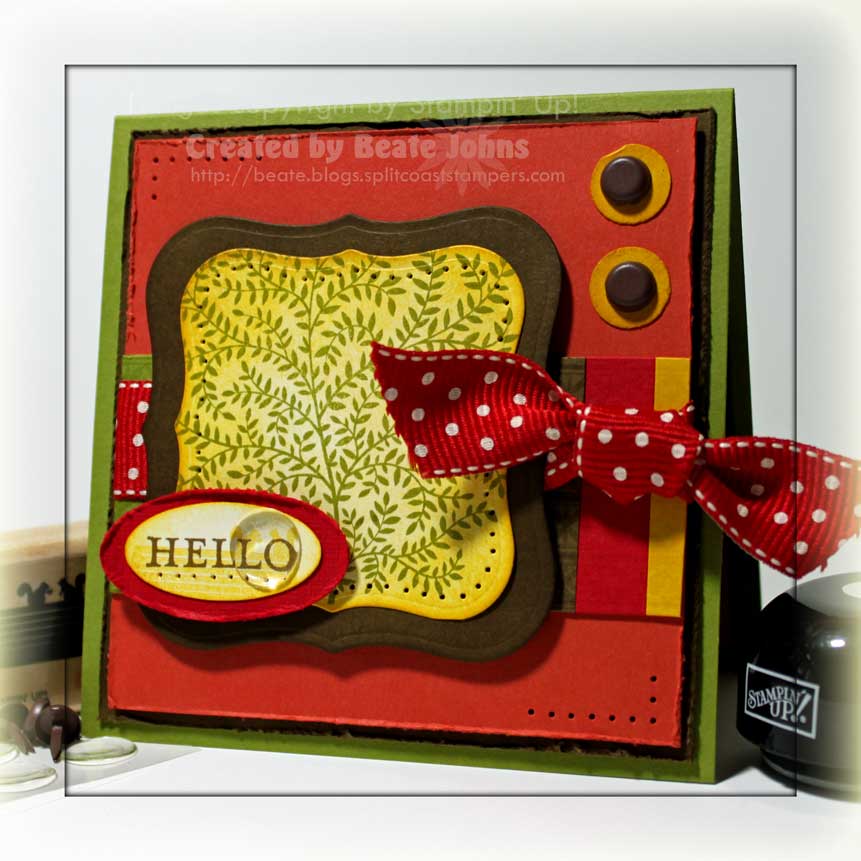
The first card I will share with you is for the Wilted Lettuce challenge.

You had to use only salad colors and had to incorporate crinkled cardstock and an italian sentiment.

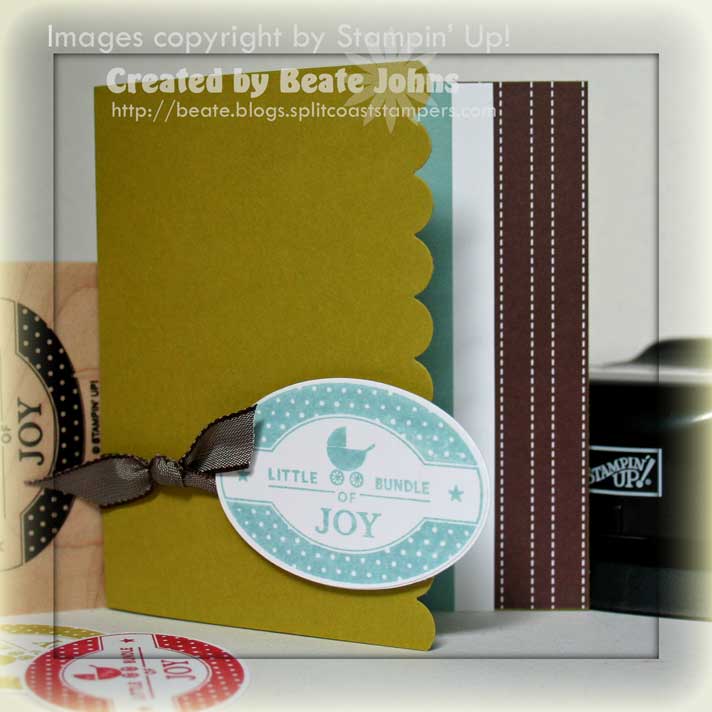
I figured when lettuce goes bad, it turns brown and chose Rich Razzleberry, Chocolate Chip and Old Olive as my colors.

I knew I wanted to make a 3″ x 3″ card. I love this little size and hadn’t made one of those since coming out of my stamping hybernation. I started with a 3″ x 6″ piece of Chocolate Chip cardstock folded in half.  Next I distressed the edge of a 2 3/4″ square of Rich Razzleberry. The next layer is a 1/4″ smaller piece of Old Olive. The edges were stamped with the branch stamp from Great Friend, distressed with the cutter kit and sponged in Old Olive.

The designer paper is from the retired Hawaii Papaya paper pack. It was cut with Circle Nestabilities, crumpled and then taped on a slightly bigger scallop Chocolate Chip circle. I sanded over the paper to make the crinkles stand out more,  cut one side off and paper pierced the remaining round edge. Before adhering the round layers to the Razzleberry/Olive layers with dimensionals, I tied White Organza ribbon around the square layers.

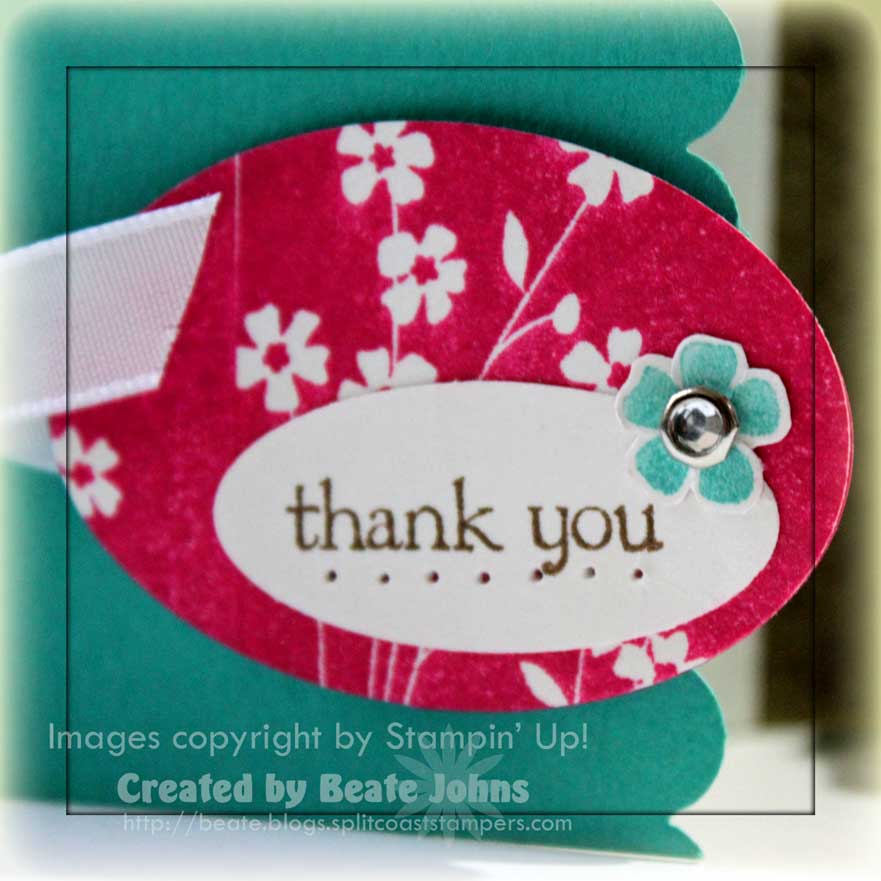
I stamped the butterfly from Great Friend twice in Rich Razzleberry on Shimmery White cardstock, cut them out with the paper snips and adhered one on top of the other with Sticky Strip under it’s body and a stack of two dimensionals under each wing. Kaiser clear Rhinestones were added to the body of the butterfly to finish him off.

The sentiment was stamped with the retired Rough Edge Alphabet (I really need to get the current Calendar Alpha set) in Rich Razzleberry on Shimmery White cardstock. It was punched out with the Window Word punch. The branch stamp was stamped twice in second generation Old Olive and the edges were sponged. It was layered on a Rich Razzleberry Modern Label Punch-out. The right edge was cut off and it was taped the the card. Last I added another rhinestone to tie them in to the rest of the card.

greatfriendlettuceaugvsnpot.jpg

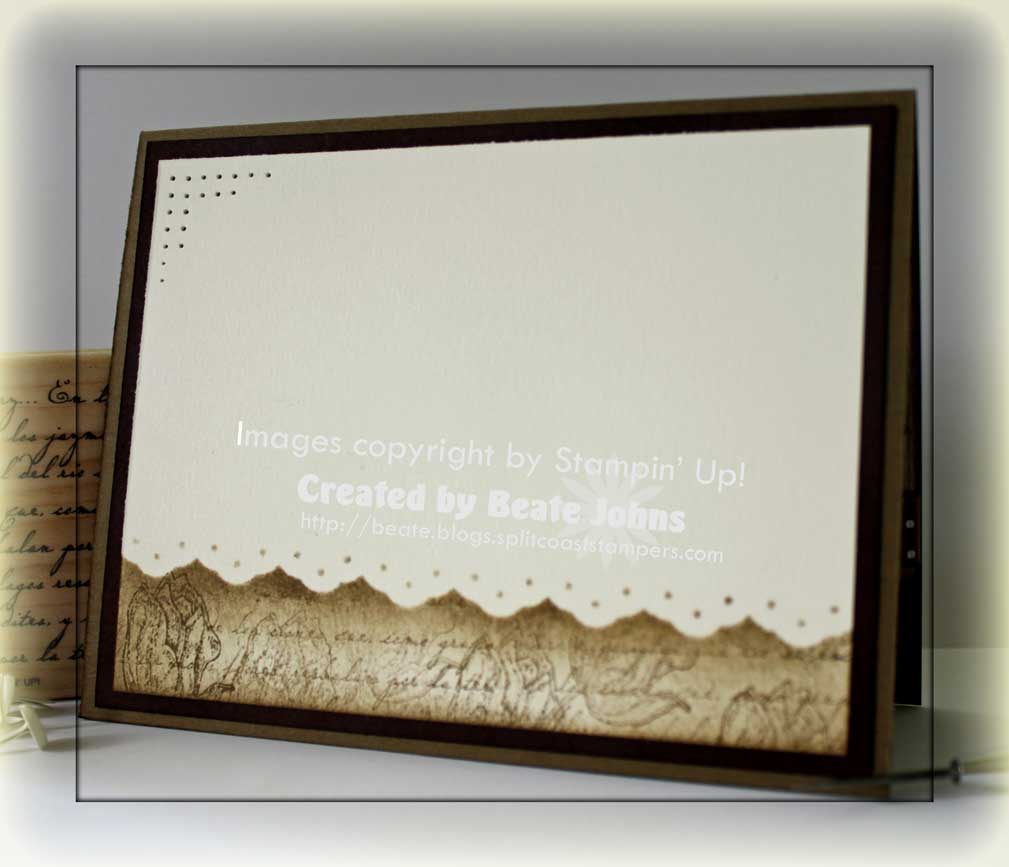
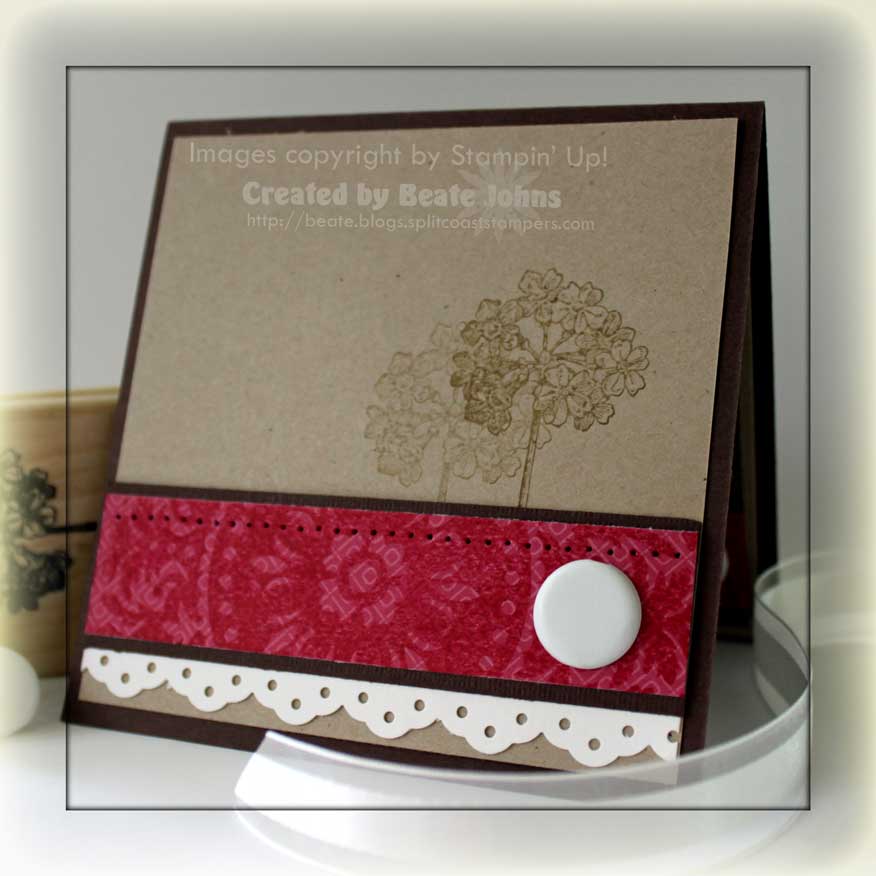
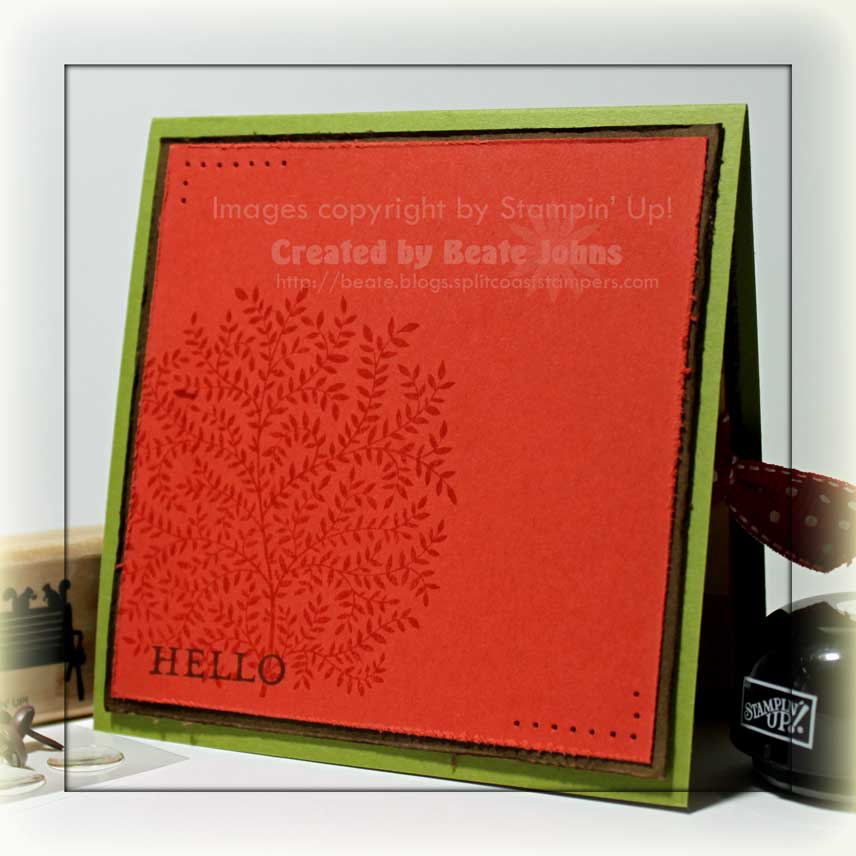
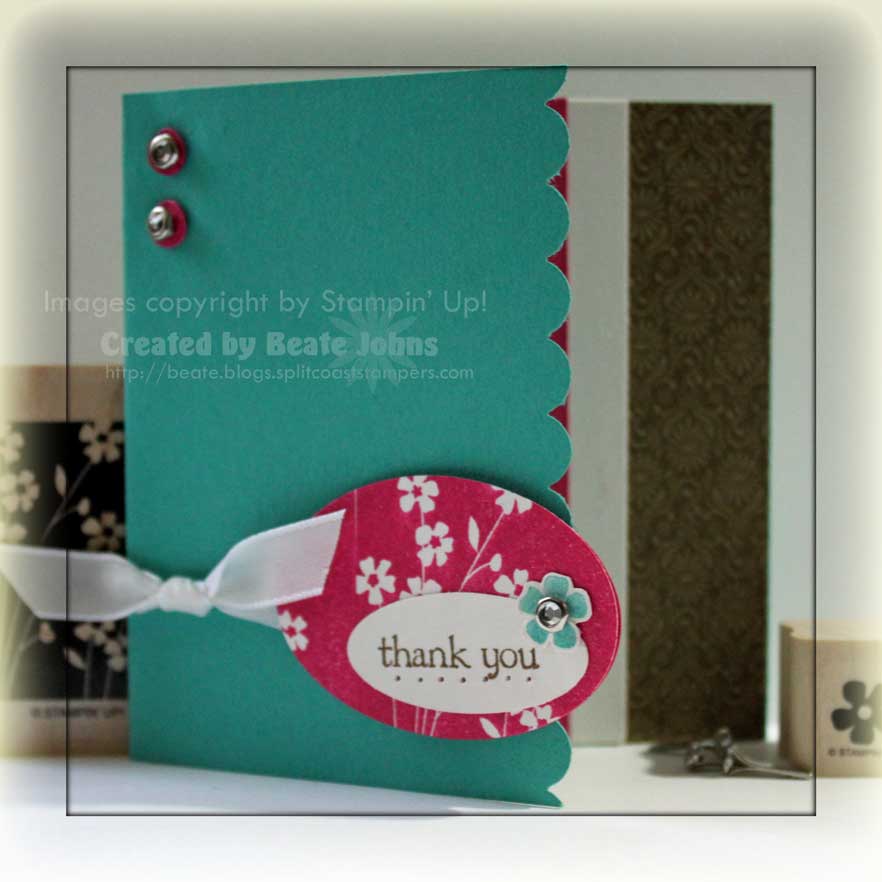
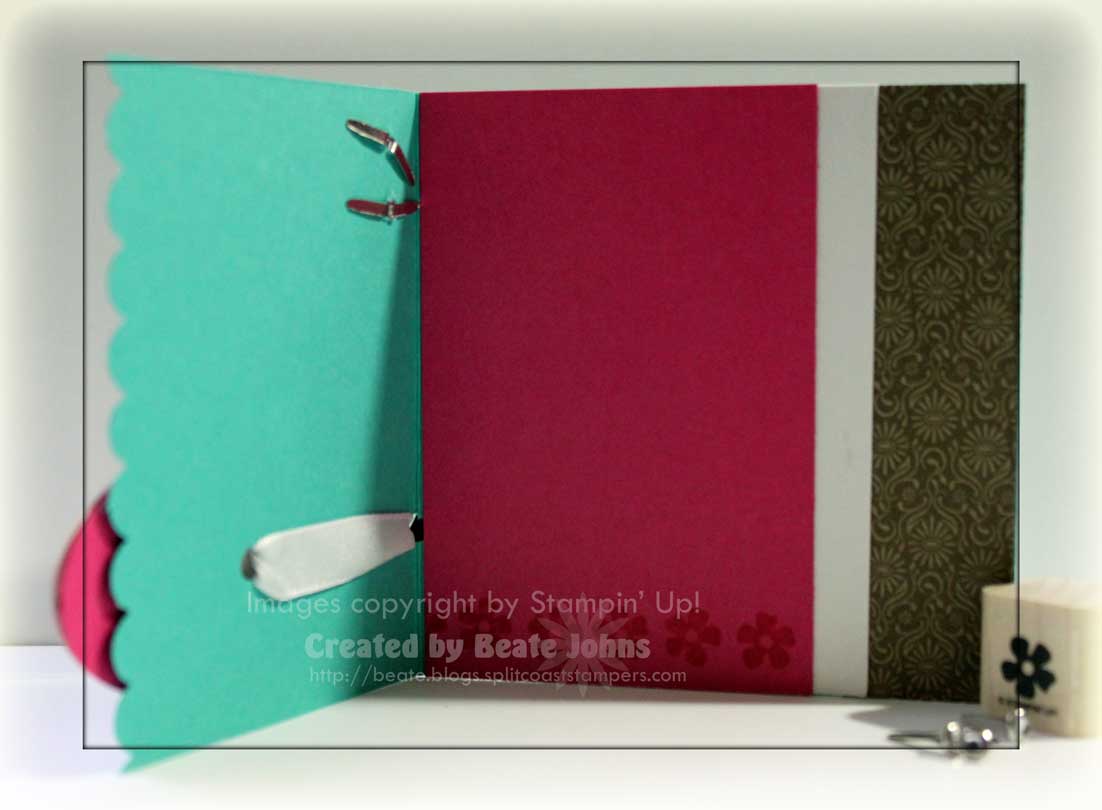
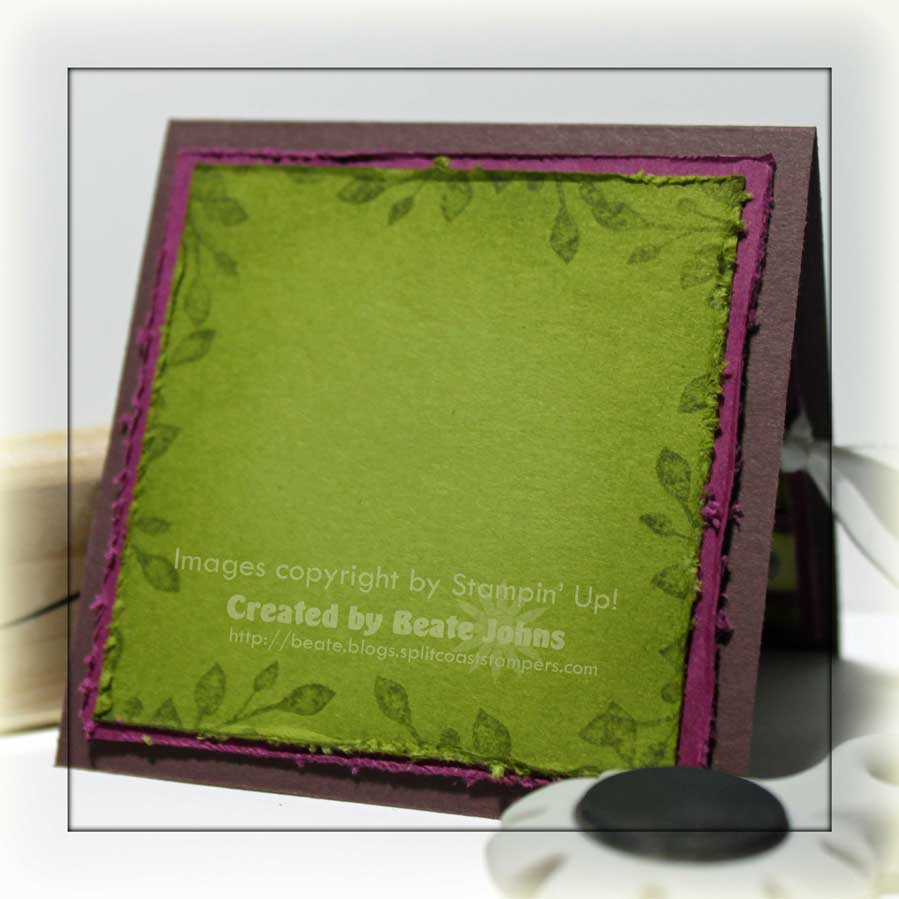
The inside of the card is very simple.

I stamped a 2 1/2″ Old Olive square with the branch stamp from Great Friend in Old Olive, distressed  and sponged the edges.

That layer was adhered to a 2 3/4″ square of Rich Razzleberry with distressed edges. Easy Peasy.

Have a great Saturday afternoon. Hugs and smiles

© 2012 fresh & fun Suffusion theme by Sayontan Sinha